Showing posts with label C&9 - Joy. Show all posts

Wednesday, 11 November 2020

SHC - Ornament Banner Christmas ...

... Hello! Time is marching on - it's almost the middle of November and that means there are only six weeks until Christmas. So, my Seven Hills Crafts post features Christmas cards. All feature ornament banners - I made banners in pinks, blues, gold, rainbow, and red & green. Here's the first card using the pink ornament banner:


Stamps: My Favorite Things - Ornament Builder Banner; Concord & 9th - Star Turnabout, Very Merry Sentiments, Christmas Cottage
Inks: Gina K - Innocent Pink, Passionate Pink, Red Hot, Cherry Red, Jet Black Amalgam; Delicata - Silvery Shimmer
Dies: Die-namics - Ornament Builder Banner
Accessories: White & Black Card

I used the Star Turnabout alternating pink and silver inks to create the background. I cut the pink ornament banner into two, adhered them to the card front and finished by stamping the sentiment in the middle. On the inside, I stamped and added some decoration in pink to match the front of the card.


My next card uses the blue banner:


Stamps: My Favorite Things - Ornament Builder Banner; Concord & 9th - Star Turnabout, Joy, Christmas Cottage
Inks: Gina K - Powder Blue, Blue Denim, Jet Black Amalgam; Delicata - Silvery Shimmer
Dies: Die-namics - Ornament Builder Banner
Accessories: White & Black Card

I used the same star stamp for the background, but this time only stamped it twice, once in blue and once in silver.

Next is the rainbow ornament banner card:


Stamps: My Favorite Things - Ornament Builder Banner; Concord & 9th - Star Turnabout, Christmas Cottage, Warm Wishes
Inks: Versafine Clair - Tulip Red, Summertime, Cheerful, Verdant, Paradise, Charming Pink, Purple Delight; Gina K- Jet Black Amalgam; Delicata - Golden Glitz
Dies: Die-namics - Ornament Builder Banner
Accessories: White & Black Card

For this card I only stamped the stars once in shimmery gold ink as I wanted the rainbow ornaments to stand out. I stamped a greeting on the front and inside, I used the same words as the previous two cards, but this time the decoration is stamped in gold to match the stars.


The next card features the gold ornament banner:


Stamps: My Favorite Things - Ornament Builder Banner; Concord & 9th - Polka Dot Turnabout, Very Merry Sentiments
Inks: Delicata - Golden Glitz; Versafine - Onyx Black
Dies: Die-namics - Ornament Builder Banner
Accessories: White, Cream, & Black Card; Clear Embossing Powder

I changed the background to polka dots for this card and stamped the turnabout image twice in gold. I adhered the ornament banner across one corner of the card and stamped a bold greeting in black in the opposite corner which I embossed with clear powder. On the inside, I stamped the verse from Very Merry Sentiments.


My last card uses the red & green ornament banner and this time I opted for a portrait look:


Stamps: My Favorite Things - Ornament Builder Banner; Concord & 9th - Polka Dot Turnabout, Very Merry Sentiments
Inks: Kaleidacolor - Fruit Cake; Versafine - Onyx Black
Dies: Die-namics - Ornament Builder Banner
Accessories: White & Black Card; Clear Embossing Powder

I really like this Kaleidacolor ink pad, I think it's perfect for Christmas cards. I stamped the polk dot background twice. I cut the banner into two pieces, adhered them across the corners of the card and added the centre ornament with a dimensional pad. I finished by stamped the sentiment directly on the card and heat embossing with clear powder. The inside has the same verse as the cream card - but the photo was blurred!! 

These cards are flat and will be easy to mail. That's all from me today. Hope you're all keeping safe and well. Bye for now.

signature photo Signature.png

Wednesday, 14 October 2020

SHC - Iconic Christmas and More! ...

.... Hello! Sorry to have been missing for a while, I've not been feeling totally great, but I think all is well now. Not Covid related!! Anyway, I'm here with some Christmas cards - several in fact! I ordered some lovely new Concord & 9th and Altenew stamps from Seven Hills Crafts and they arrived last Friday, so I was able to spend the weekend crafting. I love the turnabout stamps that Concord & 9th make and I got the Iconic Christmas turnabout and made lots of backgrounds. Here's the first card I made:


Stamps: Concord & 9th - Iconic Christmas Turnabout, Merry Mantle
Inks: Gina K - Wild Dandelion, Peach Bellini, Prickly Pear, Tomato Soup; Versafine - Onyx Black
Accessories: White Card; Clear Embossing Powder; Nuvo - Midas Touch Aquashimmer Brush; Copic Markers

I'm submitting this card to The Holly & Ivy Christmas Challenge - H&ICC#81, where it's Anything Christmas Goes.


I've used non-traditional colours here - I like the feeling of warmth they give. I used my MISTI to stamp the background and then trimmed the panel to fit the front of a top folding A2 card (US size). I edged it with an orange marker and adhered it flat to the card. I stamped the stockings and mantle on white card, coloured the images with Copic markers, repositioned the images in the MISTI and stamped with Versafine black ink and heat embossed with clear powder. Then I carefully cut around the images. I adhered the stockings to the front of the card, added the mantle above and finished with a simple greeting. The inside is, as yet, unfinished. 


Stamps: Concord & 9th - Iconic Christmas Turnabout, Joy
Inks: Gina K - Powder Blue, Dusty Rose, Blue Denim; Versamark
Dies: Concord & 9th - Joy
Accessories: White Card; Clear Embossing Powder; Pink Satin Mirri Card; Silver Embossing Powder; Vellum

This is a large 8" square card. I used the whole 6" stamped panel for the centre of the card. I edged it with a blue marker, adhered it to some satin mirri card and added it to the front of the card. I finished the card with a large 'Joy' word. I stamped the large solid word in pink and carefully cut it out. I stamped the thin 'joy' word onto some vellum, and heat embossed it with clear powder. I used the matching die to cut out the word and layered the vellum letters onto the background word and added it to the centre of the card. I finished the front with a simple greeting from the Joy stamp set. The inside has yet to be done!


Stamps: Concord & 9th - Iconic Christmas Turnabout; Altenew - Warm Blessings
Inks: Gina K - Jelly Bean Green, Red Velvet, Christmas Pine, Obsidian Amalgam; Versamark
Dies: Altenew - Holiday Tag
Accessories: White Card; Gold Embossing Powder; Gold Satin Mirri Card; Green Fibres

This card has a much more traditional Christmas feel with greens, red and gold. It's a standard A2 card (US size). I layered the stamped panel on gold satin mirri card and added it to the front of the card. I made the tag with an Altenew die. I cut gold and white pieces and used a fancy edge to cut the zig-zag on the white card. I added a simple greetings and some stamped holly. I attached some green fibres to the tag and adhered to the card. Once again, the inside still has to be completed.


Stamps: Concord & 9th - Iconic Christmas Turnabout, Merry Mantle, Joy; Altenew - Warm Blessings
Inks: Gina K - Key Lime, Sea Glass, Lovely Lavender, Kraft, Sandy Beach; Versafine - Onyx Black
Dies: Concord & 9th - Merry Mantle
Accessories: White Card; SU Card - Crumb Cake; Clear Embossing Powder; Green Mulberry Paper; Copic Markers

I made the card bases from kraft card. I cut the stamped panel to fit the card, layered it on some green mulberry paper and attached it to the card base. I stamped the wreath on white card, coloured with Copics, and cut it out with the matching die. I also used the word 'Noel' from the die set. I cut one black and three white words, adhered them together to give a more dimension to the word and added it to the card. I used the left over strip on another card. I stamped some snowflakes on the card, added the strip of card and finished by stamping the bold greeting in black and heat embossing it with clear powder. I still have to complete the inside of both cards.

That's all from me today. Do come by again tomorrow when I'll be sharing another Christmas card for Christmas 24 Challenge. See you soon.

signature photo Signature.png

Thursday, 14 September 2017

Christmas Owl ....

.... Hi again, I'm definitely getting back into my groove, I've another card to share today. This time it's a Christmas card (you're going to see lots of those in the coming weeks) and it's really CAS:

Peace Love Joy - photo by Deborah Frings - Deborah's Gems

Stamps: Dare 2B Artzy - Owl Be Home 4 Christmas, Daddy Owl; Concord & 9th - Joy; Uniko - Background Builders Chevrons
Inks: Gina K - Red Velvet, Grass Green, Black Onyx; Versafine - Onyx Black
Accessories: White Lustre Card; SU Card - Basic Black; Copics; Wink of Stella - Clear; Clear Embossing Powder


I've used the sketch from Christmas Card Throwdown - CCT#17 for the layout - so pleased to be playing along. As it's a one layer card with a coloured in element I'm going to play along with Less is More - LIM#345. There's an owl on here so I'm going to enter AAA Cards - AAA#98 as they want creatures great and small.

I used my MISTI to stamp the owl, removed the card and coloured the owl. I put the card back in the MISTI and stamped it again in Versafine Onyx Black and heat embossed with clear powder. Next I stamped the zig-zag lines to match the owl's clothes. Again, using the MISTI makes this process very easy. I finished the front with a simple sentiment. On the inside I cut a mat layer of black card and on the white panel added a Christmas greeting.

Peace Love Joy inside - photo by Deborah Frings - Deborah's Gems

I've really settled back into my regular routine. I've recently added an aquarobics class on Monday morning - it's so much fun, but I think I've rediscovered muscles that I'd forgotten I had!!! That's it for now. Take care.
signature

Tuesday, 12 September 2017

12 Days of Christmas - day 5 ....

.... Morning! I made another card in the 12 Days of Christmas series - no, it's not Day 2, it's actually Day 5:

Peace Love Joy - photo by Deborah Frings - Deborah's Gems

Stamps: Graphic 45 - 12 Days of Christmas; Concord & 9th - Joy
Inks: Versafine - Onyx Black
Dies: Memory Box - Cross Stitched Frame Borders #7
Accessories: White Lustre Card; SU Card - Basic Black; Tim Holtz Water Colour Card; Shimmer Spritz Spray - Frost; Clear Embossing Powder; Brusho - Alizarin Crimson, Rose Red


I'm submitting this card to Happy Little Stampers Watercolour Challenge - HLSWC09 where the optional twist is spritz. The idea for the background comes from City Crafter Challenge Blog, but that challenge has closed. The process of making this is the same as yesterday - die cut the panel, add some brusho crystals and spritz with shimmer spray - love the result. It's always different. Once dry, I used my MISTI to stamp the image and sentiment - several times to make sure that I got good coverage of the watercolour paper. I heat embossed with clear powder, layered it on black card and adhered it to the card. The inside has yet to be done!

Peace Love Joy sq - photo by Deborah Frings - Deborah's Gems

I will be completing this series of cards - there are so many pretty colours of Brusho crystals!! That's all for now - see you soon.

signature

Monday, 11 September 2017

12 Days of Christmas .....

.... Hi! I've been having so much fun in my craft room, and that's good because I've hardly been in there for the past few months!! I'm working on building up my Christmas card stash. I need lots as I've many friends and family in the UK, along with friends here. So here's another Christmas card:

Peace Love Joy - photo by Deborah Frings - Deborah's Gems

Stamps: Graphic 45 - 12 Days of Christmas; Concord & 9th - Joy
Inks: Versafine - Onyx Black
Dies: Memory Box - Cross Stitched Frame Borders - #7
Accessories: White Lustre Card; Tim Holtz Water Colour Card; SU Card - Basic Black; Brusho - Sea Green, Leaf Green, Lime Green; Sheer Shimmer Spritz - Frost; Clear Embossing Powder


This is the start of a series of 12 Christmas cards. I die cut a panel of water colour card using a stitched die, applied some Brusho crystals and spritzed with a frost shimmer spray - I just love the effect you get. Once dry, I used my MISTI to stamp the image in black - I repeated this step a couple of times to make sure I got reasonably good coverage, and then heat embossed with clear powder. I added a simple sentiment and layered the panel on black card. I've not done the inside of the card as yet.


I'm submitting this card to Addicted to Stamps and More! - ATSM#258, to City Crafter Challenge Blog - CCCB#378, and to Happy Little Stampers CAS challenge - HLSCAS09.

That's all for now! See you soon.

signature

Sunday, 10 September 2017

Christmas Joy .....

.... Morning! Before I go on, I must say a HUGE thank you to all the wonderful comments I've had about my cards for the recent Uniko release - I really appreciate them all.

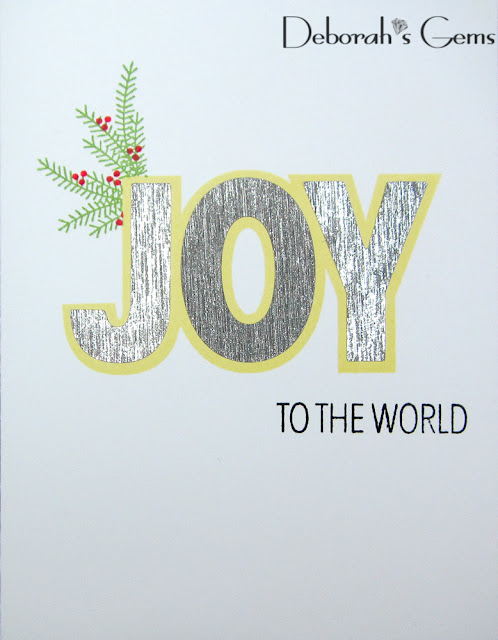
I seem to be back into my crafting groove, and while I was in my craft room yesterday I realised that I'm very, very short of Christmas cards in my stash, so I've got one to share with you now:

Joy to the World - photo by Deborah Frings - Deborah's Gems

Stamps: Concord & 9th - Joy
Inks: Gina K - Black Onyx, Lemon Drop, Red Velvet, Grass Green
Dies: Concord & 9th - Joy
Accessories: White Lustre Card; Allton Silver Glitter Satin Sticky Paper


It's almost one layer and is ultra CAS. I used my new Concord & 9th stamps. I stamped the large solid image in pale yellow, cut a mask and then stamped the Christmas foliage. After removing the mask, I layered on the silver sticky letters, cut with the matching die. I completed the front by finishing the sentiment. On the inside I simply stamped some more foliage and berries. I'm submitting this card to Cupcake Inspiration Challenge - CIC#422 where I got the colours, also to Merry Monday - MM#255 where they want to see "joy" on the card, and finally to Happy Little Stampers Christmas - HLSXMAS09 where the option is sparkle. Done!

Joy to the World inside - photo by Deborah Frings - Deborah's GemsJoy to the World sq - photo by Deborah Frings - Deborah's Gems

I must apologise for the photos - light is not great and my card is brilliant white - sadly doesn't look it in these photos. I really like this one and I'm going to make a whole lot more - I need to get my Christmas stash built!! See you soon.

signature
Related Posts Plugin for WordPress, Blogger...