.... Hello!! It's been a while since I've been here. I was lucky enough to go to a Uniko/Dies to Die For workshop at the beginning of August and my creative mojo started to come back. So, here I am with a much needed birthday card for my stash:
Stamps: Uniko - Simply Said Blocks 3; Birthday Sentiments
I'm submitting this card to AAA Cards - AAA#297 where it's Anything CAS Goes with the option of all green, and I love all shades of green. I'm also playing along Just Us Girls - JUGS#790 where it's Stencil week. And, as this is the first time I've used this stencil, I'm also submitting to Never-Before-Used-Schtuff - NBUS#77.
I had such a good time at the Uniko/Dies to Die For workshop, that I was inspired to get out some of my Uniko stencils. I'm embarrassed to say that I've had this stencil for ages, but not used it. The design is made of three layering stencils, and I simply used three shades of green from light to dark. I trimmed the panel to be slightly smaller than 5" square, edged it with dark green Copic and adhered it to the card base. I didn't want to hide the image, so I stamped a small birthday greeting in black ink, cut it out and added to the card. For the inside, I cut a piece of white card to 4¾" square and I added the centre strip of the stencil to the card (I turned it sideways), and added a fun greeting.
It's been fun getting back to making cards. I needs lots!!
The reason I've been absent, is that Mum's cancer came back early last year, and I spent as much time as I could with her. Sadly, mum died in January, I've been coming to terms with no having mum here. It's been a tough, but my mojo seems to be back, and mum would be so pleased to see me making cards again. I worked my way through all my stash, and I so need more cards. So, I'm back. See you again soon.
... Good morning! I'm here with my weekly Seven Hills Craft blog post. For a change I've only got one card to share with you today. It's a one layer, clean and simple card.
Inks: Gina K - Powder Blue, Blue Raspberry, Blue Denim; Versafine Clair - Nocturne
Accessories: White Card; Black Marker Pen
I was inspired to make this card by a couple of challenges - Less is More - LIM#449 where they want us to use Shades of Blue, and AAA Cards - AAA#196 where they want us to decorate two quarters with the option of our favourite colour.
This card is really easy to make. I worked out the centre of side and used them to mask off the card. I stamped the chevron stamp in three shades of blue ink in the top left-hand corner. I removed the masking tape, repositioned it and then stamped the same image in the bottom right-hand corner. I used a black marker pen and ruler to draw the lines to mark off the quarters. I finished the front by adding a simple greeting in black ink. Inside the card, I simply stamped a line of dots at the top of the card (I slipped a bit), and some more chevrons at the bottom. There's lots of space for my message.
I'm very pleased how this card turned out. It's so easy to make that I might make a set and send them to Ben, along with some greetings that he can add as he wants.
After a rather wet and cool weekend, we've had some lovely sunny days here. Looks like summer might stick around for a while longer. Mum has been busy in her garden - it looks fab. Kat has been packing her bags as she's going back to Nottingham soon for her second year at university. That's all from me today. See you again soon.
..... Good morning! I'm here with my weekly Seven Hills Craft blog post. I've got a couple of floral birthday cards to share with you today. Here's the first:
Stamps: Concord & 9th - Buds & Blossoms, Yay for Birthdays; Altenew - Birthday Builder
Mum asked me to make her a card for one of her friends - so I thought a floral card would be just right. I die cut several flowers and leaves using the Buds & Blossoms dies from white card. I kept the negative space card and put that in my MISTI, positioned the matching solid images in the space, picked them up with the MISTI door and then put the white diecuts in the space and stamped. Once I'd done the solid images I stamped the outline images. I worked out where I wanted the flowers and leaves to be on the card, and then stamped the birthday greeting. I adhered the outer flowers and leaves flat to the card and used dimensional pads for the yellow, peach and pink flowers. I finished the front by adding some Stickles glitter to the flowers. Inside the card, I cut a piece of white card slightly smaller than the card. I stamped a couple more flowers on the corners and finished by adding a fun birthday greeting. I edged the panel with an aqua marker.
I had a couple of die cut flowers and some leaves leftover, so I made another card:
I started by stamping the polka dot background directly on the card. I used the Polka Dot turnabout stamp and only stamped it once in bright red to match the flower. I used a hexagon die to cut the white panel, to get the black mat layer I simply placed the die on black card, drew round it and cut it out. Makes the perfect size mat. I stamped a simple birthday greeting on the hexagon. I finished by adding the multi-headed flower - this has been layered onto three other die cuts to give dimension and stability. Inside the card, I cut a piece of white card onto which I stamped a greeting and added the last of my left over flowers and leaves.
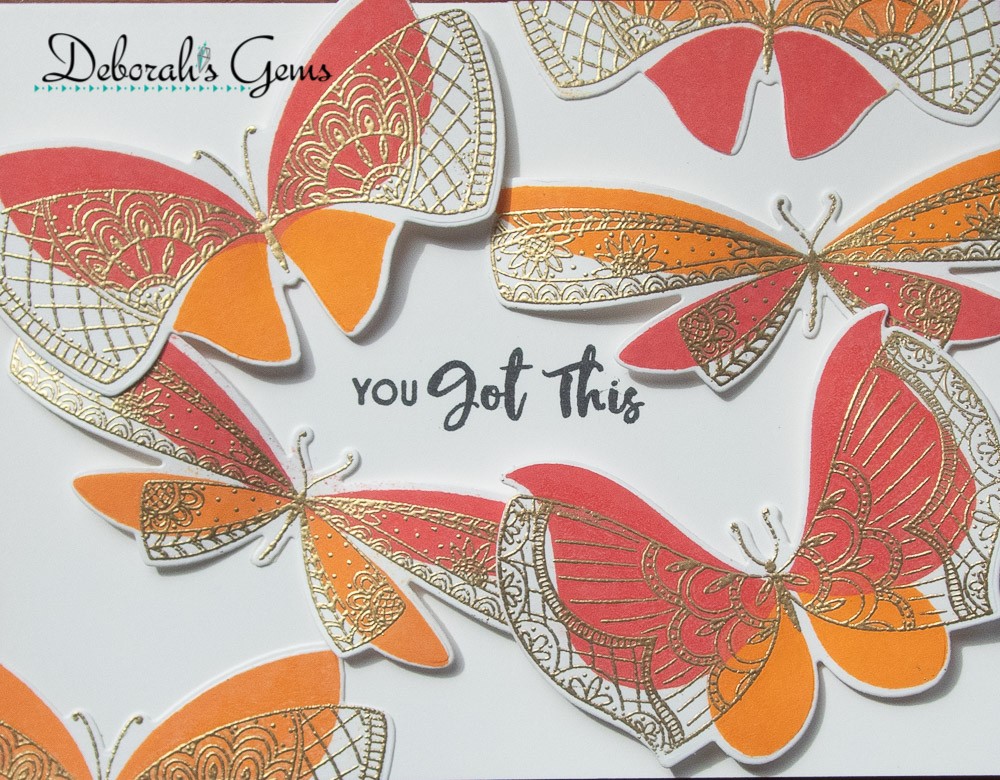
... Morning! I'm here with my regular weekly post for Seven Hills Crafts. I've been playing with My Favorite Things More Brilliant Butterflies stamps and dies. I have their first set and when I saw this second set, I just had to have them. I've made several cards. Here's the first:
Stamps: MFT - More Brilliant Butterflies, Anything But Basic Encouragement
Accessories; White Card; Lawn Fawn - Gold Embossing Powder
I'm submitting this card to Color Hues - CH#17 where they want us to use Red and Orange - love these bright, bold colours.
I've cased a stunning card made by Yana Smakula (a member of the MFT design team) and I've linked the video at the bottom so you can see her card. I've skipped the use of an acetate wrap and simply made a white card. I started by stamping a greeting in the centre. Then I made lots of butterflies.
My process is to die cut lots of butterflies from white card. I use a MISTI to stamp the images on the die cuts. I start by putting a butterfly negative in the MISTI and line up the filigree stamp with the space. I pick up the stamp and then ink with Versamark and heat emboss with either gold or silver embossing powder. Next, I line up the solid wings, pick up the wings, ink with the required colour and stamp. I repeat this process until all the butterflies have been stamped. You can see a few of the butterflies in the last picture.
For this card I used several red and orange butterflies. I used a think strip of very strong adhesive tape down the centre of each butterfly and on two of the larger butterflies I added some dimeensional pads to lift the wings. I trimmed the excess wings from around the card. Inside, I stamped a lovely encouragement verse in black ink and finished by adding another red and orange butterfly. This card has been sent to my aunt who had surgery a few weeks ago to remove a cancerous tumour. She is now cancer free and is working on her recovery. She is one of the strongest women I know, and I can't wait to visit her and give her a big hug! In the meantime, this will have to do.
I had a couple of red and orange butterflies left, so I made another card:
Stamps: MFT - More Brilliant Butterflies, Anything But Basic Encouragement
Inks: Gina K - Red Velvet, Tangerine Twist; Versamark; Versafine Clair - Nocturne
Dies: MFT - More Brilliant Butterflies
Accessories; White Card; Lawn Fawn - Gold Embossing Powder; Black Card
I'm submitting this card to Perfectly CAS - PCAS#14 where they want to see Wings on your card and you must only use a 1/3 or less of your card. Oops! I missed the deadline for this one. Oh well, nevermind.
I cut a strip of black card and adhered that to the front of an A6 (US size card) card. I stamped this fabulous sentiment below the strip and used dimensional pads to adhere the butterfly. I do like the simplicity of this card. Inside, I kept is extremely simple with no message but lots of space for my message and one more butterfly.
My final card is another clean, simple card, this time using shades of blue and green ink:
Stamps: MFT - More Brilliant Butterflies, Bitty Hugs and Kisses
Accessories; White Card; Lawn Fawn - Silver Embossing Powder; SU - Black and Granny Apple Green Card
I'm submitting this card to AAA Cards - AAA#189 where they want us to use up to 1/3 of your card, there is the option of a mythical beast, but I skipped that.
Like the previous card I cut a strip of black card to go along the front of the card, but I added a strip of green card too. I stamped this lovely sentiment - so very appropriate in these times - in black ink. I used dimensional pads to adhered the butterfly. Inside the card, I simply added another butterfly and left a large space for my message.
I think these last two cards are going to my kids - Kat at the University of Nottingham, and Ben in Hastings.
That's all from me for now, but before I go, here's the link to Yana's video showing her lovely card:
You're either wondering what the heck I'm playing at, or you're falling about laughing! If you're a Dr Who fan, I guess you get the reference. For those who don't know what this picture means, I've added a video clip at the end of the post. Watch and enjoy. I stamped the bowl of fish fingers and custard on white card, coloured it with Copic markers and fussy cut it out. I cut a panel of navy card onto which I adhered a smaller white panel. I stamped the sentiment and used dimensional pads to attach the image. On the inside, I simply stamped the image again in black and added another greetings.
Jonathan will LOVE this card - he has a huge and varied Dr Who collection. This picture references when Matt Smith took over the role of Dr Who, and we all really enjoyed Matt's portrayal of the Doctor. However, Jonathan's Doctor was played by Tom Baker and my Doctor was played by Jon Pertwee. I have to admit that I have a soft spot for David Tennant too 😉. That's it from me today - here's the video clip I was telling you about:
... Hello again! I do hope everyone is keeping safe and well. I'm sure that like me, many of you are beginning to go a bit stir crazy. My main method of keeping sane while stuck inside is crafting, but the other method involves books and coffee, and this is the card I made:
Stamps: Stamplorations - Good Books & Coffee; Lil Inkers - Coffee Cozy Inks: Gina K - Black Amalgam, Sandy Beach Accessories: White Card; Copic Markers; Nuvo - Clear Aqua Shimmer Brush
I'm submitting this card to Just Us Girls - JUGS#532 where they have colours for us, and I have to admit that I found these colours very challenging, until I found this stamp! I'm also playing along with AAA Cards - AAA#163 where they have a sketch challenge (I've skipped the option of it flies).
This is a really clean, simple one-layer card. I stamped the image and sentiment directly on the card base. The mug in the image doesn't have a pattern, so I added the flower from the Lil Inkers set, along with the subtle steam image. I used Copic markers to colour the image and added a touch of sparkle to the flower and steam. On the inside, I simply stamped a quote from J D Salinger which, I think, is so appropriate for our very weird times.
That's it from me for today. Hope to see you again soon. Keep safe.