Showing posts with label Perfectly CAS. Show all posts

Wednesday, 28 July 2021

SHC - Christmas in July 4 ....

... Morning!! I'm here with my last Christmas in July post for Seven Hills Craft blog. I have used Lawn Fawn products on my cards. Here's the first:


Stamps: Lawn Fawn - Simply Celebrate Winter, Simply Winter Sentiments, Snowy Backdrops
Inks: Gina K - Sea Glass, Ocean Mist, Soft Stone; Hero Arts - Unicorn; Versafine - Onyx Black; Versafine Clair - Nocturne
Dies: Lawn Fawn - Simply Celebrate Winter; Gina K - Master Layouts 2
Accessories: White & Black Card; SU Card - Island Indigo; Copic Markers; Silver & Clear Embossing Powder; Nuvo - Clear Aqua Shimmer Brush


I used a stitch edged die to cut out a white piece of card onto which I stamped the snowy backdrop in Versmark ink. I heat embossed the image with silver powder and then blended shades of soft aqua and grey to create the sky. I used the same die to cut a panel of dark aqua card which I adhered to the bottom of the white card. I stamped a clean, crisp greeting in white ink and heat embossed with white powder. I stamped the snowguys on white card, coloured them with Copic markers, returned them to the MISTI and restamped with Versafine ink and heat embossed with clear powder. I used the matching die to cut them out. I adhered them to the white panel, added that to a black mat layer and added the whole lot to the front of a top folding A2 white note card. Inside, I cut a mat layer of black card. On the white panel I stamped another greeting and some Christmas trees.


My next card features a Christmas evening scene:


Stamps: Lawn Fawn - Simply Celebrate Winter, Simply Winter Sentiments, Snowy Backdrops
Inks: Gina K - Sea Glass, Ocean Mist, Soft Stone; Hero Arts - Unicorn; Versafine - Onyx Black; Versafine Clair - Nocturne
Dies: Lawn Fawn - Simply Celebrate Winter; Gina K - Master Layouts 2
Accessories: White & Black Card; SU Card - Island Indigo; Copic Markers; Silver & Clear Embossing Powder; Nuvo - Clear Aqua Shimmer Brush

I'm submitting this card to The Holly & Ivy Christmas Card Challenge - H&ICC#99 where is Anything Christmas goes.


I used the same technique as outline above to create the background for this card and to cut the houses and trees. Before blending the sky, I added a little mask for the moon, and finished the front by adding glitter to the roof tops and to the trees. Inside, I cut a mat layer of black card. On the white panel I stamped the snowy background across the centre of the card in soft aqua ink and added a greeting in black.


My final card if ultra clean and simple:


Stamps: Lawn Fawn - Simply Celebrate Winter, Snowy Backdrops
Inks: Versafine - Onyx Black; Versafine Clair - Nocturne; Memento - Summer Sky
Dies: Lawn Fawn - Simply Celebrate Winter
Accessories: White Card; SU Card - Poppy Parade; Copic Markers; Clear Embossing Powder; Sakura - Stardust Pens

I'm submitting this card to Perfectly CAS - PCAS#17 where they want to see Embossing.


I used the method outline above to stamp, colour and die cut the Christmas ornaments. I adhered them to the card front with dimensional pads. I finished the front by stamping a clean, crisp greeting in black ink and added the strings for the ornaments. Inside the card, I cut a red mat layer and on the white panel stamped the snowy backdrop in soft blue ink and a greeting in black ink.


That's all from me today - thank you so much for stopping by. I enjoyed making all these Christmas cards - I have 12 ready for my stash. That will make things so much less stressful in November and December. See you soon.

signature photo Signature.png

Wednesday, 12 May 2021

SHC - More Brilliant Butterflies ...

... Morning! I'm here with my regular weekly post for Seven Hills Crafts. I've been playing with My Favorite Things More Brilliant Butterflies stamps and dies. I have their first set and when I saw this second set, I just had to have them. I've made several cards. Here's the first:


Stamps: MFT - More Brilliant Butterflies, Anything But Basic Encouragement
Inks: Distress Oxide - Festive Berries, Barn Door, Spiced Marmalade, Carved Pumpkin; Versamark; Versafine Clair - Nocturne
Dies: MFT - More Brilliant Butterflies
Accessories; White Card; Lawn Fawn - Gold Embossing Powder

I'm submitting this card to Color Hues - CH#17 where they want us to use Red and Orange - love these bright, bold colours.


I've cased a stunning card made by Yana Smakula (a member of the MFT design team) and I've linked the video at the bottom so you can see her card. I've skipped the use of an acetate wrap and simply made a white card. I started by stamping a greeting in the centre. Then I made lots of butterflies. 


My process is to die cut lots of butterflies from white card. I use a MISTI to stamp the images on the die cuts. I start by putting a butterfly negative in the MISTI and line up the filigree stamp with the space. I pick up the stamp and then ink with Versamark and heat emboss with either gold or silver embossing powder. Next, I line up the solid wings, pick up the wings, ink with the required colour and stamp. I repeat this process until all the butterflies have been stamped. You can see a few of the butterflies in the last picture.

For this card I used several red and orange butterflies. I used a think strip of very strong adhesive tape down the centre of each butterfly and on two of the larger butterflies I added some dimeensional pads to lift the wings. I trimmed the excess wings from around the card. Inside, I stamped a lovely encouragement verse in black ink and finished by adding another red and orange butterfly. This card has been sent to my aunt who had surgery a few weeks ago to remove a cancerous tumour. She is now cancer free and is working on her recovery. She is one of the strongest women I know, and I can't wait to visit her and give her a big hug! In the meantime, this will have to do.


I had a couple of red and orange butterflies left, so I made another card:


Stamps: MFT - More Brilliant Butterflies, Anything But Basic Encouragement
Inks: Gina K - Red Velvet, Tangerine Twist; Versamark; Versafine Clair - Nocturne
Dies: MFT - More Brilliant Butterflies
Accessories; White Card; Lawn Fawn - Gold Embossing Powder; Black Card

I'm submitting this card to Perfectly CAS - PCAS#14 where they want to see Wings on your card and you must only use a 1/3 or less of your card. Oops! I missed the deadline for this one. Oh well, nevermind.


I cut a strip of black card and adhered that to the front of an A6 (US size card) card. I stamped this fabulous sentiment below the strip and used dimensional pads to adhere the butterfly. I do like the simplicity of this card. Inside, I kept is extremely simple with no message but lots of space for my message and one more butterfly.


My final card is another clean, simple card, this time using shades of blue and green ink:


Stamps: MFT - More Brilliant Butterflies, Bitty Hugs and Kisses
Inks: Distress Oxide - Twisted Citron, Tumbled Glass; Versamark; Versafine Clair - Nocturne
Dies: MFT - More Brilliant Butterflies
Accessories; White Card; Lawn Fawn - Silver Embossing Powder; SU - Black and Granny Apple Green Card

I'm submitting this card to AAA Cards - AAA#189 where they want us to use up to 1/3 of your card, there is the option of a mythical beast, but I skipped that.


Like the previous card I cut a strip of black card to go along the front of the card, but I added a strip of green card too. I stamped this lovely sentiment - so very appropriate in these times - in black ink. I used dimensional pads to adhered the butterfly. Inside the card, I simply added another butterfly and left a large space for my message.

I think these last two cards are going to my kids - Kat at the University of Nottingham, and Ben in Hastings. 

That's all from me for now, but before I go, here's the link to Yana's video showing her lovely card:


See you soon.

signature photo Signature.png

Sunday, 11 April 2021

Happy 80th Birthday ....

..... Good morning! I'm sharing a couple of birthday cards I've made for my father-in-law, Simon, who is 80 years old today. He's not much for celebrating birthdays, so I decided not to put a number on his cards, but you I think you can tell it's a special birthday! Here's the first card:


Stamps: Impression Obsession - Umpteenth Birthday; Concord & 9th - Yay for Birthdays; Waltzingmouse Stamps - Woodgrain
Inks: Gina K - Sandy Beach, Dark Chocolate, Soft Stone, Barely There; Versafine Clair - Nocturne; Memento - Summer Sky, New Sprout
Dies: Spellbinders - Contemporary Squares
Accessories: White Card; Scrap blue and green card

I'm submitting this card to The Male Room - TMR#149 where the theme is wood. I've used the sketch from Freshly Made Sketches - FMS#480 for the layout, and I'm also playing along with Happy Little Stampers Anything Goes with Dies - HLSAGD#04.


I thought I had some real wood card in my stash, but I couldn't find it, so I stamped a woodgrain image on white card using two shades of brown and a soft grey. I used a Spellbinder die to cut out the swoosh of contemporary squares. I adhered the outline piece to the front of an A2 card. I used some scraps of blue and green card to cut out the 'squares' and adhered them inside the outline. I finished the strip by adding the square of 'wood' card. I completed the front with a fun birthday greeting, which I'm sure Simon will like! On the inside, I cut a piece of white card slightly smaller than the base. I stamped a fun birthday cupcake in soft tones of blue and green and finished with a fun sentiment.


The card above is the one that mum sent to Simon. I also made one for Jonathan and I to send to Simon:


Stamps: Stampin' Up! - Best of Birthdays; Concord & 9th - Birthday Stacks
Inks: SU - Merry Merlot, Mossy Meadow, Daffodil Delight; Versafine - Onyx Black
Accessories: White Card; Visible Image Stencil - Two Tone; Copic Markers; Clear Embossing Powder; Nuvo - Clear Aqua Shimmer Brush

I'm submitting this card to CAS Colours & Sketches - CASC&S#414, Perfectly CAS - PCAS#13, and to Seize the Birthday - STB#211 where the toppings option is Squares.


I started by masking the card to create a central panel onto which I stencilled lots of little squares in burgundy, yellow and green. Next I stamped this cute cake topped with loads of candles and a fun sentiment. I coloured the image with Copic markers and fussy cut it out. I added lots of sparkle to the cake with a clear aqua shimmer brush. I used dimensional pads to adhere it to the front of the card. Inside, I cut another piece of white card, slightly smaller than the card. At the bottom I stamped a line of bold birthday candle which I coloured with Copic markers to match the central panel. I embossed the candles and finished with a bold, simple birthday greeting which finishes off the message.


While travel restrictions have been relaxed in the United Kingdom, it is not possible for us all to get together to celebrate. However, we will be having a Zoom get together for a quiz and to chat later this afternoon. So looking forward to when we can all meet in person!!

That's all from me today - have a good one. See you soon.

signature photo Signature.png

Friday, 29 May 2020

CASOF - GD - Happy Birthday ...

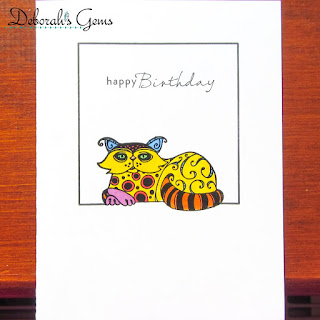
... Hi! Recently, I was picked as winner of the flower challenge at CAS on Friday and, as a result, I'm their Guest Designer for this week's challenge. So this week at CAS on Friday - CASOF#181, the DT want us to make a clean, simple card with the theme of Animal. Here's my card:


Stamps: Waltzingmouse Stamps - Frame It; Inkadinkadoo - Patterned Pets; MFT - Sassy Pants Birthday Greetings 2
Inks: Gina K - Jet Black Amalgam; Versafine - Onyx Black
Accessories: White Card; Copic Markers; Clear Embossing Powder

I'm submitting this card to Perfectly CAS - PCAS#9 where the theme is to use only a third of the card along with Animals, and to Addicted to CAS - ATCAS#185 where the theme is Rainbow.


For me this is an ultra CAS card - I do tend towards CAS, but it's not often that I go as CAS as this!!! I stamped the square frame onto the white card base and, using my MISTI, carefully positioned the funky cat image in the space. I stamped the cat, coloured it with Copic markers, repositioned it in the MISTI and restamped using Versafine ink and then heat embossed the image. This technique gives a really clean, crisp image - which is exactly what you need for a CAS card. I finished by adding the simple sentiment. On the inside, I added a sassy and fun birthday greeting along with the same cat, but this time I didn't colour the image.


I had fun colouring the cat all the colours of the rainbow! That's all from me today - see you again soon.

signature photo Signature.png

Saturday, 2 May 2020

JUGS GD - Hero ....

... Morning all! I am so excited to share the news that I am Guest Designer at Just Us Girls for the entire month of May!!! 😄😀😄 The first challenge of the month is a word challenge and this week the word is HERO. Here's my take:


Stamps: Waltzingmouse Stamps - Kaboom, Halftone Basics; There She Goes - Cutie Pi
Inks: Hero Arts Neon - Orange, Green; Gina K - Black Amalgam
Accessories: White Card; Copic Markers; Glossy Accents; Nuvo - Clear Aqua Shimmer Brush

With all that's going on in the world with Covid-19, some of my heroes are the scientists who are working so hard to come up with a vaccine and treatment. So my card is to honour the scientists, that's not to say the other key workers are forgotten. I'm submitting this card to Perfectly CAS - PCAS#08 where they want us to use Masking.


I've been going through all my crafty stash and this card is made entirely from stamps that have been discontinued (so sad), but they are still super. I stamped the scientist towards the edge of the card and then covered her with a mask so that I could stamp the neon "superhero" elements. After removing the mask, I coloured the image with Copic markers. I stamped the sentiment in bold black and finished the front by adding glossy accents to the goggles. I also added a touch of sparkle to the fluid in the testtube. On the inside, I carried on with the "superhero" elements with a bold green frame around the words and some stars. I also stamps some chemistry glassware at the bottom of the card.


I took a close-up photo of the goggles to show the glossy finish - it makes such a difference to the finished look of the card.


Come and join in this week's challenge at Just Us Girls - JUGS#534 to make a card for a hero. Can't wait to see what you make. Be safe, keep well. See you soon.

signature photo Signature.png
Related Posts Plugin for WordPress, Blogger...