Showing posts with label Fab Friday. Show all posts

Wednesday, 30 June 2021

SHC - Floral Birthday ....

... Morning all! I'm here with my Seven Hills Craft blog post. Today I've got a pretty birthday card to share with you. I made this one for my mother-in-law, it's her birthday tomorrow, but I'm safe to share it here now as she doesn't look at the Internet.


Stamps: Concord & 9th - All the Birthdays, Type Talk
Inks: Gina K - Innocent Pink, Sweet Corn, Jelly Bean Green; Versafine - Onyx Black; Versafine Clair - Nocturne
Dies: Concord & 9th - Birthday, Everyday Circles, Type Talk; Gina K - Master Layouts 1
Accessories: White Card; Gina K - Black Onyx Card; C&9 - Everyday Tintables Card Pack; C&9 Summer Glitter Pack; Clear Embossing Powder

I'm submitting this card to Fab Friday - FABF#216 - such pretty colours for the challenge.


I was going through my stash last week and found a couple of pack of Tintables Card from Concord & 9th, so I decided to use the rainbow arches sheet for my card. I used pink, yellow and green inks and blended them onto the card to reveal the pattern. I then used a die to cut the panel to size and layered it onto a piece of black card. I adhered both pieces to the front of an A2 (US size card) card. 

I wanted to use some of my older die and stamp sets on this card, so I found this lovely circle die and cut it in white card - I found, to my surprise, that it also cut a think frame for the circle, so I cut it again in black card and used the thin black frame for the card. I added some stitched detail to the bottom of the circle, stamped the word birthday and added a die cut glitter happy word. I stamped the flowers from another C&9 stamp set onto white card, removed them from the MISTI coloured with Copics, restamped with Versafine ink and heat embossed with clear powder. I used the matching die to cut out the flowers. I adhered the flowers directly to the ink blended background. Then I added the circle and think black circle frame. I like how this matches the thin frame on the main panel. Inside the card, I cut a mat layer of black card. On the white card, I added thin strips of the tinted card to each side and finished by stamping a birthday greeting along with some fun dot decoration.


This card has already been posted to my MIL, and she should get it tomorrow. That's all from me today. See you again soon.

signature photo Signature.png

Wednesday, 16 June 2021

SHC - Happy Birthday ....

.... Morning! I'm here with my weekly Seven Hills Craft blog post. I've been watching lots of crafting videos recently, particularly Gina K and Jennifer McGuire. This card is inspired by some peek-a-boo door cards that Jennifer made in July last year. I decided to have a go and make a rainbow birthday card:


Stamps: MFT - Musical Notes Background; The Stamping Village - Happy Birthday; 
Inks: Gina K - Red Hot, Sweet Mango, Wild Dandelion, Lucky Clover, Turquoise Sea, Stormy Sky; Versafine Clair - Nocturne; Versamark
Dies: Hero Arts - Oval Peekaboo Doors Infinity Dies; MFT - A2 Rectangle Stax Set 1 #11, A2 Rectangle Stax Set 2 #11
Accessories: White & Black Card; Clear Embossing Powder; Nuvo - Aqua Shimmer Brush; Copic Markers

I'm submitting this card to Seize the Birthday - STB#216 - where I've skipped their toppings challenge and just gone for Anything Goes Birthday. I'm also playing along with Fab Friday - FABF#215 - this is based on their sketch.


I used my MISTI to stamp the images on this card. I used the largest of the peekaboo door dies to cut a piece of masking paper and placed that in the centre of my diecut white panel. I positioned it over the musical notes background, stamped the image with Versamark ink and heat embossed with clear powder. I then used rainbow dye inks to create the ink blended background. I removed the masking paper and used the die to cut out the door. I used the oval die to cut another door from white card. I stamped the musical notes on some scrap white paper which I left in the MISTI. I put the rainbow panel back in the MISTI and drew round the inside of the die cut door. After removing the panel, I positioned the white oval (with some temporary adhesive on the back) in the pencilled shape on the scrap paper. I then stamped the musical notes again in soft grey ink. I removed all the stamped pieces from the MISTI. I adhered the white panel behind the rainbow panel and then stamped the Happy Birthday balloon image on the front white door, and the Hip Hip Hooray image on the musical note panel inside the door.


I used Copic markers to colour the image. I also restamped the balloon image on white card, coloured the balloons, fussy cut them out and adhered them to the front of the card with dimensional pads. I adhered the whole of the rainbow panel to a piece of black card slightly bigger and then that to the front of an A2 note card. Inside the card, I cut a mat layer of black card. On the white panel I stamped another image from the birthday greeting set and that's it done. I like that when you open the door you get to see a cute message and then another inside the card!!


I've included Jennifer's video to show how she makes these pretty interactive peek-a-boo door cards.


That's all from me today - see you soon.

signature photo Signature.png

Thursday, 1 April 2021

C24C - Snow People ....

... Good morning! It's April 1st - can't quite believe how it got to be April so quickly!! Hey ho! It does mean that it's time for our new challenge at Christmas 24 Challenge - C24C#31. We want to see your Snow People on your Christmas cards. Now, that can be snowmen, or just people enjoying the snow - your choice! Here's my take:


Stamps: Bugaboo Digital - Scene It Snowmen Fun; Lawn Fawn - Winter Scripty Sentiments, Simply Celebrate Winter; Colorado Craft Company - Frosty's Hat
Inks: Gina K - Stormy Sky; Versafine Claire - Nocturne
Dies: Spellbinders - Mega Rectangles Lg (S4-142) #4
Accessories: White Card; Carta Bella DP - Snow Fun; Copic Markers; Glitter

I'm submitting this card to several challenges. I've used the sketch from Freshly Made Sketches - FMS#479, the colours are from Fab Friday - FABF#210, and the theme at Addicted to Stamps and More - ATSM#402 is Christmas.


I love this fun image from Bugaboo Stamps - it's a digital image so you can print it whatever size you need. I printed it on white card and used a rectangle die to cut it out. I coloured the image with Copic markers and edged it with a dark grey marker pen. I used a strip of dark grey design paper down the side, adhered the image on top and finished with a fun sentiment that matches the image. On the inside, I cut another piece of the design paper for the mat layer. On the white card I stamped a Christmas greeting and another line of cute little snow folk!


That's all from me today - don't forget to visit our Christmas 24 Challenge blog to see more inspiration cards from the rest of the design team. Have fun and I look forward to visiting your blogs to see your creations. See you soon.

signature photo Signature.png

Saturday, 27 February 2021

Perfect Moment ...

.... Good afternoon! Yes, I'm posting again! I've been having fun just playing along with various challenges. So, today I have a rather quirky card to share:


Stamps: Stamp Mania - Mexican Pottery Set; Visible Image - Take the Moment, The Ripple Effect
Inks: Versafine - Onyx Black; Stampin' Up! - Mint Macaron, Mossy Meadow; Verafine Claire - Nocturne
Accessories: White Card; Copic Markers; Sakura Stardust Pens; Nuvo Clear Aquashimmer Brush; Clear Embossing Powder

I'm submitting this card to Fab Friday - FABF#208 - where they have these lovely colours, and to Addicted to CAS - ATCAS#192 where the cue word is Animal. 


I love this lizard image and I think he's perfect for the animal element of my card. I used my MISTI to stamp him on white card. I removed the image and coloured it with Copic markers. I then returned the image to the MISTI and restamped in black Versafine ink and heat embossed with clear powder. This technique is one of my favourites because it gives such a lovely crisp, clean image. I then very carefully fussy cut him out. I used a top-folding A2 white card and stamped a subtle background directly onto the card. I adhered the lizard, onto which I have added some shimmer, and then added a sentiment. On the inside, I finished the message in bold black and stamped the lizard again in dark green ink.


I really like this inspirational message. For the moment, the card is going into my stash but I think I know where its eventual home will be. 

I've got a couple more cards in progress, so I'm going to make the most of a nice quiet Saturday afternoon and work on them. See you again soon.

signature photo Signature.png

Wednesday, 30 September 2020

SHC - Autumnal Feathers ...

.... Morning. I'm here with my weekly post for Seven Hills Craft Blog. I've made a couple of cards for my kids. I've been sending cards to Ben for a long time and now I'm adding a card for Kat. These are the cards I made for them this week:


Stamps: Altenew - Golden Feather; MFT - Brush Splatter Background, Greetings & Salutaions
Inks: Gina K - Coral Reef, Peach Bellini, Sweet Corn, Blue Raspberry, Innocent Pink, Blue Denim; Stampin' Up! - Grey Granite, Balmy Blue
Dies: Altenew - Golden Feather; Lil Inkers - Long & Skinny Stitched Rectangles
Accessories: White Card

The card on the left is for Kat - I've gone with a softer colour palette, and the tall skinny card is for Ben. I started by stamping the background splatter image on white card, I used grey and yellow for the tall thin card, and peach for the other one. I cut out some panel with a stitch edge die and cut the panels to fit the card, so the stitch detail is at the top and bottom of each piece. I adhered them flat to the card. Then I stamped the layered feathers. For Ben's card I used the clean, simple feather with no flourishes and stamped the outline in dark blue and added the details with a softer blue. For Kat's card I used the softer feathers. I used the matching dies to cut the feathers out. I adhered them to the card and then finished each card with a simple greeting.  For Kat, it was simple 'Hello, Hi' greeting, and for Ben, who struggles, it was an 'It's Okay' message. The insides are blank for my messages.


I'm submitting Kat's card to The Card Concept - CC#140 where they have a lovely image of patterned leaves. I've interpreted this to be feathers with pretty patterns. I've made a clean, layered card. I used the sketch from CAS(E) this Sketch! - CTS#391 for the layout. For Ben's long, thin card, I used the sketch from CAS(E) this Sketch and the colours are from Fab Friday - FabF#198.


That's all from me for today. See you tomorrow with my card for Christmas 24 Challenge. Bye!!

signature photo Signature.png

Friday, 29 May 2020

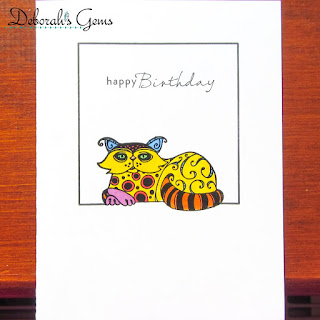
CASOF - GD - Happy Birthday ...

... Hi! Recently, I was picked as winner of the flower challenge at CAS on Friday and, as a result, I'm their Guest Designer for this week's challenge. So this week at CAS on Friday - CASOF#181, the DT want us to make a clean, simple card with the theme of Animal. Here's my card:


Stamps: Waltzingmouse Stamps - Frame It; Inkadinkadoo - Patterned Pets; MFT - Sassy Pants Birthday Greetings 2
Inks: Gina K - Jet Black Amalgam; Versafine - Onyx Black
Accessories: White Card; Copic Markers; Clear Embossing Powder

I'm submitting this card to Perfectly CAS - PCAS#9 where the theme is to use only a third of the card along with Animals, and to Addicted to CAS - ATCAS#185 where the theme is Rainbow.


For me this is an ultra CAS card - I do tend towards CAS, but it's not often that I go as CAS as this!!! I stamped the square frame onto the white card base and, using my MISTI, carefully positioned the funky cat image in the space. I stamped the cat, coloured it with Copic markers, repositioned it in the MISTI and restamped using Versafine ink and then heat embossed the image. This technique gives a really clean, crisp image - which is exactly what you need for a CAS card. I finished by adding the simple sentiment. On the inside, I added a sassy and fun birthday greeting along with the same cat, but this time I didn't colour the image.


I had fun colouring the cat all the colours of the rainbow! That's all from me today - see you again soon.

signature photo Signature.png

Wednesday, 27 May 2020

SHC - Totally Tropical birthday ...

... Morning! It's time for my post for Seven Hills Craft blog. I've a bold, bright and very tropical birthday card to share with you today:


Stamps: Altenew - Parrot Paradise, Totally Tropical; MFT - Bitty Birthday Wishes, Sassy Pants Birthday Greetings 2
Inks: Gina K - Black Amalgam; Stampin' Up! - Blushing Bride, Flirty Flamingo, Granny Apple Green, Call Me Clover; Versafine - Onyx Black
Dies: Altenew - Parrot Paradise, Totally Tropical
Accessories: White Card; SU Card - Flirty Flamingo; Clear Embossing Powder; Copic Markers; SU Vellum - Botanical Garden; Nuvo - Clear Aqua Shimmer Brush

I'm submitting this card to Seize the Birthday - STB#191 where they want a Totally Tropical card, and to Fab Friday - FABF#190 where the colours are quite tropical!


I started by stamping the large parrot on white card, colouring with Copic markers, putting it back in the MISTI and restamping with Versafine and heat embossing with clear powder. I used the matching die to cut it out. I put some white card in my MISTI and did all the leaves at one go - so easy with this stamp positioner. I used a couple of shades of green ink and then cut out the leaves with the matching dies. I wanted a large tropical flower and used the layered hibiscus image. I cut a panel of peach card adhered it to the cardbase and added some matching tropical themed vellum over the top. I attached the leaves and flower directly to the card and used dimensional pads for the parrot. I did add some sparkle to the parrot. I finished the front with a clean, crisp and simple birthday greeting.


On the inside, I cut a mat layer of peach card and on the white panel I stamped a fun and sassy birthday greeting along with another hibiscus flower.

That's all from me today. I'm having a very busy week - I'm doing another online mixed media class with Dyan Reaveley in the evenings - it's so much fun! See you again soon.

signature photo Signature.png

Saturday, 16 May 2020

JUGS GD - Happy Birthday ...

.... Hi! I'm half-way through my time as Guest Designer at Just Us Girls and I'm having a great time with so many lovely cards to see. This week is colour week - JUGS#536 and we want to see bright colours - green, orange, yellow and pink. Here's my card:


Stamps: Concord & 9th - Butterfly Love Turnabout, Beautiful Butterfly; MFT - Bitty Birthday Wishes, Sassy Pants Birthday Greetings
Inks: Versafine Clair - Cheerful, Summertime, Charming Pink, Verdant; Gina K - Black Amalgam
Dies: Spellbinders - 5 x 7 Modern Stationary (S6-013) #4; Die-namics - Stitched Fishtail Flags STAX #1
Accessories: White Card; Black Card; Vellum; Copic Markers

I'm submitting this card to Fab Friday - FABF#189 where they have a lovely versatile sketch, and to AAA Birthday - AAAB#13 where they want to see things with wings.


I used my MISTI to stamp the butterfly turnabout image in bold, bright Versafine Clair inks. I stamped the large butterfly on the turnabout in black ink and coloured it with Copic markers, then fussy cut it out. I used a die to cut a panel of the butterfly image and a layer of vellum, adhered them together and put them on the front of the card. I stamped a simple birthday greeting, cut it out with a die and attached it to the card. I finished the front by adding the bold butterfly. On the inside, I cut a mat layer of black card and on the white panel stamped a sassy birthday message along with another smaller butterfly. I coloured the butterfly with softer tones on the inside of the card.


Do join in with this week's challenge at Just Us Girls - JUGS#536 - I can't wait to see your bold, bright cards! That's all from me for today - see you again soon.

signature photo Signature.png
Related Posts Plugin for WordPress, Blogger...