Showing posts with label C&9 - Birthday Stacks. Show all posts

Wednesday, 6 April 2022

SHC - Birthdays

.... Morning. Time for my Seven Hills Craft blog post. Today I've got a couple of birthday cards to share with you. The first is for my father-in-law:


Stamps: Concord & 9th - Birthday Stacks; The Greetery - Sentiment Suite Birthday
Inks: Gina K - Applemint, Key Lime, Grass Green, Lucky Clover, Ocean Mist, Turquoise Sea; Versafine Clair - Nocturne
Dies: Altenew - Just a Number
Accessories: White & Black Card

I'm submitting this card to Happy Little Stampers Anything Goes with Dies - HLSAGD#04.


This was fun to make. I used my MISTI to stamp the birthday presents, starting in the middle and moving the card up and down to create a nice background panel. I removed the panel from the MISTI and freehand stamped the parcels with the solid square block. The block lines up easily and it's very quick. I trimmed the panel to 4" x 5¼" and layered it onto a black mat layer and added it to the front of an A2 (US size) notecard. I finished the front by die cutting a scripty birthday greeting - the shadow in black and the text in white. Inside the card, I cut a mat layer of black card. On the white panel I stamped a fun sentiment - and who doesn't like cake? In the message I'll add have a glass of wine too!! I finished the inside with a few more of the birthday presents.


Next is a card I made for our son's aunty who lives in the US - so she'll have this card by now:


Stamps: Concord & 9th - Birthday Stacks, All the Birthdays; The Greetery - Sentiment Suite Birthday
Inks: Versafine Clair - Nocturne; Gina K - Bubblegum Pink; Versamark
Dies: C&9 - Birthday Stacks
Accessories: White & Black Card; Gold Embossing Powder; Nuvo - Midas Aqua Shimmer Brush; Copic Markers

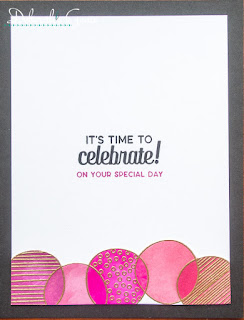
I'm submitting this card to Less is More - LIM#461 where they want us to use pink and gold - done! So glad I've managed to join in with this challenge - it's been a while. I'm also playing along with Perfectly CAS - PCAS#25 where they want us to use Die Cuts and to only use a ⅓ of a page or less.


I used black card to make an A2 side-opening notecard. I cut a piece of white card 4" wide and put it in my MISTI. I stamped the balloons towards the top of the card in a soft grey, removed the panel and coloured the balloons with Copic markers. I replaced the card and restamped with Versamark ink and heat embossed with gold powder. I then went to use the matching die to cut out the balloons and discovered that there is a right way to use the balloon stamps!! So I re-did the balloons, the right way this time, cut them out, stamped the balloon strings and heat embossed them with gold powder and then added the panel to the front of the card. I trimmed it to measure 5¼" from the tallest balloon to the bottom of the panel. I finished the front by adding a simple birthday greeting and adding some gold shimmer to the two plain balloons. Inside the card, I cut a piece of white card to be smaller then the note card. I stamped a birthday greeting in the middle and added the spare set of pink balloons to decorate the bottom of the panel.


You can actually see the gold shimmer in the balloons in the photos!! 

I'm busy making these cards in advance - typing this on 28 March - a few days after my first round of chemo. It's been okay - no sickness or nausea, but I am tired. So, I think it's good to get well ahead, just in case the next round isn't as kind!!

That's all from me today. See you again soon.

signature photo Signature.png

Wednesday, 16 March 2022

SHC - Kids Cards

..... Morning! I'm here with my weekly post for Seven Hills Craft blog. Yesterday was my great-nephew's 10th birthday. I made a couple of cards for him - one from me and one from my mum. Here's the first card:


Stamps: Concord & 9th - Make Some Noise, Out of This World, All the Birthdays
Inks: Gina K - Electro Pop - Raging Red, Orange Glow, Blaring Blue, Screamin' Green, Hello Yellow; Versafine Clair - Nocturne; Hero Arts - Unicorn White
Dies: C&9 - Out of This World
Accessories: White & Black Card; Copic Markers; Nuvo - Clear & Midas Aqua Shimmer Brushes

I'm submitting this card to Never-Before-Used-Schtuff - NBUS#36 - two new sets from Concord & 9th, and also to Love to Craft Challenge Blog - LTCCB#67 where it's anything goes.


I stamped the two-step birthday greeting directly onto the note card using bright neon inks. It was reasonably easy to ink the letters are they are widely spaced. The focal image is CASED directly from the packing for the dies I used. I changed the starry background by stamping the stars on black card. I could have used my colour scraps, but I was lazy and just used white card which I coloured with Copic markers and then die cut. I adhered the starry background to the card and added the rocket and planet on top. I finished the front by stamping a few bright stars. Inside the card, I cut a mat layer of black card. On the white panel I stamped a bold red greeting and smaller birthday greeting in black ink, along with some more stars.


My next card uses Birthday Stacks - one of my favourite stamp and die sets:


Stamps: Concord & 9th - Birthday Stacks, All the Birthdays
Inks: Gina K - Red Hot, Wild Dandelion, Tangerine Twist, Lucky Clover, Bubblegum Pink, Blue Raspberry, Black Onyx
Dies: C&9 - Birthday Stacks
Accessories: White & Black Card; Felt Pens; Nuvo - Clear & Midas Aqua Shimmer Brushes


I started by cutting three piece of white card to the following measurements: 6¾" x 4¼" for the background layer, 5⅜" x 2½" for the candle layer, and 5⅜" x 1½" for the presents layer. I also cut a black layer at 5⅜" x 3" for the celebrate layer. Concord and 9th have an excellent video on their blog to show how to attach the layers. 

I stamped the balloons directly onto the background layer and used the solid circle to quickly add colour to the balloons, and then added some strings. I stamped the candles on the next layer, added colour and used the matching die to cut out the candles. I repeated this process for the presents. For the black layer I used the 'celebrate' die and cut out the word. All the dies cut little notches either side of the main images which is where you score the card. I added ¼" sticky tape to the tabs by the score lines and trimmed off the excess card. At this point I made sure all the layers were the correct depth and trimmed away any excess card. I added some extra detail with felt pens, and some sparkle to the candle flames and all the presents. On the back of the 3D card, I added a birthday greeting. I cut another of the background layers, used the shaped die to cut the curved dotted pattern, cut off the side pieces and trimmed the panel to be slightly smaller then the actual card. I stamped a greeting and added a balloon.


I took a photo looking down on the card so that you can see the 3D effect - it's a super card as it fits inside a standard A2 (US size) envelope.


You'll be seeing more cards featuring Birthday Stacks in next week's post - I made them earlier this week as I go for my first round of chemotherapy tomorrow afternoon. I'm not too worried about the actual process, but I'm not looking forward to the after effects - I'm a rubbish patient. I decided it would be a good idea to get ahead with my cards just in case I feel awful this coming weekend!!

That's all from me today - see you soon.

signature photo Signature.png

Thursday, 9 December 2021

Pinwheels and Robot ...

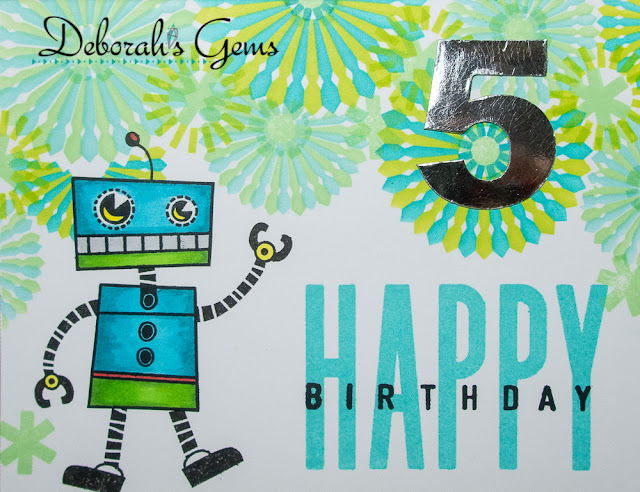
.... Morning! My great nephew - Nico-Lewis - was 5 years old on Tuesday and I had lots of fun making a special birthday card for him:


Stamps: C&9 - All the Birthdays, Birthday Stacks; My Mind's Eye - Boy Crazy; The Greetery - Pinwheel Party Stamps
Inks: Gina K - Applemint, Key Lime, Sea Glass, Turquoise Sea, Blue Lagoon; Versafine Claire - Nocturne
Accessories; White Card; The Greetery - Pinwheel Party Stencils; Lakeland - Die cut Number; Copic Markers; SU Card - Pear Pizzazz

I'm submitting this card to Never-Before-Used-Schtuff - NBUS#33. While I shared cards yesterday made with the Pinwheel suite, this was the first card I used them on!!

I used shades of blue and green to create the pinwheel garland at the top of the card. I stamped the robot directly on to the card and also onto a scrap of white card. I coloured the one on scrap with Copic markers and cut out the head and body and adhered them to the card. I stamped a bold birthday greeting and finished by adding a large silver number 5. Inside the card, I cut a mat layer of green card and on the white panel I added a birthday greeting along with some stars and circles.


I know that Nico has received this card and had a wonderful birthday with his mum and dad, and his friends. That's all for now. Off to have my hair cut now!

signature photo Signature.png

Wednesday, 3 November 2021

SHC - Masculine Birthday Card ...

... Hello, it's time for my weekly Seven Hills Craft blog post. This week I have a masculine theme birthday card:


Stamps: Altenew - Birthday Builder; Concord & 9th - Birthday Stacks
Inks: Gina K - Turquoise Sea, Jelly Bean Green; Memento - Tuxedo Black
Dies: C&9 - Stitched Strip Card Front, Say Thanks
Accessories: White & Black Card; SU Card - Pacific Point, Costal Cabana, Pear Pizzazz; Sakura Stardust Pens; Copic Markers

I'm submitting this to Seize the Birthday - STB#226 but I'm not playing along with the topping, I'm just doing Anything Goes Birthday.


This is a fun card to make. I cut three pieces of coloured card to fit on the cover plate and ran them through my Big Shot. The die cut a spaced out, double stitch pattern diagonally across the card. I decided to cut out the strip of stitching and make my own background pattern. I adhered the thin strips diagonally across a piece of copy paper, and then adhered the whole panel at the bottom of an A2 note card. Next I stamped some birthday pennants across the top of the card and coloured them with Copic markers to match the cardstock. I used glitter pens to add small details to the pennants. I finished the front of the card with a large speech bubble. I die cut a white bubble, stamped the greeting inside, and layered it onto a black shadow piece of card. I made the shadow by drawing round the outside of the bubble die and cutting it out. Inside the card, I cut a mat layer of black card. On the white panel I stamped more birthday pennants and a birthday greeting in coloured ink.


I have some die cut pieces of card left, but ran out of time to make more cards. Perhaps I'll share them next week. That's all for now. See you again soon.

signature photo Signature.png

Sunday, 11 April 2021

Happy 80th Birthday ....

..... Good morning! I'm sharing a couple of birthday cards I've made for my father-in-law, Simon, who is 80 years old today. He's not much for celebrating birthdays, so I decided not to put a number on his cards, but you I think you can tell it's a special birthday! Here's the first card:


Stamps: Impression Obsession - Umpteenth Birthday; Concord & 9th - Yay for Birthdays; Waltzingmouse Stamps - Woodgrain
Inks: Gina K - Sandy Beach, Dark Chocolate, Soft Stone, Barely There; Versafine Clair - Nocturne; Memento - Summer Sky, New Sprout
Dies: Spellbinders - Contemporary Squares
Accessories: White Card; Scrap blue and green card

I'm submitting this card to The Male Room - TMR#149 where the theme is wood. I've used the sketch from Freshly Made Sketches - FMS#480 for the layout, and I'm also playing along with Happy Little Stampers Anything Goes with Dies - HLSAGD#04.


I thought I had some real wood card in my stash, but I couldn't find it, so I stamped a woodgrain image on white card using two shades of brown and a soft grey. I used a Spellbinder die to cut out the swoosh of contemporary squares. I adhered the outline piece to the front of an A2 card. I used some scraps of blue and green card to cut out the 'squares' and adhered them inside the outline. I finished the strip by adding the square of 'wood' card. I completed the front with a fun birthday greeting, which I'm sure Simon will like! On the inside, I cut a piece of white card slightly smaller than the base. I stamped a fun birthday cupcake in soft tones of blue and green and finished with a fun sentiment.


The card above is the one that mum sent to Simon. I also made one for Jonathan and I to send to Simon:


Stamps: Stampin' Up! - Best of Birthdays; Concord & 9th - Birthday Stacks
Inks: SU - Merry Merlot, Mossy Meadow, Daffodil Delight; Versafine - Onyx Black
Accessories: White Card; Visible Image Stencil - Two Tone; Copic Markers; Clear Embossing Powder; Nuvo - Clear Aqua Shimmer Brush

I'm submitting this card to CAS Colours & Sketches - CASC&S#414, Perfectly CAS - PCAS#13, and to Seize the Birthday - STB#211 where the toppings option is Squares.


I started by masking the card to create a central panel onto which I stencilled lots of little squares in burgundy, yellow and green. Next I stamped this cute cake topped with loads of candles and a fun sentiment. I coloured the image with Copic markers and fussy cut it out. I added lots of sparkle to the cake with a clear aqua shimmer brush. I used dimensional pads to adhere it to the front of the card. Inside, I cut another piece of white card, slightly smaller than the card. At the bottom I stamped a line of bold birthday candle which I coloured with Copic markers to match the central panel. I embossed the candles and finished with a bold, simple birthday greeting which finishes off the message.


While travel restrictions have been relaxed in the United Kingdom, it is not possible for us all to get together to celebrate. However, we will be having a Zoom get together for a quiz and to chat later this afternoon. So looking forward to when we can all meet in person!!

That's all from me today - have a good one. See you soon.

signature photo Signature.png

Wednesday, 29 July 2020

SHC - Birthday Balloons ....

... Morning! Hope you're all keeping well and safe. We're on holiday!!! We should have been in Turkey enjoying the sun and sea, but as things stand we're doing day trips around North Wales - still nice and lots of fun!

I'm here this morning with my card for Seven Hill Craft blog. I've made a simple and fun birthday card:


Stamps: Concord & 9th - Birthday Stacks; Lawn Fawn - Chit Chat
Inks: Versafine - Onyx Black; Versafine Clair - Verdant
Dies: Concord & 9th - Birthday Stacks; Lawn Fawn - Chit Chat
Accessories: White Card; SU Card - Granny Apple Green; Copic Markers; Sakura Stardust Glitter Pens; Clear Embossing Powder

I used the sketch from the current CAS(E) this Sketch - CTS#382 challenge.


I started by stamping the circles onto white card, coloured them with a selection of green Copic markers, restamped with Versafine black ink and heat embossed with clear powder. I added the string images to make them into balloons; I extended the strings with a black marker pen. I added some glitter with Sakura pens and then cut out the panel with the matching die.I adhered the panel to the front of the card. On scrap card I stamped the cute little bird and a fun speech bubble saying 'happy birthday'. I embossed both these images and cut them out with the matching dies. I used dimensional pads to attach them to the card. On the inside, I cut a mat layer of green card and on the white panel I stamped a birthday message along with some cute birthday presents.


I sent this to my nephew - he was 18 last Sunday. I think it's a fun card and I'm absolutely sure he enjoyed the birthday present inside!! That's all for now. See you again soon.

signature photo Signature.png

Sunday, 5 January 2020

Belated birthday card ....

...  First up - Happy New Year to you all.  It's been quite sometime since I posted anything on my blog.  I was very busy last year with renovations on our house and I found it almost impossible to get into my craft room.  However, I made a resolution that this year will be different.  I've spent the last few days getting my craft room tidied up and have finally done it - a card!


Stamps: Concord & 9th - Birthday Stacks; MFT - Bitty Birthday Wishes
Inks: Versafine - Black Onyx; Gina K - Onyx Black
Dies: Concord & 9th - Birthday Stacks
Accessories: White Lustre Card; SU Card - Basic Black; Copic Markers; Nuvo Aqua Shimmer - Clear; Clear Embossing Powder

Sadly, while I've made a card, it is going to be late! Still it's the thought that counts.  I'm submitting this card to Perfectly CAS - PCAS#4 and to Fab Friday - FABF#180.  Please excuse the photo above - the light wasn't great last night.  I'll try to take a new photo tomorrow and change the photo.


I cut a panel of white card, stamped the candles, coloured them with Copic markers, restamped in Versafine ink and heat embossed with clear powder.  I added the sentiment, and then used the co-ordinating die to cut out the candles.  I layered the panel onto a black card base.  I added sparkle to all the candles using a clear shimmer brush. On the inside I cut another white panel, slightly smaller than the card, added a simple greeting and another row of candles at the bottom of the panel.


I took a close up of the candles to show the colours slightly better - you can clearly see the sparkle in the photo above!!


This card will be in the post tomorrow and the recipient will get it when she gets back from her holiday.  That's all for this evening.  I hope to be back tomorrow with another card. Bye for now.

signature
Related Posts Plugin for WordPress, Blogger...