Showing posts with label TG - Birthday Suite Sentiments. Show all posts

Thursday, 7 March 2024

Mother's Day Postage Card

... Afternoon!! It's been a really dull day here in Northop Hall - but I've had fun in my craft room working on a card for Mothering Sunday. Here it is:


Stamps: Waffle Flower - Postage Collage Love, Postage Collage Fall, Postage Collage; Gina K - Handmade Holidays, Filled with Sunshine; The Greetery - Sentiment Suite Birthday
Inks: Gina K - Ocean Mist, Powder Blue, Peach Bellini, Sweet Mango, Tangerine Twist, Wild Dandelion; Versafine Clair - Nocturne, Morning Mist
Dies: Waffle Flower - A2 Postage Collage; Gina K - Handmade Holidays
Accessories: White Card; Waffle Flower Stencils - Postage Collage Rose Stencil, Postage Collage Colouring Stencil; Peach Card

I'm submitting this card to Cupcake Inspirations Challenge - CIC#589 - love these colours, and to Love to Craft Challenge Blog - LTCCB#79 where it's always Anything Goes.


I have a stack of these A2 postage stamp die cuts on my desk and I've been working my way through them, I love how different they look. For this card I used the co-ordinating PC Rose stencil - it has three parts (very easy to line up), I did the roses in shades of orange, the leaves in blues and added the starry highlights in yellow ink. I used the additional little stamps sets to add works and prices and franking marks. I layered the finished panel on to pale orange card. I used one of the stencils to add the decoration to the A2 note card and then added the stamped panel. I finished the front with a stamped sentiment.


Inside the card, I cut a couple of pieces of white card. I lightly added orange ink to the larger piece and then edged with an orange marker. On the smaller piece of card, I stamped a greeting and added some tiny flowers.


This card is for my aunty Sue. I lived with them for about 6 months when I was in my early 20s and Sue has always taken good care of me. That's it for today. Bye for now.

signature photo Signature.png

Thursday, 22 February 2024

Floral Birthday Postage Card

... Hello! I've got a birthday card to share with you this morning. This was inspired by Gina K's recent video, although the only Gina K products on the card are the inks!! Here's the card:


Stamps: Altenew - Enjoy Life, Just a Number; Waffle Flower - Postage Collage Fall, Postage Collage; The Greetery - Sentiment Suite Birthday
Inks: Gina K - Lemon Drop, Light Lilac, Medium Lilac, Dark Lilac, Applemint, Lucky Clover; Versafine Clair - Nocturne
Dies: Waffle Flower - A2 Postage Collage Die 
Accessories: White Card; Stencils - Waffle Flower Postage Collage Colouring Stencil, Altenew Enjoy Life; Copic Markers

I'm submitting this to Color Hues - CH#81 to use Lilac and Mint, to The Flower Challenge - TFC#88 - to add a heart, and to Never-Before-Used-Schtuff - NBUS#59 - the Postage Collage stencil and stamps have not been used before.


I have the Waffle Flowers postage collage collection and not really used it much. I was watching Gina K's release video where she made a postage stamp card with one of her flower stencils - I loved it. So I decided to use that as the inspiration and mix and match my existing stamps, dies, stencils, etc. I started by cutting the A2 postage collage die in white card. I added masking magic tape to cover the dots and stitched lines and using the first part of the collage colouring stencil, I lightly inked in pale yellow around the edges to define the 'stamps'. I then stamped the floral image onto the panel and used the matching stencils to add colour. I removed the masking magic and using a variety of stamps added words, images and prices to the 'stamps'. I created the border on the A2 note card by using Waffle Flower's Postage Collage Colouring stencil - first in green, then in lilac. I adhered the postage stamp panel to the front of the card.


For the inside, I cut a piece of white card slightly smaller than the note card. I lightly inked the edges of the panel with lilac ink. I stamped a fun greeting in the middle of the panel, and stamped the floral image again and coloured it with Copic markers.


This card is for my aunty Sue. She has her birthday on Saturday - and I'm safe to share it here now as Sue doesn't look at my blog! To be honest, not sure any of my family look at my blog. That's all for today - I'm off to the post office now. See you all soon.

signature photo Signature.png

Sunday, 7 January 2024

Rainbow Birthday

.....  Good afternoon. It's been a lovely day here in Northop Hall - bright, sunny, clear and cold!! But no rain, yea! I've been playing in my craft room. For me, January, is a very busy month - I have 9 family birthdays. I've made a bright and fun card for my niece, Anne, who will be 40 years old on 11 January. I can share the card here as Anne doesn't look at my blog:


Stamps: The Greetery - Pinwheel Party, Sentiment Suite Birthday, Birthday Blooms
Inks: Gina K - Passionate Pink, Red Velvet, Tangerine Twist, Wild Dandelion, Lucky Clover, Turquoise Sea, Blue Raspberry, Wild Lilac; Versafine Clair - Nocturne
Dies: The Greetery - Pinwheel Party, Birthday Blooms
Accessories: White & Black Card; The Greetery Stencils - Pinwheel Party; Gina K - Flat Sequins; Rainbow Gems

I'm submitting this card to several challenges - AAA Birthday - AAAB#57 where the theme is to use a rainbow or rainbow colours, The Paper Players - PP#671 where the team want us to make a birthday card, and to AAA Cards - AAA#256 where we have a sketch to use.


I had considered making a card with a big '40' on the front, but decided instead to make a chain of pretty rainbow pinwheels. This is a large card measuring 5" x 7" and I've put it in landscape format so that I can get the whole rainbow of colours across the front of the card. It's been a while since I've used these fun pinwheels. I used the dies to cut out lots of white pinwheels in all sizes (I still have a quite a few left). I used the co-ordinating stencils to add colour and made each pinwheel two-tone. I started with pink/red, then red/orange, orange/yellow, yellow/green, green/teal, teal/blue, and blue/purple. I adhered four of the pinwheels flat to the card and used dimensional pads to add the other three. I added rainbow gems to the centre of four pinwheels and flat sequins to the other three. I stamped the word 'happy' directly on the card. I stamped the word 'birthday' on card and used the matching die to cut it, and two other out. I layered them together and added it to the card. I love the simplicity of this card and the bold, bright colours.


On the inside, I cut a mat layer of black card. On the white panel, I stamped a birthday greeting in black ink. I added three more pinwheels which I stencilled directly onto the card. The stencil kit comes with the masks, so it was easy to layer the two smaller pinwheels.


It's so nice to be making cards again. My mojo took a long trip away, and it's only recently that I've got it back. Thank you for stopping by and for your comments. I really do appreciate you taking the time.

See you soon.

signature photo Signature.png

Friday, 13 January 2023

SHC - More Birthday Cards

.... Morning! I'm here with my Seven Hills Craft blog post. January is a busy month for birthdays - there are ten in total. I spent the weekend making cards for three of them!! Here's the first card:


Stamps: Concord & 9th - Happy Rays Turnabout, All the Birthdays; The Greetery - Sentiment Suite Birthdays
Inks: Versafine Clair - Verdant, Warm Breeze, Paradise, Nocturne; Stampin' Up! - Pineapple Punch
Dies: C&9 - Happy Rays Dies
Accessories: White Card; SU Card - Pacific Blue; Silver Holographic Mirri Card

I'm submitting this card to AAA Birthday - AAAB#45 where it's anything birthday goes.


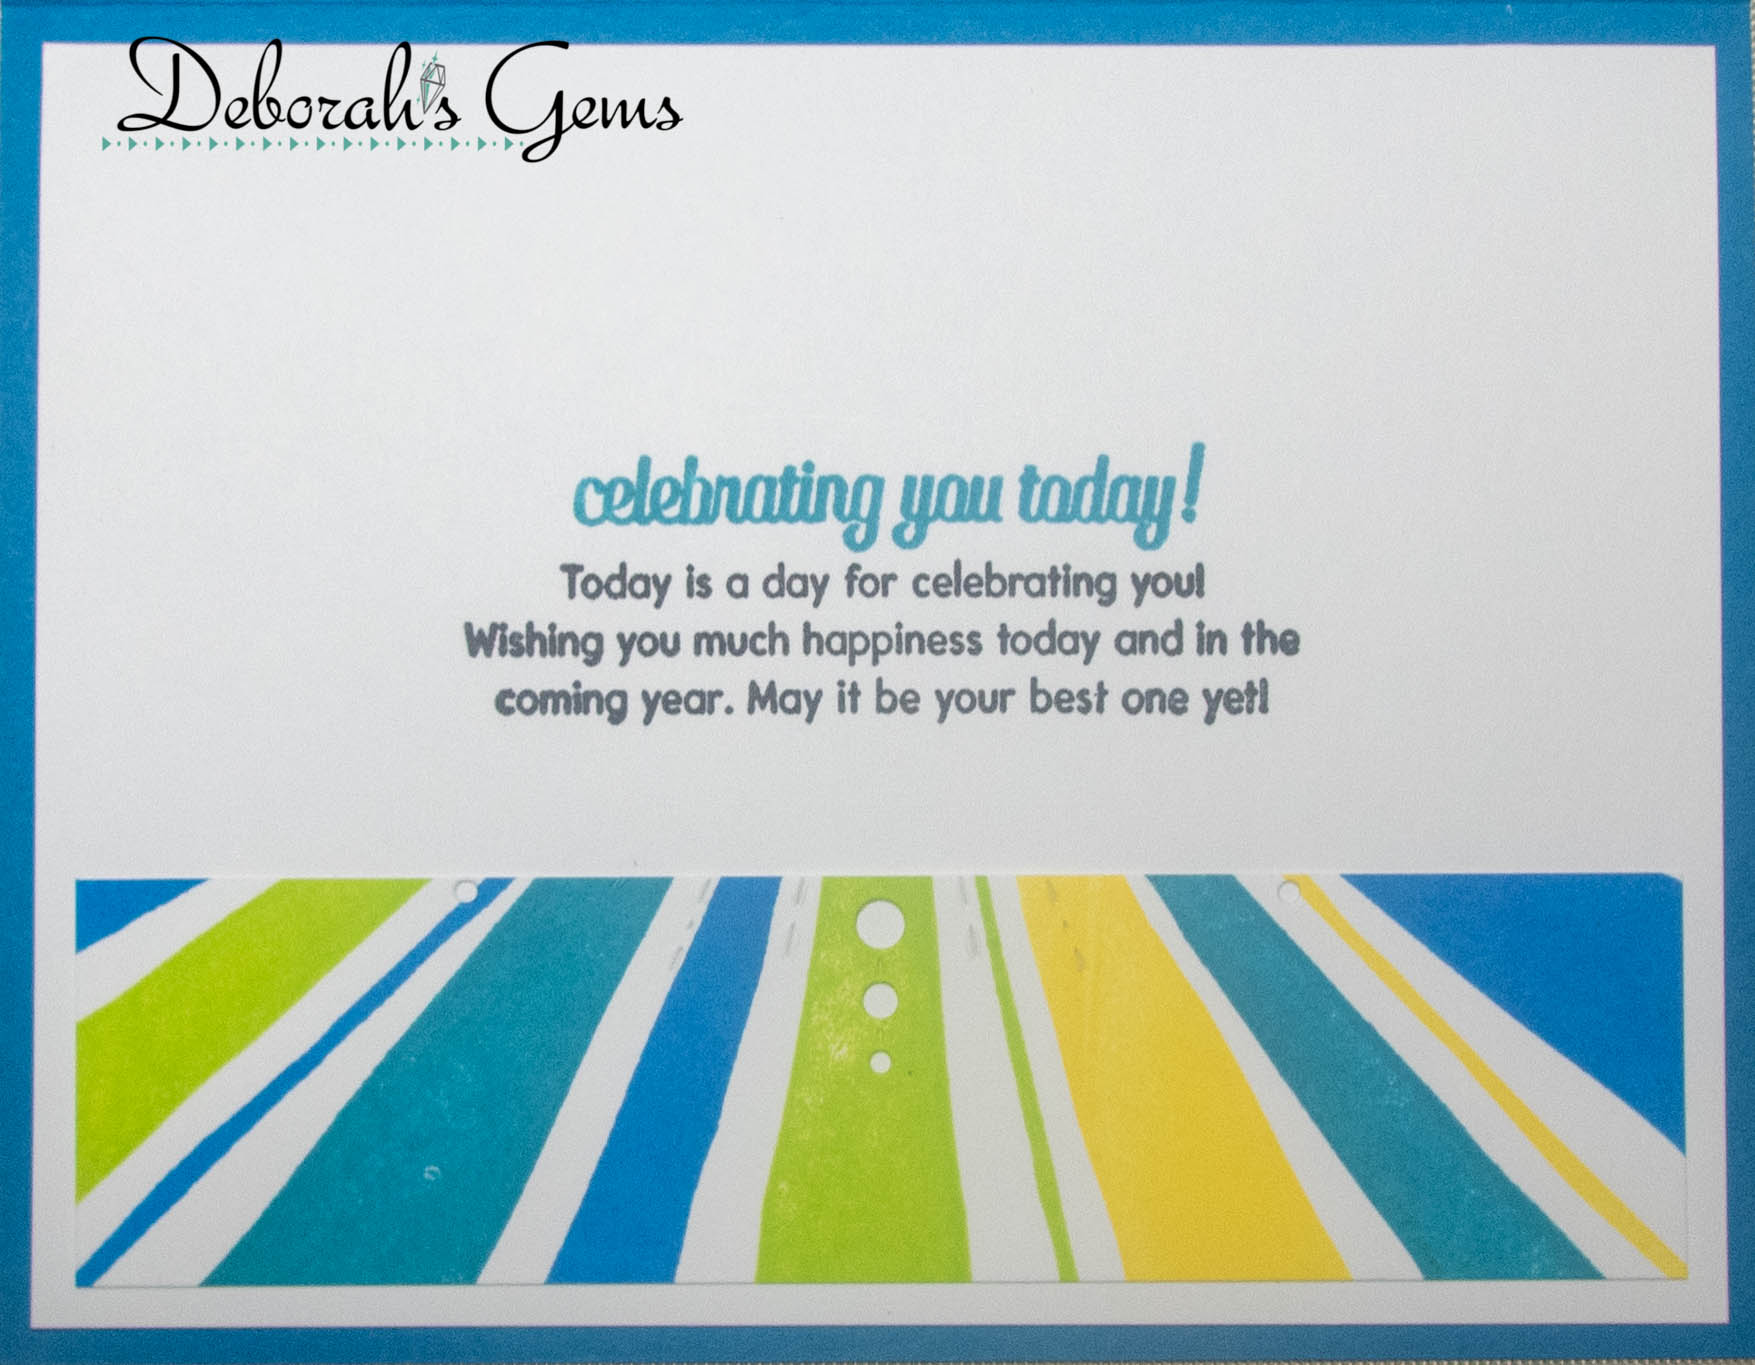
I used my MISTI to stamp the turnabout image in bold, vibrant colours. I used the sunray die, from the co-ordinating die set, to cut the dotty pattern on the image. I then trimmed the panel and layered it on silver holographic card. I adhered the whole piece to the front of an A2 landscape note card. I finished the front by die cutting a circle of blue card and stamping a simple black birthday greeting on it. Inside the card, I cut a piece of white card onto which I glued the left-over piece of the turnabout image. I completed the panel by adding a birthday greeting. This card is for our son, Ben, he is 27 years old today!! I can't work out how he got to be 27 so quickly 😊.


My next card is for our niece, who had her birthday last Wednesday:


Stamps: Concord & 9th - Kaleidoscope Turnabout, All the Birthdays; The Greetery - Sentiment Suite Birthdays
Inks: Gina K - Innocent Pink, Dusty Rose, Bubblegum Pink, Passionate Pink; Versafine Clair - Nocturne
Dies: C&9 - Kaleidoscope Dies
Accessories: White Card; SU Card - Petal Pink; Gold Vellum

I'm submitting this card to Color Hues - CH#55 - such pretty colours!


I stamped the turnabout image in four shades of pink and used the matching dies to cut out sections. I used the dies to cut out several plain white layers too. I layered each section up to give depth to the finished card. I used the circle dies to cut the gold vellum frame too. I finished the front of the card by stamping a birthday greeting. Inside the card, I cut a mat layer from gold vellum. On the white panel I stamped a birthday greeting. I took a side view photo to show the depth from the layers.


Next is a card for my friend Annette:


Stamps: Concord & 9th - Kaleidoscope Turnabout, Yay for Birthdays, All the Birthdays; The Greetery - Sentiment Suite Birthdays
Inks: Gina K - Wild Dandelion, Key Lime, Turquoise Sea, Blue Raspberry, Tranquil Teal; Versafine Clair - Nocturne
Accessories: White Card; SU Card - Granny Apple Green

I'm submitting this card to Never-Before-Used-Schtuff - NBUS#46 - this is a site to showcase stash that you've not used before!!


I used cool colours to stamp the Kaleidoscope pattern this time and added a bold birthday greeting right across the centre of the image. I adhered the panel to a green A2 notecard. I cut a piece of white card for the inside, stamped a fun greeting and added some smaller images for decortion.


My final card is for Ben - this one is from his Nanna:


Stamps: Concord & 9th - Happy Rays Turnabout, All the Birthdays, Yay for Birthdays
Inks: Gina K - Lemon Drop, Wild Dandelion, Sweet Mango; Stampin' Up! - Pineapple Punch
Dies: C&9 - Happy Rays Dies
Accessories: White Card; SU Card - Mango Melody; Gold Vellum

I know the stamp is called happy rays, but they remind me of sunrays, so this time I stamped in bright, sunny colours.  I trimmed the stamped panel to 5" x 3¾", being sure to keep the panel symmetrical, and adhered the panel a gold vellum mat measuring 5¼" x 4". I glued the whole piece to the front of an orange A2 note card. I finished the front by using the matching dies to cut to circles - one in gold vellum and one white. On the white circle I stamped a birthday greeting. For the inside, I cut a piece of white card to 5¼" x 4" and stamped a greeting along with some confetti decoration.


I had so much fun making these cards. I posted them early - just in case they get caught up in the postal backlog. That's all from me for today. See you again soon.

signature photo Signature.png

Friday, 6 January 2023

SHC - Elegant Birthday

... Hello, Happy New Year!! It's time for my Seven Hills Craft blog post. This week I've made an elegant and simple birthday card:


Stamps: MFT - Sassy Pants Birthday Greetings 3; The Greetery - Sentiment Suite Birthday
Inks: Versafine Clair - Nocture; Gina K - Pinks
Dies: Altenew - Radial Circles Cover Die
Accessories: White Card; Gold Design Paper; Pink Flower Gem

I'm submitting this card to a couple of challenges. The first is AAA Birthday - AAAB#45 where it's Anything Birthday Goes, and the second is Color Hues - CH#55 where the colours are gold and light pink.


I started by cutting a piece of gold design paper slightly smaller than an A2 note card and adhering it to the front of the card. I die cut a piece of white card, removed all the little circles (which I could have kept to use on other products, but didn't!!), and used my pink blending brush to colour the card. I didn't add any additional ink to the brush, just started at the large circle and blended the pink ink to the edges of the panel. I stamped a black birthday greeting in the large circle and adhered the panel to the note card. I finished the front by adding a simple pink flower gem. Inside the card, I cut the gold design paper for a mat layer. On the white panel I stamped a fun birthday greeting and, using the blending brush, added a touch of pink ink around the edges of the panel.


January is a busy month for birthdays in our family - there are nine!! Good thing this card was quite quick to make! That's all from me for now. See you again soon.

signature photo Signature.png

Friday, 9 December 2022

SHC - Birthday Flowers

... Good morning!! It's been a while since I posted here - life got very busy and I simply ran out of time to make a card. However, I'm here today with my Seven Hills Craft post and I've made a birthday card:


Stamps: Altenew - Calming Cluster; C&9 - Yay for Birthdays; The Greetery - Sentiment Suite - Birthdays
Inks: Gina K - Soft Stone, Wild Dandelion, Dusty Rose; Versafine Clair - Nocturne
Dies: Altenew - Calming Cluster
Accessories: White Card; Concord & 9th - Confetti Dots Turnabout Stencil; Copic Markers; Gold Embossing Powder

I'm submitting this card to a couple of challenges - Happy Little Stampers Birthday Challenge - HLSBC#12 where it's Anything Goes, and AAA Birthday - AAAB#44 - where the theme is Embossing.


I used my MISTI to stamp the large flower cluster onto white card. I removed the piece and coloured the image with Copic markers. I returned the coloured imaged to the MISTI and stamped with Versamark ink and heat embossed with gold powder. I used the matching die to cut out the finished piece along with two white pieces. I layered these pieces together to give the flower image stability and dimension. On a  white note card measuring 4½" x 6¼" I used the Confetti Dots Turnabout stencil to add a subtle grey background. I adhered the flowers to the card and finished the front by stamping a simple vertical greeting in black ink. Inside the card, I cut a piece of white card slightly smaller than the base. On this panel I stamped a fun two-step greeting in pink and yellow, and finished by adding two smaller messages in black ink.


This card is for my friend Cheryl - she lives in Florida, so I'm sending it now. Postal strikes permitting, Cheryl should get the card on time!!

It's very cold here in North Wales - we've had our first frosts of winter, but yesterday was gorgeous with bright sunshine too! That's all from me today. See you soon.

signature photo Signature.png

Wednesday, 4 May 2022

SHC - Pastel Birthday

... Morning! This is my weekly Seven Hills Craft blog post. It's been prepared in advance as I don't want to be late again!! Last week, while I was full of energy, I not only made Jonathan's birthday card, but I made one for Charlotte his sister. They share their birthday on 30 April - seven years apart!! 


Stamps: Stamping Bella - Oddball Jane Austen; C&9 - Yay for Birthdays; The Greetery - Sentiment Suite Birthday
Inks: Gina K - Passionate Pink, Red Hot, Sweet Mango, Wild Dandelion, Lucky Clover, Turquoise Sea, Wild Wisteria; Versafine Clair - Nocturne; Versafine - Onyx Black
Dies: Reverse Confetti - Big Flower Cover Plate
Accessories: White Card; Copic Markers; Clear Embossing Powder; Nuvo - Clear Aquashimmer Brush; Gems; Gina K - Masking Magic

I'm submitting this card to Seize the Birthday - STB#237 but I'm skipping the topping option and going with Anything Goes. I'm also playing along with AAA Birthday - AAAB#37 where the theme is Let's Party. Now it's restrained on the front, but the message inside says it all!!!


I used the cover plate to die cut a pattern in masking paper which I added to the front of a white A2 note card. I lightly blended over a rainbow of inks to create a pretty floral background. I used my MISTI to stamp Oddball Jane onto white card. I removed the image and coloured it with Copic markers. I returned the image to the MISTI, restamped with Versafine black ink and heat embossed with clear powder. I then carefully cut out the image and added it to the card with dimensional pads. I finished the front with a simple birthday greeting in black ink, some gems and sparkle all over the dress and hat.


For the inside of the card, I cut two pieces of white card. On the large piece I lightly blended the rainbow of inks around the edge to create a pastel border to match the front of the card. On the smaller panel, I stamped a fun greeting and added some bold party confetti.

That's all from me today. Thanks so much for stopping by. I really do appreciate all your lovely comments. See you soon.

signature photo Signature.png
Related Posts Plugin for WordPress, Blogger...