Showing posts with label ALN - Just a Number. Show all posts

Thursday, 22 February 2024

Floral Birthday Postage Card

... Hello! I've got a birthday card to share with you this morning. This was inspired by Gina K's recent video, although the only Gina K products on the card are the inks!! Here's the card:


Stamps: Altenew - Enjoy Life, Just a Number; Waffle Flower - Postage Collage Fall, Postage Collage; The Greetery - Sentiment Suite Birthday
Inks: Gina K - Lemon Drop, Light Lilac, Medium Lilac, Dark Lilac, Applemint, Lucky Clover; Versafine Clair - Nocturne
Dies: Waffle Flower - A2 Postage Collage Die 
Accessories: White Card; Stencils - Waffle Flower Postage Collage Colouring Stencil, Altenew Enjoy Life; Copic Markers

I'm submitting this to Color Hues - CH#81 to use Lilac and Mint, to The Flower Challenge - TFC#88 - to add a heart, and to Never-Before-Used-Schtuff - NBUS#59 - the Postage Collage stencil and stamps have not been used before.


I have the Waffle Flowers postage collage collection and not really used it much. I was watching Gina K's release video where she made a postage stamp card with one of her flower stencils - I loved it. So I decided to use that as the inspiration and mix and match my existing stamps, dies, stencils, etc. I started by cutting the A2 postage collage die in white card. I added masking magic tape to cover the dots and stitched lines and using the first part of the collage colouring stencil, I lightly inked in pale yellow around the edges to define the 'stamps'. I then stamped the floral image onto the panel and used the matching stencils to add colour. I removed the masking magic and using a variety of stamps added words, images and prices to the 'stamps'. I created the border on the A2 note card by using Waffle Flower's Postage Collage Colouring stencil - first in green, then in lilac. I adhered the postage stamp panel to the front of the card.


For the inside, I cut a piece of white card slightly smaller than the note card. I lightly inked the edges of the panel with lilac ink. I stamped a fun greeting in the middle of the panel, and stamped the floral image again and coloured it with Copic markers.


This card is for my aunty Sue. She has her birthday on Saturday - and I'm safe to share it here now as Sue doesn't look at my blog! To be honest, not sure any of my family look at my blog. That's all for today - I'm off to the post office now. See you all soon.

signature photo Signature.png

Friday, 5 May 2023

Big Birthday Wishes

... Morning! I mentioned in my last post that April was a busy month for birthdays in the family. Well, it continues into May!! Today is my brother-in-law's birthday, and this is the card I made for Tim:


Stamps: Altenew - Just a Number
Inks: Gina K - Wild Dandelion, Lucky Clover, Light Lilac, Turquoise Sea, Tangerine Tango, Red Hot, Light Orchid; Versafine Claire - Nocturne
Dies: MFT - Big Birthday Wishes
Accessories: White & Black Card; Simon Hurley Stencil - Dazzling Diamonds

I'm submitting this card to a few challenges - The Paper Players - PP#638 where there is a tic-tac-toe grid and I used the diagonal 'bright colours, die cut, birthday'; Addicted to Stamps and More - ATSM#445 where the theme is to use stencils and dies; and finally to Happy Little Stampers Birthday Challenge - HLSBC#05 where it's anything goes.


I took part in the Stencilled 2 online card class and finally got round to making some cards. For this card I used two of the layers from Dazzling Diamonds. I used the large diamond added colour, shifted positions, added more colour, and shifted again. Next I used the tiny diamond on top with darker inks and ended up with this lovely pattern. I placed the large die cut in the centre of the panel and cut out the greeting, I trimmed the piece to size and layered the panel onto black card and added it to an A2 notecard. Inside the card, I cut a piece of black card for the mat layer. I added a strip of the pattern paper to the edge of the white panel and stamped a birthday greeting.


And the fun thing about this card is that I have left-over letters with the pretty pattern on them. I'll share that card soon. That's all for now. See you soon.

signature photo Signature.png

Sunday, 30 April 2023

Family Birthday Cards

...  Good morning! April is a busy month for birthdays in our family. And today is especially busy. My husband, Jonathan, and his sister, Charlotte, both have their birthdays on 30th April - only Charlotte's 7 years younger!! So, I've been busy making cards, and using some new stash. Here's the card I made for Charlotte:


Stamps: Gina K - Sweet Sentiments; MFT - Inside & Outside Birthday Greetings
Inks: Gina K - Med Lilac, Sea Glass, Sweetcorn, Key Lime, Bubblegum Pink, Light Orchid, Jelly Bean Green; Versafine Clair - Nocturne
Dies: Gina K - Master Layout 2
Accessories: White & Black Card; Gina K Stencil - Layered Peony 

I'm submitting this card to Addicted to Stamps and More - ATSM#444 where the theme is Any Occasion, and to Never-Before-Used-Schtuff - NBUS#49 - this is the first time I've used the stencils and stamps.


I thought Charlotte's birthday card would be the perfect time to use the layered peony stencils. I love rainbows and was totally inspired by Mindy Eggen's beautiful rainbow cards. I stencilled the peony onto a piece of white card and used a stitch-edge die to cut out the panel. I added a simple greeting to one side and then layered the piece onto black card and added the whole panel to the front of a white A2 note card. Inside, I cut a piece of black card for the mat layer. On the white panel I lightly stencilled the peony again - using only layer 1 of the stencils and using a very light hand. I finished by adding a simple birthday greeting.


Hopefully, Charlotte will have received this card by now - but I'm not sure I got it in the post on time!! Heyho!! The next card is the one I made for my mum to give to Jonathan:


Stamps: Altenew - Just a Number
Inks: Gina K - Wild Dandelion, Key Lime, Turquoise Sea, Blue Raspberry, Sweet Mango, Lipstick
Dies: Gina K - Master Layout 1; Altenew - Just a Number
Accessories: White & Black Card; Gina K Stencil - Making Waves; Simon Hurley Stencil - Candles

I'm submitting this card to The Male Room - TMR#173 where the challenge is to use stencil and/or dies - done. I'm also playing along with Seize the Birthday - STB#260 - the Anything Goes part of the challenge.


I took part in Stenciled 2 - on the Online Card Classes  - recently, and this is the first time I've tried out any of the techniques. I first stencilled the candles from yellow to blue to create an ombre colour. Leaving the candle stencil in place, I added the Making Waves stencil on top and, using the same colours, I added more colour on top. I love the subtle pattern this creates in the candles. I used layer 2 of the candles stencil to add the candle flames blending orange and red ink. I die cut a section of the panel and adhered it to a black mat layer and then onto an A2 note card. On a scrap of white card, I blended the same colours and then used a 'happy birthday' die to cut out the words and layered them onto black shadow layers and glued to the card. Inside, I cut a mat layer of black card. On the white card I added a fun sentiment and a few candles that I cut out from the piece of card left over from the front.


I think the candles stencil is just super - perfect for everyone! 

That's all from me for now. It's a dull, wet day here in North Wales, so I'm planning on spending the day in my craft room making cards and listening to my Audible book. See you soon.

signature photo Signature.png

Friday, 20 January 2023

SHC - One Background - Four Ways

... Hello again! I'm beginning to get back into card making - so many birthday cards needed this month. I'm here with my Seven Hills Craft blog post. I've used one background stamp - four different ways. Here's the first card:


Stamps: Altenew - Woven Stripes, Just a Number, Birthday Builder; Colorado Craft Company - Big & Bold Majestic Moth
Inks: Gina K - Soft Stone, Keylime, Blue Raspberry, Sea Glass; Versafine Clair - Nocturne; Versafine - Onyx Black
Dies: C&9 - Confetti Card Die
Accessories: White Card; SU Card - Pear Pizzazz; Copic Markers; Clear Embossing Powder; Nuvo - Clear Aquashimmer Brush

I'm submitting this card to Seize the Birthday - STB#253 - I'm using the toppings option - 'winged things'.


I made an A2 note card using green card from my stash. I put the Woven Stripes stamp into my MISTI and masked off sections, I stamped the panel in four colours. I used a scallop edge die to cut out a piece of the panel and glued it to the note card. I stamped a simple birthday greeting in the bottom corner of the panel, along with a dragonfly above. I stamped the dragonfly again on white card, coloured it with Copic markers, restamped in Versamark ink and heat embossed with clear powder. I then carefully cut out the dragonfly, edged it with a black marker and glued it to the note card. I finished the front by adding some shimmer to the dragonfly with a clear aquashimmer brush. I cut a piece of white card for the inside, I stamped a fun sentiment and another dragonfly.


Next is a card for Ben's grandmother:


Stamps: Altenew - Woven Stripes, Just a Number, Enchanting Beauty, Sentiment Strips 3
Inks: Gina K - Powder Blue; Versafine Clair - Nocturne; Versamark; Memento - Angel Pink
Dies: Altenew - Just a Number, Enchanting Beauty
Accessories: White & Black Card; Watercolour Card; Brusho - Cobalt Blue, Violet, Rose Red; Silver Mirri Card; Silver & White Embossing Powders; Vellum

I'm submitting this card to a new challenge - Birthstone Challenges - BSC#01 - January (Garnet) and February (Amethyst).


This time I stamped the Woven Stripes image in Versamark on watercolour card and heat embossed with white powder. I sprinkled Brusho crystals onto the panel, spritzed with water and allowed the colours to flow and blend. Once dry, I trimmed the panel and layered it onto a black mat layer. I glued the whole piece to the front of a note card measuring 6¼" x 4½". I stamped the leaf image in Versamark onto vellum and heat embossed with silver powder. I used the matching die to cut out the leaf and adhered it to the panel. I finished the front with a die cut birthday greeting. Inside the card, I cut a mat layer of black card and on the white panel I stamped the leaf image in pink and added a birthday greeting.


Next up is a clean, simple card:


Stamps: Altenew - Woven Stripes, Just a Number, Sentiment Strips 3, Half-tone Stars;
Inks: Gina K - Wild Dandelion, Red Hot, Lucky Clover, Blue Raspberry, Medium Lilac; Versafine Clair - Nocturne
Accessories: White & Black Card

I'm submitting this one to The Male Room - TMR#170 where the theme is 'galaxy and/or stars'. I've not played along with this challenge for a long while, so it's good to play along.


I stamped this background in several colours - using my MISTI and masking off areas. Once stamped, I cut the card in half along the long line of the biggest set of stripes. I turned one section and glued it to the bottom of an A2 white note card and trimmed off the excess. I then added a thin strip of black card above. I finished the front by stamping a simple birthday greeting and adding several stars stamped to match the colour of the stripes. For the inside, I cut a piece of white card slightly smaller than the note card. I added two more portions of the Woven Stamp panel at the corners and edged them with a black marker. I finished by adding a fun sentiment and a few more stars.


For my last card, I simply stamped the Woven Stripes background directly on the card:


Stamps: Altenew - Woven Stripes, Just a Number, Sentiment Strips 3; C&9 - Triple-Step Hooray
Inks: Kaleidacolor - Blue Breeze; Gina K - Powder Blue, Ocean Mist, Blue Raspberry; Versafine Clair - Nocturne
Accessories: White & Black Card

I'm submitting this card to Love to Craft Challenge Blog - LTCCB#72 where it's always 'anything goes'.


I used my Kaleidacolor ink pad to stamp this background - I love the ombre effect you get with these ink pads. I stamped the three-step word 'hooray' on white card - it's very easy to line up these stamps. I then cut out the word and layered it onto a black mat and adhered it to the front of the card. I finished the front by stamping one of the smaller sentiments from Triple-Step Hooray in bold black ink, trimmed it to size and used dimensional pads to adhere it to the card. On the white panel inside, I stamped a birthday greeting and some stars.


That's all my cards for today. I'm so pleased to be making cards again. I need to replenish my own card stash. See you soon. Take care.

signature photo Signature.png

Wednesday, 2 March 2022

SHC - Neon Bright Birthday

.... Morning! It's time for my Seven Hills craft blog post. Today I've a neon bright birthday card to share with you. It's for my cousin Neil, who is 56 years old today - and that just doesn't seem right!! Here's the card:


Stamps: Altenew - Spheres and Spirals, Just a Number; Concord & 9th - All the Birthdays
Inks: Gina K - Electro Pop - Blaring Blue, Hello Yellow, Screamin' Green; Versafine - Onyx Black; Versafine Clair - Nocturne
Dies: Gina K - Master Layouts 1; C&9 - All the Birthdays
Accessories: White & Black Card; Clear Embossing Powder

I'm submitting this card to AAA Birthday - AAAB#34 where they want us to use pattern on our cards.


I stamped the hexagon image in neon yellow, green and blue to build up a bright background pattern. I lightly blended the blue ink around the edge of the finished pattern and then adhered the panel to a black mat layer. I added the whole piece to the front of an A2 note card. To finish the front I stamped a bold birthday greeting in black ink and embossed with clear powder, I repeated the process to get an enamelled look. I used a die to cut out the greeting and added it to the card. Inside, I cut a mat layer of black card. On the white panel I stamped my favourite birthday greeting and added some confetti decoration with the neon inks. 
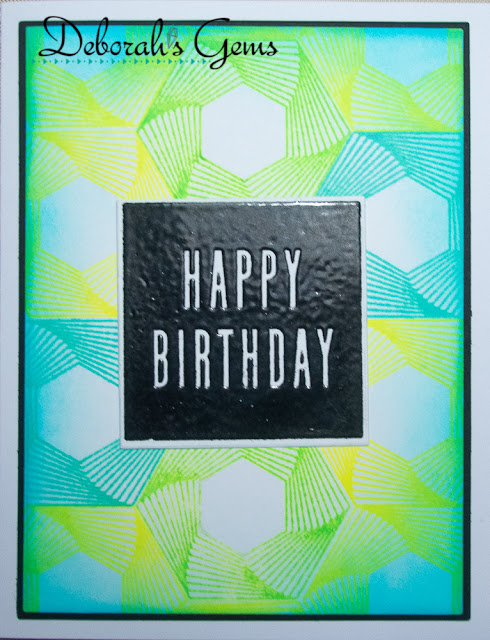

I think the greeting is perfect for my cousin - he's always a crazy one!! 

That's all from me today. See you soon.

signature photo Signature.png

Wednesday, 2 February 2022

SHC - Illusion Diamonds

.... Good morning! I'm here with my Seven Hills Craft blog post. I've made a couple of birthday cards and a Hello card - they all feature a new stamp set from Altenew - Illusion Diamond - it's fab! Here's my first card:


Stamps: Altenew - Illusion Diamond, Note for You, Enchanting Beauty, Just a Number
Inks: Versafine Clair - Nocturne, Paradise Blue; Gina K - Blue Lagoon, Wild Wisteria, Powder Blue
Dies: Altenew - Enchanting Beauty; Gina K - Master Layouts 1
Accessories: White Card; SU Card - Balmy Blue; Blue Mirri Card; Vellum

I'm submitting this card to Darnell's Never-Before-Used-Schtuff - NBUS#35 - it's all new to me!! 


I used my MISTI to stamp this lovely diamond panel onto white card. I used a brayer to roll on three shades of blue ink for a blended look. I used a die to cut out the panel and added a birthday greeting at the top. I really like the elegant font used and it goes so well with the diamond pattern. I layered the panel onto blue mirri card and added it all to a blue A2 note card. I finished the front by stamping a beautiful leaf frond onto vellum. I dried the ink and once dry, used the matching die to cut out the image and adhered it to the front of the card. Inside, I cut a panel of white card onto which I stamped the leaf front and a birthday greeting. This card is for my aunt - she'll be 70 at the end of the month.


I used Distress reinkers on my next card:


Stamps: Altenew - Illusion Diamond, Note for You, Just a Number
Inks: Versamark; Kaleidacolor - Pastel; Distress Reinkers - Festive Berries, Carved Pumpkin, Mustard Seed, Mowed Lawn, Salty Ocean
Dies: Altenew - All About Wishes
Accessories: White & Black Card; Tim Holtz Water Colour Card; Nuvo Clear Aqua Shimmer Brush; Gems; White Embossing Powder; Frosty Spritz

I'm submitting this card to The Paper Players - PP#576 where they have a Tic-Tac-Toe board to play along with. I've used the top row - rainbow, sparkle, die cut. I'm also playing along with Happy Little Stampers Watercolour Challenge - HLSWC#02 where it is anything goes.


This time I stamped the diamond panel in Versamark ink onto water colour card. I heat embossed the image with white embossing powder. To reveal the pattern, I added drops of Distress reinkers along the side of the pattern and spritzed, liberally, with water and allowed the inks to run and blend. I love the effect this gives. I adhered the dry panel to a piece of black card and added it all to the front of an A2 note card. I finished the front by die cutting a birthday greeting from black card and added lots of little aurora gems. I used a clear aqua shimmer brush to go over the die cut words and finally spritzed a clear sparkle spray over the whole panel. Sadly, you can't see the effect in the photo - but it's so pretty in real-life. Inside the card, I cut a mat layer of black card. On the white panel, I stamped a simple greeting and added a row of dots to match the colour of the front of the card.


My final card is a 'Hello' card:


Stamps: Altenew - Illusion Diamond, Note for You
Inks: Kaleidacolor - Pastel; Versafine Clair - Nocturne
Dies: C&9 - Everyday Sayings; Gina K - Master Layouts 1
Accessories: White & Black Card

I used a multicolor ink pad for this card and used a brayer to apply colour to the stamp. As I used a MISTI for stamping, I was able to stamp the image several times to build up the depth of colour. I used a die to cut the panel to size. I then die cut the large 'hello' from the centre of the panel. I adhered this panel to a black mat layer and added it to the front of the card. I also die cut two further plain black 'hello' dies and layered them together with the diamond pattern image on top. I used the in-laid die technique to add the die back into the card. I like the way this allows the pattern to star, but you can still see the greeting. Inside, I cut a mat layer of black card. On the white panel I stamped a simple greeting and added a row of coloured dots.


That's all from me today. Thanks for stopping by. See you again soon.

signature photo Signature.png
Related Posts Plugin for WordPress, Blogger...