Showing posts with label ALN - Happy Dreams. Show all posts

Wednesday, 1 June 2022

SHC - Birthday Wreaths

.... Good Morning!! I can hardly believe it's already 1st June!! Time is flying by. It does mean, however, that it's time for my weekly Seven Hills Craft blog post. This week I've got three birthday cards to share with you. I've been doing the Spring Card Camp from Online Card Classes, and these cards are based on Laura Bassen's wreath technique. I'll start with the large square card:


Stamps: Altenew - Hello Sunshine, Beautiful Inside; C&9 - All the Birthdays
Inks: Gina K - Wild Dandelion, Key Lime, Sea Glass, Powder Blue, Lovely Lavender, Innocent Pink, Lipstick, Peach Bellini, Slate; Versafine - Onyx Black
Accessories: White & Black Card; Clear Embossing Powder

I'm submitting this card to The Paper Players - PP#593 where they have a tic-tac-toe grid - I've picked the diagonal - birthday, floral & circle. I'm also playing along with Fusion Card Challenge - FUSION#1122 - I've used the rainbow colours from the photo.


For all my cards I used my MISTI stamp position, although Laura says you can do this technique with blocks!! I cut a piece of white card 5¼" and drew diagonal, horizontal and vertical pencil lines on the card - with all lines crossing in the centre. I placed the card into the MISTI and put my first flower image on the top most vertical pencil line and stamped in yellow ink. I turned the card 90° and repeated the process, and continued until I had the horizontal and vertical flowers stamps. I returned the card to the MISTI with the yellow flower at the top, repositioned the flower image onto the diagonal pencil line between the yellow and teal flowers and stamped in lime green. I repeated the process above until I have a complete wreath. I repeated the process to add some more smaller star flowers. Next, I stamped a bold 'happy' in dark grey ink. I heat set all the ink before stamping the scripty 'birthday' in Versafine ink and heat embossing with clear powder. I adhered the finished panel to a black mat layer and added the whole lot to the front of a 5¾" square white card. Inside, I cut a mat layer of black card. On the white panel I created a birthday greeting and finished by adding a couple of flowers.


My next card has a more masculine feel:


Stamps: Altenew - Parrot Paradise, Happy Dreams, Floral Sprig, Beautiful Inside
Inks: Gina K - Prickly Pear, Honey Mustard, Jelly Bean Green, Fresh Asparagus, Blue Lagoon; Versafine Clair - Nocturne
Accessories: White & Black Card

I'm submitting this card to Seize the Birthday - STB#239 - I'm playing along with the Anything Goes option.


I used the same technique as outline above, but this time I made an A2 side-opening card. I cut the white card to 3¼" × 4½", drew in the pencil lines and then picked leaves and darker colours for a masculine feel. I finished the front with a birthday greeting in black - love this font. I layered the panel onto a black mat and added to the front of the card. Inside, I cut a mat layer of black card and on the white panel stamped a birthday greeting and another fun leaf.


My final card is another rainbow card:


Stamps: Altenew - Beautiful Inside; C&9 - All the Birthdays, Lucky
Inks: Gina K - Wild Dandelion, Key Lime, Sea Glass, Powder Blue, Lovely Lavender, Innocent Pink, Lipstick, Sweet Mango; Versafine Clair - Nocturne
Accessories: White & Black Card

I'm submitting this card to Less Is More - LIM#465 where they have a rainbow colour challenge.


I used the same technique as outline above. I kept this card reasonably simple - I picked a group of stars, stamped them in rainbow order and finished with a bold black birthday greeting. As before, inside has a black mat layer and a greeting and decoration on the white panel.

For me June is a busy birthday month and I realised that I'm almost out of birthday cards in my stash, so it's been good to make a few. I still need more!! That's all for today. See you again soon.

signature photo Signature.png

Wednesday, 15 December 2021

SHC - Batch Christmas Cards ....

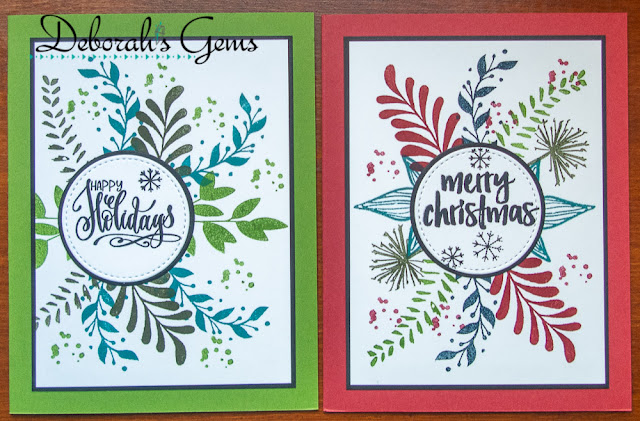
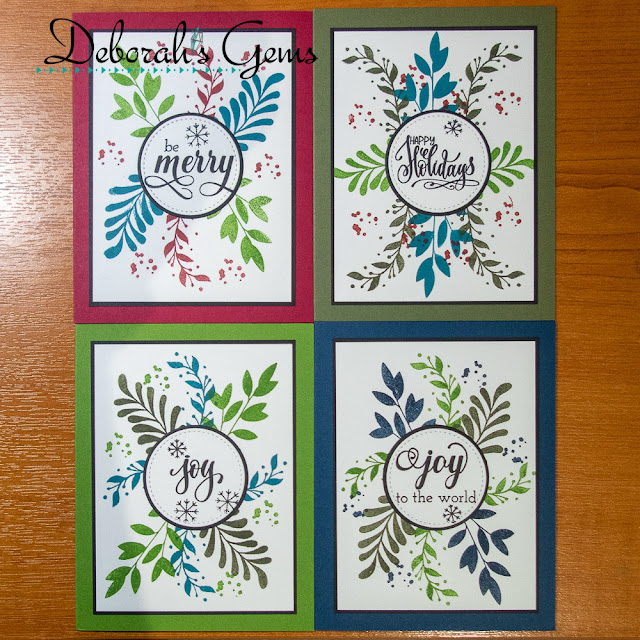
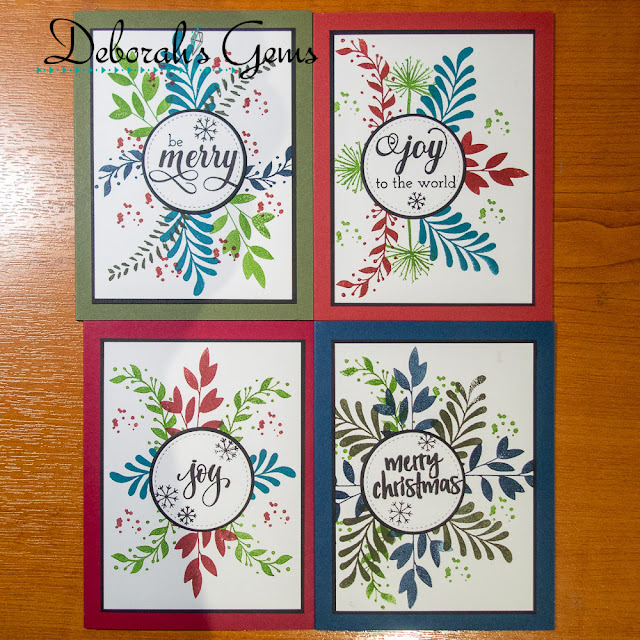
.... Morning! I'm here with my Seven Hills Craft blog post. I've been a bit smug about finishing all my Christmas cards for this year. Sadly, last weekend, I discovered that I was in fact short several cards. So I decided to batch make some cards. Inspiration for the designs comes from Gina K, but I've used Altenew, Concord & 9th, Colorado Craft Company, and Hero Arts products for my cards. Here are my ten cards:


Stamps: C&9 0 Harvest Wreath Turnabout, Warm Wishes Turnabout, Christmas Cottage; Altenew - Freeform Greenery, Parrot Paradise, Happy Dreams, Majestic Mistletoe, Warm Blessings; Hero Arts - Color Layering Holly; CCC - Big & Bold Majestic Moth, Big & Bold Holly & Berries
Inks: Stampin' Up! - Midnight Muse, Raspberry Ripple, Always Artichoke, Gumball Green, Riding Hood Red; Gina K - Tranquil Teal; Versafine Claire - Nocturne
Dies: Gina K - Master Layouts 3
Accessories: White & Black Card; SU Card - Midnight Muse, Raspberry Ripple, Always Artichoke, Gumball Green, Riding Hood Red

I'm submitting these cards to Holly & Ivy Christmas Challenge - H&ICC#106 and to Merry Little Christmas Challenge Blog - MLCCB#41 where it is always Anything Christmas Goes.


I started by preparing all my materials. I used old cardstock to make the note cards - all A2 side opening cards in festive colours. I cut ten white panels 3½" x 4¾" and 10 black panels 3⅝" x 4⅞". I went through my large vast stamp collection and found stamps sets with lots of smaller leaf images that would work to create a wreath. Most of the designs are centred on the white panel, with a few off to the side. I stamped the various leaves using inks to match the cardstock. Once finished, I adhered the stamped panels to the black layer panels and added them to the front of the note cards. Next I made the focal sentiments. Once again, I found smaller greetings, stamped them in black on white card. I used a stitch edged circle die to cut them out and a slightly larger die to cut a black mat layer. I adhered all the greetings flat to the front of the card. Inside, I kept things simple. I cut a white panel 4" x 5¼" and I used the same greeting for all the panels. I added a single leaf image for decoration and stamped it to match the cardstock.


I'm very pleased how these turned out. I got them made in about three hours and I think I've now got all the cards I need this year. But I had such fun, that I might make a couple of sets to give as gifts this year - to my son and to my daughter!! I spent most of Sunday writing all my cards and they are now on their way to my family and friends. That's all for today. See you soon.

signature photo Signature.png

Wednesday, 16 September 2020

SHC - Back to School ...

... Hello again! Two days on the trot, something strange going on! I'm here with my Seven Hills Craft blog post. Today I'm sharing a card that Kat asked me to make. She wanted me to make a good luck card for a friend who's shortly heading off to Cardiff University. This is what I made:


Stamps: Hero Arts/Ink Blot Shop - Please Deliver; Altenew - Happy Dreams, School Days
Inks: Memento - Tuxedo Black; Gina K - Soft Stone; Kaleidacolor - Spectrum
Dies: Hero Arts - Rectangle Peek-a-Boo Doors #11
Accessories: Black and White Card; Copic Markers; Nuvo - Clear Aquashimmer Brush

I'm submitting this card to Love to Craft Challenge Blog - LTCCB#50 where it's always, Anything Goes.


Before I start, I have to give credit for this card to Jennifer McGuire - check out her video where she shows you how to make peek-a-boo doors in your cards. I pretty much CASEd the entire card. I cut a piece of white card, larger than I needed, and stamped the pencil image along the bottom. I colour the pencils with Copic markers, such fun to make the rainbow. I die cut the door in the panel, replaced it in the MISTI and stamped the sentiment and arrow. I then trimmed the panel to fit the card. I made the card from black cardstock and added a piece of white card to the front. I put the card in the MISTI and placed the stamped panel on top. I opened the door and pencilled around the opening, removed the panel and stamped another image.


I think this inspirational sentiment is perfect for someone starting university. On the inside, I cut a white panel of card and stamped another message. This one has the words 'Back to School' - well, a university is just a very big school for big kids - so I think it works! I also added some little stars for fun.


I added some sparkle to the coloured pencils with a clear aquashimmer  brush - you can't see it in the photos above, but I did take a photo holding the card out of the window and you can really see the shimmer in this photo. Love all that sparkle!!


Not only is Kat's friend heading for university, Kat will be heading to the University of Nottingham on Saturday to study Politics & American Studies. Kat is so excited, but a bit nervous too. Because of the Covid-19 restrictions only one parent can accompany Kat on moving-in day, so she's going with her dad. I've told Kat she has to send me lots of photos of her room and new friends. I know the campus well - it's one of my favourite universities. I'll share the card I made for Kat later this week! Bye for now!

signature photo Signature.png

Monday, 16 March 2020

Snapshot ....

... Hello again! Normally on a Monday I have craft class in the morning, but as it's been closed for the next few weeks, I had some spare time. I went for a lovely walk around the village - such a lovely day with sunshine and birds singing. Then, after lunch, I came up to play for a bit. I made a card for my wonderful husband.


Stamps: Altenew - Snapshots, Happy Dreams, Heartfelt Sentiments
Inks: Gina K - Key Lime, Lucky Clover, Fresh Asparagus, Black Amalgam; Versamark
Dies: Altenew - Snapshots
Accessories: White Card; SU Card - Black, Granny Apple Green; Clear shimmer brush; White Embossing Powder

I'm submitting this card to CAS Colours & Sketches - CASC&S#361, Colour Throwdown - CTD#584, and CAS on Friday - CASOF#175.


The idea of a camera came from CAS on Friday where they want to see Boys and their toys, well Jonathan absolutely loves his cameras, lights and studio. He had a photoshot yesterday. As his favourite colour is green I used several shades. I used my MISTI to stamp the body of the camera and used the various layering images to add colour to the image, and I used the matching die to cut it out. I used the sketch but turned it to make a landscape card as it works so much better for the camera. I stamped the sentiment on a strip of black card and embossed with white powder. I added some detail behind the camera and adhered the camera with dimensional pads. On the inside, I cut a mat layer of green card and simply added a heart and some words. I made this card just because!!


That really is all from me today. Kat is home from school and Jonathan will be finishing work shortly, so I'm off to cook dinner for us all.  Take care. See you soon.

signature photo Signature.png

Wednesday, 14 March 2018

TMR - Theme ....

... Hello! I can't quite believe that it's been two weeks since I posted anything!! Time is going by so fast. Anyway, it's time for our new challenge at The Male Room - TMR#81. We have a fun theme, we want to see Space/Science inspired masculine projects. I actually ended up making two cards, here's the first with a science theme:

Our Chemistry - photo by Deborah Frings - Deborah's Gems

Stamps: My Favourite Things - LLD Undeniable Chemistry
Inks: Distress - Cracked Pistachio, Evergreen Bough, Lucky Clover; Versamark
Dies: Die-namics - Chemistry Set
Accessories: White Lustre Card; SU Card - Garden Green; Copic Markers; Spectrum Noir - Clear Sparkle Brush; White and Clear Embossing Powder


I'm submitting this card to AAA Cards - AAA#110 where they have an Ombre theme, to The Card Concept - CC#88 where they want shades of green, and to CAS(E) this Sketch! - CTS#262. I die cut several different flasks from white card and coloured them with shades of green - moving from the most concentrated to the least. I stamped some 'molecules' in Versamark on to the card base, heat embossed them with clear powder and then inked over with soft shades of green. I also stamped some little hearts in the same shades of green. I stamped a sentiment on green card in Versamark and heat embossed with white powder. I added lots of sparkle to the 'chemicals' in the flasks and adhered them to the card. On the inside, I cut a mat layer of dark green card and added a fun sentiment on the white panel with more 'chemical' symbols!!

Our Chemistry inside - photo by Deborah Frings - Deborah's GemsOur Chemistry sq - photo by Deborah Frings - Deborah's Gems

I was on a bit of a roll, so I made a second card, this time with a space theme:

Shoot for the Moon - photo by Deborah Frings - Deborah's Gems

Stamps: Altenew - To The Moon, Happy Dreams; Uniko - Reach for the Stars
Inks: Versamark; Delicata - Silvery Shimmer; Gina K - Moonlit Fog, Dark Sage
Dies: Die-namics - Circles Set 2 #5
Accessories: White Lustre Card; Stampin' Up! Card - Basic Black; Shimmer Spritz - Frost; White Embossing Powder


I made the card base from Stampin' Up! black card. I used the multi-step moon image from To The Moon to create the focal image, stamping in silver, pale grey and dark grey, and cut it out with a circle die. I spritzed the card with frost shimmer spray to give the impression of a galaxy of stars. I stamped the sentiment in Versamark and heat embossed with white powder. I finished the front by added a few larger stars in silver. On the inside, I cut a panel of white card on which I stamped another moon and added a greeting. I'm submitting this card to Less Is More - LIM#366 where they want a monochromatic card.

Shoot for the Moon inside- photo by Deborah Frings - Deborah's GemsShoot for the Moon sq - photo by Deborah Frings - Deborah's Gems

That's all from me for today. But do visit The Male Room blog to see lots more inspiration from the rest of the Design Team and also from our Guest Designer Lynda from Lynda's Crafty Hall. You've got lots of time to play along with this challenge, submission deadline is midnight BST on Tuesday 27th March, that's 7.00pm EDT in the States. Have fun!!

signature
Related Posts Plugin for WordPress, Blogger...