Saturday, 15 February 2014

52CCT - Theme ....

.... Good morning everyone.  We had so many lovely cards for our colour challenge last week, and this week at 52 {Christmas} Card Throwdown we have a theme challenge.  Jacqueline has picked the theme of Christmas Landscapes, so much scope!  Here's my card:

Let it Snow - photo by Deborah Frings - Deborah's Gems

Stamps: Waltzingmouse - Alpine Christmas
Inks: Stampin' Up! - Island Indigo, Elegant Eggplant, Basic Black; Distress - Milled Lavender; Memento - Teal Zeal; Versamark
Dies: WMS - Alpine Christmas
Accessories: White Lustre Card; SU Card - Island Indigo, Elegant Eggplant; White Embossing Powder; Glitter

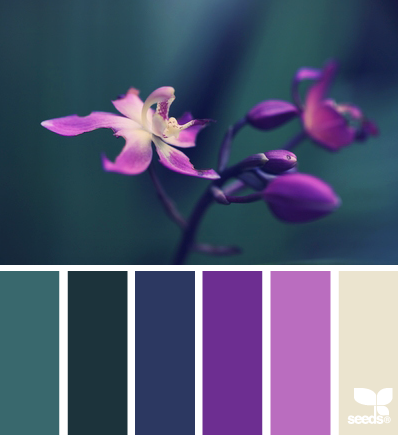
When I saw this theme I knew I had to use the wonderful Alpine Christmas (I think the alpine skiing might have had a bit of influence too).  I owe inspiration to a couple of cards - Laurie's and Kelly's cards.  I've used the colours from the current Waltzingmouse Fanatics Challenge - WMSFC#11 - I just love them!  You have until Thursday 20th February, 5.00pm to join the Waltzingmouse Fanatics challenge!

I made the card from Island Indigo, cut a panel of Elegant Eggplant on which I stamped the sentiment and snowflakes in Versamark and heat embossed them with white powder.  I cut a panel of white card slightly smaller then the purple and stamped the mountain range.  To make the really dark teal colour I inked up the mountains in black, stamped off once and then inked again with Teal Zeal - result a nice dark teal.  I stamped the alpine village using purple for the houses, soft purple for the snow covered roofs and light teal (Island Indigo stamped off once) for the trees.  I used the matching die to cut out the mountain and then attached it to the card to reveal the sentiment and snowflakes.  I finished the front by adding glitter.  For the inside I cut a white panel, added a bit of a village and a lovely Christmas verse.

Let it Snow inside - photo by Deborah Frings - Deborah's Gems

For more inspiration with the Christmas Landscape theme - check out the cards from the rest of the team - as always, they are just fab!  Looking forward to seeing your creations. 

My plans for the weekend include a mix of watching the Winter Olympics and some crafting.  Kathryn has a friend coming for a sleepover, so I won't see them for most of the time and Jonathan is off to a photo shoot.  It's going to be a fun time.  Hope you have a good weekend, be safe!

signature

Friday, 14 February 2014

Neon bright ....

...  Morning everyone!  The snow's back, so I've a perfect excuse for staying in and playing in my craft room.  Not that I actually need an excuse :)  Today's card is for a couple of challenges:

Superlots - photo by Deborah Frings - Deborah's Gems

Stamps: CAS-ual Friday Stamps - Truth Is, Cupid's Arrow, Exclamations
Inks: Hero Arts Neon - Pink, Orange, Green; Memento - Tuxedo Black
Accessories: Stampin' Up! Card - Lucky Limeade; White Lustre Card; Copics Neon


I really like Therese's card with the pretty flowers and lovely green card base.  I decided to keep the colours but make them much bolder!  I made the base from Lucky Limeade and instead of flowers I used the wonderful stylised asterisks from Exclamations.  I stamped the asterisks on a strip of white card to follow the pattern of the flowers.  Before adhering it to the card I stamped the superlots arrow and coloured the feathers with Copic neon markers.  I finished the front with a sentiment above the asterisks.  For the inside I kept it really simple with a white panel onto which I stamped some flowers and coloured them with Copics.

Superlots inside - photo by Deborah Frings - Deborah's Gems

I'm really pleased how this one turned out!  It's going into my stash for the time being.  Now, I'm not doing anymore crafting for a while as I'm off to watch the Men's Free Skate from Sochi - we get to see all the competitors.  Should be a great competition too!  That's all for now - see you tomorrow.

signature

Thursday, 13 February 2014

A flutter of butterflies .....

... or that could be swarm, rabble, kaledioscope or rainbow!  I've check online and there are quite a lot of collective nouns that relate to butterflies.  I think my favourites are flutter and rainbow!!  Why am I rambling on about butterflies?  Here's why:

Happy Birthday - photo by Deborah Frings - Deborah's Gems

Stamps: Uniko Studio - Label Love: Birthday
Inks: Stampin' Up! - Melon Mambo
Accessories: White Lustre Card; Kaisercraft DP - Secret Admirer, Pickled Pear, Remember Me, Periwinkle, Tigerlilly, Elegance; SU Punch - Elegant Butterfly; Gems; SU Marker - Melon Mambo


I've used the layout from this week's Freshly Made Sketches - FMS#123 and the theme of butterflies is from Fusion - FUSION#4.  I used some of my scrap bits from Kaisercraft pads and punched out lots of butterflies.  After attaching them all to the card, I added a tiny gem to each one.  I drew the ribbon using a marker and stamped the bow (can't draw them!).  I finished the front with a simple birthday sentiment also stamped on a butterfly (hiding the fact that the first stamp was slightly wonky!).  At the moment the inside is blank, but I might go back and add a greeting.

I'm not sure how I feel about this card - I had an idea in my head, but I'm not sure it works!  Still, I thought I'd share and see what you think.  That's all for now!

signature

Wednesday, 12 February 2014

Collage with stencils .....

... Good morning.  No card to share this morning, just a few of the collages that I made on Sunday.  I went to a craft class held at Stampeddler (my local craft shop) and run by Valerie Brincheck.  I always enjoy Valerie's classes - we get very inky and have lots of fun.

The class description was a "couple of hours experimenting with rubber stamp ink, paints, pastels, and mica sprays to create layered collage backgrounds for journals, card or scrapbook pages".  We were a mixed bunch of seasoned crafters and some newbies, but we all had a ball.

Unique - photo by Deborah Frings - Deborah's Gems

This is the first one I made.  I used a mixture of Distress pads, markers, stains, and various other ink pads.  I picked three colours - Salty Ocean, Mowed Lawn and Seedless Preserves - wiped them onto my craft sheet, spritzed with water and smooched the watercolour paper into the inks.  Then I simply added layers of texture with stencils.  I made sure to include text, organic and geometric patterns.

Art is - photo by Deborah Frings - Deborah's Gems

This was number two - almost exactly the same background colours, just changed out the purple for Mustard Seed.

Funky, freaky - photo by Deborah Frings - Deborah's Gems

This was the last one I made.  I was determined to go for colours that I didn't normally use, I had planned on yellows and oranges, but ended up with Barn Door, Seedless Preserves and Picked Raspberry.  I didn't manage to complete this at the class (it was only two hours and we really could have spent the whole afternoon there).  I completed it at home by adding the leaves, the silver flowers (with which I wasn't entirely happy) and the black stars.

These pieces all measure 8" × 6", a bit too big for a card and I don't really want to cut them down, so I think I'm going to put them in frames and have them on my craft room wall.

Today I'm off to a Stampin' Up! class at Karin's which will be just as much fun, but perhaps, not quite as messy!  I'll post pictures of what we make later.  Bye for now!

signature

Tuesday, 11 February 2014

ASM - Make Your Mark ....

....  Good evening everyone!  You really enjoyed our Anything Goes challenge last week - it's going to be so tough to pick a winner!!  It's time for our Make Your Mark challenge at Addicted to Stamps and More!  In this challenge your creations must feature the use of markers - Copics, Promarkers, Pencils, Gels, etc.  Here's my take:

Stitched with Love - photo by Deborah Frings - Deborah's Gems

Stamps: StampArt Design - Stitched with Love
Accessories: White Lustre Card; Sakura Pens - Stardust, Glaze and Moonlight

This is about as clean and simple as it gets.  I simply printed this fun digi image, from our sponsor StampArt Design, directly on my card and coloured it.  I used Copic pens for the frame and a selection of Sakura pens for the main image.  I used glaze on the hearts, they have a wonderful shine in real-life, sadly not caught in the photo!  But I took a close up which really catches the shine on the hearts!  To colour the hills I used glaze, stardust and moonlight pens in shades of green.  I left the inside blank for me to write a message.

Stitched with Love up close - photo by Deborah Frings - Deborah's Gems

I based the colours on the ones from this week's CAS - Colour & Sketches - CASC&S#60, the layout is based on the sketch at CAS(E) this Sketch - CTS#63 and it's a one layer card so I'm going to submit it to Less is More - LIM#158 where the theme is Anything Goes so long as it's one layer. 


The winner of this week's challenge will get 5 digi images from StampArt Design. 


We are joined again this week by our Guest Designer, Dawn of Lily Pink Scraps, she and the rest of the team have some wonderful inspiration cards for you.  Have fun!  See you soon.

signature

Monday, 10 February 2014

Honeycomb birthday ....

.... Good afternoon!  Just a quick post with a birthday card made using a couple of challenges:

Honeycomb Birthday - photo by Deborah Frings - Deborah's Gems

Stamps: Stampin' Up - Itty Bitty Banners, Six Sided Sampler; Hero Arts - Hexagon BG; CAS-ual Friday Stamps - Wonderful Words
Inks: SU - Wisteria Wonder
Dies: SU - Framelits Bitty Banners
Accessories: White Lustre Card; SU Card - Wild Wisteria; SU Punch - Hexagon; SU - Button


I was in Archivers last week and got the hexagon background stamp - a real bargain!  I stamped the background directly onto the card base, cut a panel of white card and adhered it on top.  I stamped the floral hexagon, punched it out and adhered it to the card.  I finished the front with the flag birthday sentiment, attached with dimensional gel and the nickel button.  On the inside I cut a mat layer in lilac and on the white panel stamped a few more hexagons and added a fun sentiment.

Honeycomb birthday inside - photo by Deborah Frings - Deborah's Gems

Darn, I've just seen that I've missed the deadline for the Colour Me challenge!  I really must make sure that I write down all the challenge details - especially the submission time!!  Oh well, never mind.  That's all for now - off to get dinner for the family.  See you soon.

signature

Saturday, 8 February 2014

Baby card ....

... Hello again - yes, I know three posts in one day!!!  This is a quick post with a sweet little baby card that I've made for a couple of challenges:

Edited to add:  Ardyth has pointed out to me that this is monochromatic pinks and thus falls within the challenge at The Card Concept - CC#3!!!  Do you know, I even had that challenge in my note book and completely forgot to add it, silly me!
You + Me - photo by Deborah Frings - Deborah's Gems

Stamps: Waltzingmouse - Compact Sentiments; Lawn Fawn - Science of Love; Amy Tangerine - Aspire; Docrafts - Hand Script Numbers, Hallmark Baby
Inks: Stampin' Up! - Melon Mambo, Real Red, Pink Pirouette; Memento - Grey Flannel; Versafine - Onyx Black
Accessories: White Lustre Card; SU Card - Raspberry Ripple, Pink Pirouette; SU DP - Pink Pirouette; Copics; Clear Embossing Powder; SU Markers - Real Red, Pink Pirouette


I've been thinking about the CASology challenge most of the week, trying to come up with something a bit different.  And this morning it came to me - you, me & baby makes three!  So I decided how to get that into a card.  I've used several sets - Lawn Fawn for the "you + me", Amy Tangerine for the ampersand and Docrafts for the baby bear and number.  I stamped the bear directly onto the card and again on design paper, coloured the bear and then adhered the cut out towel.  I stamped the ampersand onto card, heat embossed and then cut it out and attached it to the card with dimensional tape.  I stamped the two word bits directly on the card base and added the equals sign by hand.  On the inside I made a mat layer in pink and stamped a sweet sentiment.

You + Me inside - photo by Deborah Frings - Deborah's Gems

I had a really great time this morning watching the Team Ice Skating competition on NBC sports channel.  It was live and I got to see most of the action.  I really enjoyed the Ice-Dance section and there's more to come this afternoon with the Ladies part of the competition.  Jonathan is down in Ohio attending a photo shoot and Kathryn is off to a friend's birthday party this evening and again tomorrow!  So in between the Olympics I have lots of time to craft - my idea of a perfect weekend!!  That really is all for now - see ya!

signature

WMSFC - Colours ....

... Hello again!  I'm back with our new challenge at Waltzingmouse Fanatics.  This time we have a colour challenge - there are six colours in the palette and you have to use at least three of them.  I think these are all my favourite colours.  Don't forget you can make anything for the challenge, a card, scrapbook layout, 3D project - but you MUST include at least one Waltzingmouse stamps, digi or sentiment.  Here's my card:

Amazing - photo by Deborah Frings - Deborah's Gems

Stamps: WMS - Free Spirit Boy; Impression Obsession - You are Amazing
Inks: Stampin' Up! - Wild Wisteria; Memento - Tuxedo Black
Accessories: SU Card - Naturals Ivory; Copics; Promarkers


Do you ever have an idea of a card in your head and then end up with something completely different?  Well, that's what happened with this card.

I used the sketch from Clean and Simple Stamping - FTL279 for the layout and the theme is from this week's Keep it Simple - KIS#33 where the key word is "TROPICAL" and, obviously, the colours are from our challenge.  From the graphic I took the two shades of purple, the dark teal and ivory.  I made the card from Naturals Ivory (lovely card which I don't use often enough).  The card has a subtle texture which you can see in the stamped sentiment!  I actually like the slightly distressed look.  I used my all time favourite set from Waltzingmouse - Free Spirit Boy - and stamped the hibiscus flowers several times onto white card and then coloured them with Promarkers and Copics.  I cut them out and attached them to the card.  I know that hibiscus don't appear in nature in rich teal (sort of wish they did), but they certainly come in all shades of purple.  For the inside, I kept it ultra simple with just a stamp of the hibiscus flowers.

Amazing inside - photo by Deborah Frings - Deborah's Gems

Don't forget Tara has an inspiration card to share with you too.  You have plenty of time to play along with our fabulous colours, the deadline for submission is Thursday 20th February, 5.00pm GMT (that's Noon EDT).  Oh, were you wondering what my original idea was?  Well I had planned on using the surf boards from Free Spirit and making a guy card!  That's all for now!  Whatever you plan on doing this weekend, keep safe and warm.  Bye for now!

signature

52CCT - Colours ...

....  Hi!  It's time for our colour challenge at 52 {Christmas} Card Throwdown and Jacqueline has picked some wonderful colours.  There are five colours, you must use at least three of them and the yellow is gold!  I managed to use all the colours, here:

May Your Holidays Sparkle - photo by Deborah Frings - Deborah's Gems

Stamps: My Favourite Things - Seasonal Sentiments, Sheet Music BG
Inks: Versamark; Versafine - Onyx Black
Dies: Spellbinders - Picot Edge Circles (S4-345) #3, Squares Lg (S4-126) #7; Die-namics - Fishtail Flags Layers Stax # 3 & 4, Fishtail Flags STAX #4
Accessories: White Lustre Card; SU Card - Basic Black; DPs: K-ology - Addison (Blue), Kaisercraft - Holly Bright (Green), Remember Me (Red); Gold and Clear Embossing Powder; Basic Grey - Candy Dots


I used the sketch from this week's My Favourite Things Wednesday Sketch Challenge - MFTWSC#162.  I like the layered look of the card and decided to let the design paper be the main focus.  I made the base from black card and on the white panel stamped the large sheet music background and embossed it in gold (that took rather longer than it should have!!!).  I cut a square in black and then made flags in red, blue and green.  I finished the front with a very simple sentiment in black and embossed with clear powder, adding a tiny enamel dot.  I attached the circle with dimensional tape.  Inside I made multiple layers with the design papers and a bold, simple greeting in black.

Holidays Sparkle inside - photo by Deborah Frings - Deborah's Gems

For more inspiration with our colours, check out the cards from the rest of the team, as always, they are just lovely!  Looking forward to seeing your creations.  Bye for now.

signature

Friday, 7 February 2014

Love you .....

....   Good morning everyone!  Today is the official opening of the 22nd Winter Olympics at Sochi.  I love these games, I've always been a big fan of ice skating, and being in the US there is quite good coverage.  I suspect a lot of that is because they do have good medals chances in most of the disciplines.  I would like to see the British team, but sadly I don't think they will may the cut!  Hey ho!!

Time to share a card that I made for a few challenges:

Love You and Coffee - photo by Deborah Frings - Deborahs' Gems

Stamps: Impression Obsession - Smell the Coffee; Verve - Better with You; Lil' Inkers - Coffee Cozy; Stampin' Up! - Tea Shoppe; Hero Arts - Need Caffeine
Inks: SU - Marina Mist, Pear Pizzazz, Chocolate Chip
Dies: Lil' Inkers - Coffee Cozy
Accessories: White Lustre Card; SU Card - Marina Mist; Copics; Linen Thread


I used almost all my coffee stamps sets on this card!  Yes, I know I've a lot, but I adore coffee!!!!  I used the Retro Sketch for the layout, the colours from CAS - Colour & Sketches and the inspiration from Curtain Call, although I did change it from cocoa to coffee. 

I made the background from a mat of blue and a white panel stamped steaming with coffee cups, which I coloured with Copics and then cut into bands.  Instead of buttons I used little coffee cups.  I kept the main panel fairly simple with a bold sentiment, some thread and the steaming coffee cup which I adhered with dimensional gel.  The little coffee band was coloured with Copics.  On the inside I did a mat layer in blue, some coffee stains and a little pun sentiment!

Love You and Coffee inside - photo by Deborah Frings - Deborah's Gems

I had lots of fun with this card.  I'm keeping this one in my stash.  I tend to have lots of cards ready to give to Jonathan - just because!  That's all for now.  I've got a lot of housework to catch up on, some cards to make and I want to try and find the Winter Olympics online.  See you tomorrow for our new challenge at 52 {Christmas} Card Throwdown!  Bye, be safe.

signature
Related Posts Plugin for WordPress, Blogger...