Showing posts with label WMS - Alpine Christmas. Show all posts

Sunday, 1 November 2020

C24C - Christmas Landscape ...

... Good morning!! Hope you've all recovered from any Halloween celebrations you may have had. It was quiet in our village as we are in the middle of a "Firebreak" lockdown. Basically, that means people have been asked to stay at home. So we have! 

As it's the first of the month, it's time for our new challenge at Christmas 24 Challenge - C24C#21; we want to see Christmas Landscapes on your cards. Here's my take:


Stamps: Waltzingmouse Stamps - Alpine Christmas
Inks: Memento - Tuxedo Black; Gina K - Soft Stone, Slate, Stormy Sky, Christmas Pine, In the Navy, Whisper Amalgam; Verafine - Onyx Black
Accessories: White Card; Copic Markers; Glitter

I'm submitting this card to the current The Holly & The Ivy Christmas Challenge - H&ICC#82, where it's Anything Goes Christmas.


This is a one-layer card. I did lots of masking to create depth in the image. I started by stamping the trees, snowman and path at the bottom of the card. I covered this with a mask and stamped the Alpine lodge, covered this with a mask and then stamped the mountains. I started with the closest in darkest grey, covered with a mask, moved the stamp and used a couple of lighter shades of grey, masked them and finished with a very light grey. I added some chalets and trees behind the lodge. After removing the masks, I coloured the lodge and trees at the front of the card with Copic markers. I used a glue pen to lay down some glue and then added glitter - lots of glitter. I finished the front with a simply Christmas greeting at the top of the card. Here's a close-up of the card to show the sparkle from all that glitter:


Well, you can just about see the sparkle in the photo. In real-life it shimmers so much!! Don't forget to visit our blog to see more inspiration cards from the rest of the team. I look forward to seeing your cards. Bye for now.

signature photo Signature.png

Tuesday, 15 September 2020

C24C - Christmas Ornament ....

.... Morning! It's time for our new challenge at Christmas 24 Challenge - C24C#18. We have a sketch for you to use. You can turn it (as I did) but we must be able to see the sketch in your card. Here's mine:


Stamps: Waltzingmouse Stamps - Ornate Ornaments, Alpine Christmas
Inks: Versamark; Delicata - Golden Glitz; Versafine Clair - Summertime; Memento - Tuxedo Black
Dies: Spellbinders - 2010 Heirloom Ornaments (S4-283) #5
Accessories: White Card; Kasiercraft DP - A Touch of Gold, Chase Rainbows; Gold Embossing Powder; Black Ribbon; Copic Markers

I'm submitting this card to 52 Christmas Card Throwdown - 52CCT34-20 - where they have a fun colour combination - Black, Orange and Gold (white is allowed). Also playing along with The Holly & Ivy Christmas  Challenge - H&ICC#79 where it's Anything Goes.


I started by stamping the large ornament on white card. I removed the card from the MISTI and coloured the area under the pattern with an orange marker. I repositioned the card, stamped with Versamark and then heat embossed with gold powder. Before cutting out the image with the matching die, I stamped the sentiment and little snowflake. I cut a panel of black and gold design paper to cover the front of the card and added a strip of orange patterned paper down the centre. I then added the ornament and finished the front with a little black bow. On the inside, I cut a mat layer of orange design paper and on the white panel added a Christmas greeting and some tiny snowflakes.


This card uses some of my older, much loved stamp sets from Waltzingmouse Stamps - Claire your designs are as fresh now as they were then!

Don't forget to visit our blog to see more inspiration cards from the rest of the design team. I hope you have fun playing with the sketch and I look forward to visiting and leaving a comment. Bye for now - have fun!

signature photo Signature.png

Saturday, 1 August 2020

C24C - Black & Silver ....

... Morning!! It's been a while since I posted anything on my blog. I've been busy with Dylusions online classes - such a fun time. Also, Jonathan has been on annual leave for the past week and we've been going out and about. But I did make sure to find time to make a couple of cards for our new challenge at Christmas 24 Challenge - C24C#15 where we want you to use Black and Silver on your projects.


Stamps: Waltzingmouse Stamps - Alpine Christmas
Dies: Memory Box - Sparkling Tree Tile
Inks: Gina K - Obsidian Amalgam
Accessories: White & Black Card; Silver Linen Mirri Card; Silver Greeting Label

I used black cardstock to make the card base. I placed the tree die cut on the front of the card and cut out the tree and adhered some silver linen mirri card behind to show off the pattern. I kept the card very simple by adding a silver circle Christmas greeting label. On the inside I cut a panel of white card and added a lovely Christmas verse.


I was having such fun that I made another card using only a die cut image and black card:


Stamps: Waltzingmouse Stamps - Alpine Christmas
Dies: Memory Box - Glowing Candles
Inks: Gina K - Obsidian Amalgam
Accessories: White & Black Card; Silver Mirri Card; Nuvo - Aquashimmer Brushes

For this card I simply die cut the candles from silver mirri card, adhere it to the front of the card and add some sparkle to the inside of the candle and around the candle flames. On the inside I cut a panel of white card and used the same greeting as the portrait card.

That's all from me today. See you again soon.

signature photo Signature.png

Wednesday, 1 July 2020

SHC - Retro Christmas ....

.... Morning! Can you believe that it's July already, no, me neither!!! Sorry I've been missing for a while, so busy at home. However, it's time for my new post at Seven Hills Craft blog - I've made a couple of retro style Christmas cards. Here's the first:


Stamps: Hero Arts - Mod Pattern Bold Print Background, Stylized Christmas Trees, Retro Christmas Messages
Inks: Delicata - Golden Glitz; Gina K - Jelly Bean Green, Jet Black Amalgam
Dies: Spellbinders - Petit Ovals Small (S4-140) #5; Hero Arts - Stylized Christmas Trees, Retro Christmas Messages
Accessories: White Card; Red Glitter Paper

I'm submitting this card to Merry Little Christmas Challenge - MLCC#24 where it's Any Christmas Goes.


I really like this background image - I think the repeating star gives quite a festive look, especially in shimmery gold ink. I die cut a large red glitter oval and adhered it to the centre of the card. Using the same gold ink I stamped a funky, neon sign style message, and die cut it with the matching die. I was going to leave the card there, but decided to add a retro Christmas tree too. On the inside, I cut a mat layer of glitter paper and on the white panel simply added a Christmas greeting and another of the funky Christmas trees.


For my next card I had in mind a lovely winter scene at a mountain resort with fir trees, snow, decorated trees and neon signs - this is it - sort of:


Stamps: Hero Arts - Mod Pattern Bold Print Background, Stylized Christmas Trees, Retro Christmas Messages; Waltzingmouse Stamps - Alpine Christmas (discontinued)
Inks: Gina K - Stormy Sky, Fresh Asparagus, Jet Black Amalgam
Dies: Spellbinders - Petit Ovals Large (S4-138) #6; Hero Arts - Stylized Christmas Trees, Retro Christmas Messages
Accessories: White Card; Red Glitter Paper; Clear and Iridescent Embossing Powders

As you can tell from the picture, this turned out a bit wonky!! The papers slipped when they went through the Big Shot, but never mind, it's part of the charm of a handmade card 😀. I stamped the mountain scene directly on the card. On white card I stamped the 'bauble' tree and two Christmas messages. I cut them out the the matching dies. I adhered the decorated tree directly to the card, then added the oval frame and finished with the two 'neon' Christmas messages. On the inside, I cut a mat layer of red glitter paper and on the white panel added a simple greeting and another tree.


That's all from me today - see you soon.

signature photo Signature.png

Tuesday, 27 August 2019

Birthday Wishes ....

... Hello, good afternoon!  After a wonderful Bank Holiday weekend we now have rain - it's still warm, but really damp!!  I'm here to share a birthday card:


Stamps: Waltzingmouse Stamps - Alpine Christmas, Teeny Trees, USA 1776
Inks: Gina K - Black Onyx, Innocent Pink, Sweet Mango, Red Velvet, Fresh Asparagus; Versafine Clair - Twilight, Morning Mist
Accessories: White Lustre Card; Nuvo Clear Aquashimmer Brush

A couple of days ago Kat asked me if I had an volcano stamps and sadly in my vast collection of stamps I didn't have a volcano, and I didn't have time to order one of the many cute volcano sets.  So, I checked through my catalogue and found some stamps from Waltzingmouse that I could use to create a volcano.  I stamped the mountains from Alpine Christmas in Versafine Clair ink. Then I masked the mountains and used the firework explosions from USA 1776 to make the exploding magma. I finished the card by adding some trees in the foreground and a simple birthday greeting.  On the inside, I kept it simple, just adding some more firework bursts.  I did add some sparkle to the "magma" with my clear aquashimmer brush, but you can't really see it in the photo.  And the reason for this request, Kat is going to a birthday party tonight and her friend loves volcanoes!!


I'm submitting this card to Addicted to CAS - ATCAS#166 where they want a one-layer card, and also to Seize the Birthday - STB#172 where they want birthday cards.


It's been a couple of weeks since my last post.  I've been busy spending time with the family.  Kat had her AS level results on 15th August, and I'm a very proud mum - she got 4 B grades.  This is excellent as Kat has coped with so much in the last year - a move from Michigan back to Northop Hall, settling back into the UK education system and making new friends - Kat is a star!  We had a long weekend in London to celebrate - such a fun time.  Work is continuing on the garage conversion. The new bathroom is going in, we've moved some plumbing and next week the underfloor electric heating goes in. Hopefully on a few more weeks and Mum can move into her new accommodation.

Anyway, that's all for now. 

signature

Saturday, 9 January 2016

52CCT - Sketch ....

.... Hello! I hope everyone has settled back into their normal routines.  I'm still not quite back to normal - somehow I lost days last week, but I'm getting there.  I'm hosting our challenges over at 52 Christmas Card Throwdown - 52CCT01-16 this month.  Our aim is to give you inspiration to build your Christmas card stash, so that you have time to relax in December.  As normal, our first challenge of the month is a sketch and I had lots of fun coming up with this one.   Here's my card:

Merry Christmas - photo by Deborah Frings - Deborah's Gems

Stamps: Waltzingmouse - Alpine Christmas, Vintage Postcards, Off Beat Backgrounds, Vintage Circles Small; Stampin' Up! - Sheltering Tree
Inks: Versafine - Onyx Black; SU - Soft Sky, Marina Mist, Smokey Slate
Accessories: White Lustre Card; SU Card - Smokey Slate; Glitter


I used the colours from CAS - Colours & Sketches - CASC&S#155 as they seem just perfect.  I'm also submitting this card to the current Jingle Belles - JB:16:01 challenge where they would like us to use something brand new along with something old from our stash.  The new is the Vintage Postcards stamps (not brand new to me, but never used before) and the old is the rest!

I'm very pleased with this card; I wanted to challenge myself to make a one-layer, collage style card and I did it!  I used my MISTI to make sure that I got all the stamps straight, and I was able to stamp the tree a number of times to make it slightly darker then the stripes.  I finished the front by adding some sparkle to the dotty circle.  On the inside I cut a mat layer of grey card and on the white panel I stamped another tree and a Christmas greeting.

Merry Christmas inside - photo by Deborah Frings - Deborah's GemsMerry Christmas sq - photo by Deborah Frings - Deborah's Gems

Don't forget to visit our blog and see the inspiration cards from the rest of the team.  You've got plenty of time to join in, deadline for submission is midnight (GMT) Friday 15th January (that's 7.00pm EDT).

This weekend is the Plymouth Ice Festival.  It started yesterday evening and runs through until Sunday.  Jonathan and I went last year when it was so, so cold with temperatures well below freezing. Which is just the kind of weather the organisers would like.  However, the forecast for today is rain showers this afternoon with a maximum temperature 7°C (45°F), which is not great!  We're going first thing in the morning, when it should still be cold and hopefully the sculptures won't have started melting!  That's all for now - have a great weekend!

signature

Monday, 7 December 2015

AC - Merry Creepmas - 12DOC ....

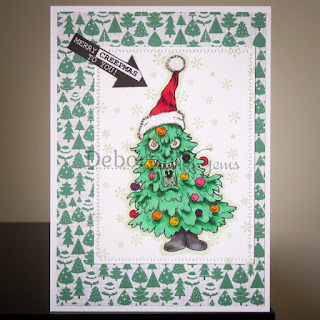
.... Morning!  I'm running a bit late with this card, I should have finished it yesterday, but we were out at a photoshoot and by the time we got home and finished watched some TV, I was just too tired.  So I completed it this morning!  It's Day 4 of the 12 Days of Creepmas sponsored by Smeared Ink and I've got a fun, in a creepy sort of way, card to share with you:

Merry Creepmas - photo by Deborah Frings - Deborah's Gems

Stamps: Rick St Dennis Digi - Creepmas Tree Monster, Stampin# Up! - Wonderland; WMS - Alpine Christmas
Inks: Stampin' Up! - Cucumber Crush, Pistachio Pudding
Dies: Die-namics - Zig-Zag Stitched Rectangles Stax #5
Accessories: White Lustre Card; Kaisercraft DP - Holly Jolly; Copic Markers; Glitter; Glossy Accents; Wink of Stella - Clear


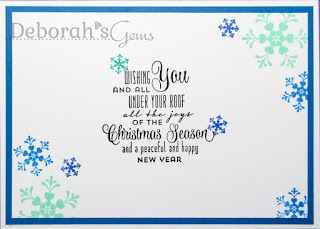
This one is a really quick and simple card.  I stamped this fabulous tree on white card, coloured his with Copic markers and cut it out with a die.  I added sparkle to the baubles using a clear Wink of Stella brush.  I used some glitter on his Santa hat and added glossy accents to his eyes.  I stamped a flurry of pale green snowflakes all round him.  I cut a panel of design paper and adhered that the the card.  I attached the die cut image and finished with a customised sentiment (also from the Kaisercraft paper pack).  On the inside I cut a mat layer of design paper and added a tag greeting on the white panel along with a few more snowflakes.

Merry Creepmas inside - photo by Deborah Frings - Deborah's GemsMerry Creepmas inside - photo by Deborah Frings - Deborah's Gems

As I've got a lovely flurry of snowflakes falling on this card, I'm going to submit to Inkspirational - INK#97 where the cue word is FLAKE and also to The Paper Players - PP#274 where the theme is LET IT SNOW.  I took a close up of the tree so that you can see the glossy accents on his eyes - he's crazy.  You can find this fab Creepmas Tree Monster at Rick's Zibbet shop and he's currently on sale too!!!   Here's the 12 Days of Creepmas Blog Hop list:


Fiona
Black Dragon
Susan R
Jessica
Suzi
Airless Chambers
Deborah
Susan S
Val
Sarah
Kat
Leigh
Lady Brayton
Sue

That's it for now - see you soon.

signature

Sunday, 6 December 2015

Merry Christmas ....

.....   Hello!  I've had a busy year making Christmas cards, so I thought it would be a good idea to count how many I've actually made.  I'm on the design team for 52 Christmas Card Throwdown so I knew I'd have a good amount of cards - well at least 50!  I'm pleased to say that I've made 88 cards, which is brilliant.  However, I actually need about 115!!!  So I need a few more cards!  Here's one I made yesterday afternoon:

Merry Christmas - photo by Deborah Frings - Deborah's Gems

Stamps: Stampendous - Mega Merry; Uniko - Simply Said Christmas; Waltingmouse - Alpine Christmas; Snowflake Tree (don't know the company)
Inks: Versamark; Versafine - Onyx Black; Distress - Lucky Clover, Cracked Pistachio, Salty Ocean, Blueprint Sketch
Accessories: White Lustre Card; Stampin' Up! Card - Pacific Point; Ranger - Holographic Embossing Powder


I started by stamping the snowflakes in Versmark and embossing them with Holographic powder.  I sponged on two shades of blue and two shades of green ink blending to reveal the sparkling snowflakes.  I cut a panel of white card, slightly smaller than the card, and stamped the word "merry" and "Christmas" in black ink.  I used a scalpel to cut out the inside of the letters in merry and then went round the cut edges with a black marker.  I adhered the panel over the inked snowflakes and attached the whole panel to the front of the card.  On the inside I cut a mat layer of blue card and on the white panel added a Christmas greeting and lots of blue and green snowflakes.

Merry Christmas inside - photo by Deborah Frings - Deborah's GemsMerry Christmas sq - photo by Deborah Frings - Deborah's Gems

I've actually managed to combine four challenges to make this clean, simple card, and they are:

I think I'm going to have to come up with a really quick, clean and simple design that I can mass produce over the next few days!  But not today.  Today, I'm off to a photoshoot with Jonathan - should be lots of fun!  And that's all for now, see you tomorrow.


signature
Related Posts Plugin for WordPress, Blogger...