Showing posts with label WMS - Tis the Season. Show all posts

Saturday, 22 October 2016

52CCT - Technique & DT Call ....

.... Morning! It's time for our new challenge at 52 Christmas Card Throwdown (52CCT42-16) and we have a really fun technique for you. Kaja has picked EMBOSSING - you can you dry embossing or heat embossing. I've used both on my card:

Christmas Wishes - photo by Deborah Frings - Deborah's Gems

Stamps: Waltzingmouse - Cabin Plaid Background, Tis The Season, Folk Art Christmas Additions
Inks: Kaleidacolor - Fruitcake; Versafine - Onyx Black; Delicata - Golden Glitz; Versamark
Dies: WMS - Folk Art Christmas
Accessories: White Lustre Card; Stampin' Up! DP - Cherry Cobbler; Cuttlebug EF - Snowflakes; Embossing Powder - Silver, Gold Tinsel


I've used one of my all time favourite stamps on this card - the plaid background from Waltzingmouse Stamps - sadly this is no longer available. I used a Kaleidacolor inkpad to give this wonderful ombre festive background. I dry embossed a scrap of white card with some snowflakes and then cut them to size. I added a touch of gold to the embossed snowflakes. I stamped the bell in Versamark and added silver and gold tinsel powder and heat embossed - I love the shimmer this gives. I cut the bell out with the co-ordinating die. I finsihed the front with a bold Christmas sentiment from Waltzingmouse. This set, Tis The Season, is available from Gina K Designs as Claire Brennan now designs for Gina. On the inside I cut a mat layer of dark red design paper and on the white panel added a greeting and a gold bell.

Christmas Wishes inside - photo by Deborah Frings - Deborah's GemsChristmas Wishes sq - photo by Deborah Frings - Deborah's Gems

I'm playing along with Merry Monday - MM#218 where they want to see plaids. And also with Freshly Made Sketches - FMS#259 as I used their sketch for the layout.

Do visit our blog to see more inspiration from the rest of the Design Team. Just a reminder that we are having a DT Call - do check the blog for full details. That's all for now!

signature

Wednesday, 16 December 2015

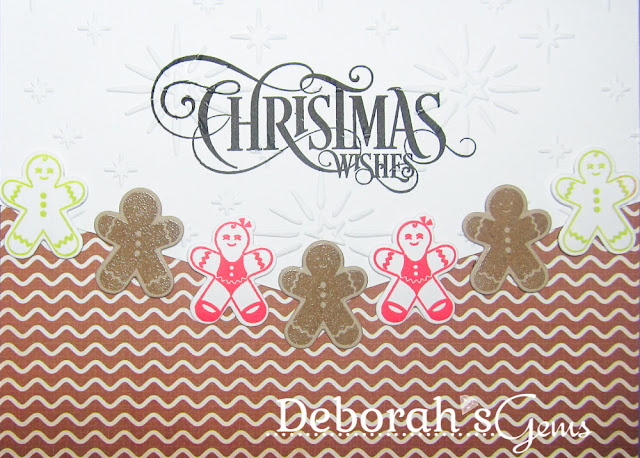
Christmas Wishes ....

... Good Morning!  We had a really wonderful evening last night.  It was the first night of the Christmas Choir concerts at Northville High School.  The choirs at the school are superb.  Kat and a group of her friends had a small ensemble bit during Joy to the World, so proud of her.  The Chorale Choir, made up more advanced singers, sang "O Come, O Come Emmanuel" as they walked into the concert hall - it was magnificent.  I am now totally in the spirit of Christmas - spent all day yesterday listening to Christmas music and making more Christmas cards.  The ones I make now will be for next year's stash!!  Here's the one I made:

Christmas Wishes - photo by Deborah Frings - Deborah's Gems

Stamps: Waltzingmouse - Oven Fresh Gingerbread Joy, Tis the Season; Stampin' Up! - Endless Wishes
Inks: Memento - Lady Bug, Pear Tart; Versamark; Versafine - Onyx Black
Dies: Waltzingmouse - Gingerbread Family
Accessories: White Lustre Card; Kaisercraft DP - Gingerbread; Crafter's Companion EF - Star; Clear Embossing Powder


I'm submitting this card to a few challenges:

When I saw that the Merry Monday theme was baking I knew that I wanted to use my little gingerbread stamps.  The colours at Colour Q are just perfect for a festive look.  I stamped three gingerbread kids in Versmark on kraft card and heat embossed them with clear powder, and then  I stamped two red and two green gingerbread kids.  I cut them all out with the coordinating dies.  In my stash I found the perfect design paper - Gingerbread, by Kaisercraft - and used a piece that reminded me of icing on gingerbread to cover the bottom of the card.  I cut a panel of white card, stamped the sentiment and then embossed it for more detail.  I finished the front by adhering the gingerbread kids.  On the inside I used another piece of design paper for the mat layer and on the white panel added a Christmas greeting, along with a couple more gingerbread kids!

Christmas Wishes inside - photo by Deborah Frings - Deborah's GemsChristmas Wishes sq - photo by Deborah Frings - Deborah's Gems

On Facebook I've seen photo that my friends and family have posted of their wonderful Christmas trees.  We don't have ours up yet, so I think today I'm going into the basement to find the tree and all the decorations and make our house look festive too!  That's all for now.  See you tomorrow.

signature

Sunday, 29 November 2015

Christmas Wishes ....

.... Good morning!  It's the last day of our long holiday weekend, we've all had a really good time.  It's been mostly lazy, but I've also had time to play in my craft room.  I've another Christmas card to share with you this morning:

Christmas Wishes - photo by Deborah Frings - Deborah's Gems

Stamps: Uniko - Essentially Christmas, Balloon Bash; Waltzingmouse - Tis the Season
Inks: Versafine - Onyx Black; Kaleidacolor - Blue Breeze
Accessories: White Lustre Card; Stampin' Up! Card - Tempting Turquoise; Gloss Card; Clear Embossing Powder; Pearlescent Embossing Paste; SU Punch - Christmas Ornament (discontinued)


Yesterday I shared a couple of cards that I'd made using some brayered gloss card - I had a bit left over, so I punched out three Christmas Ornaments.  I used the sketch from CAS(E) this Sketch! - CTS#150 for the layout and, as I've used some left over stash, I'm also playing along with Jingle Belles - JB:15:24 where the team want us to create a card with left over bits.  Finally, as the colours here are white, blue with textured snowflakes, I'm playing along with Merry Monday - MM#181 - I've managed two cards this week!

I turned the sketch to make a landscape card and stamped the sentiment in Versafine Onyx Black and heat embossed it with clear powder.  I ran the ornaments through my Xyron to make them self-adhesive and attached them to the front of the card.  I added string to them and finished with some fancy bows.  On the inside I cut a mat layer of turquoise card.  On the white panel I added a simple Christmas sentiment and a few blue stars.

Christmas Wishes inside - photo by Deborah Frings - Deborah's GemsChristmas Wishes sq - photo by Deborah Frings - Deborah's Gems

Today I'm off to the regular monthly meeting of the Scrappy Chic Kitchen Roll Sprayers club - where we get to work on our art journals.  It's the perfect way to bring this weekend to a close.  I hope that all my American friends have enjoyed the holiday weekend.  Be safe and see you soon.

signature

Saturday, 31 October 2015

52CCT - Pick a Previous ...

....  Hi!  I'm rather late with my card for this week's challenge at 52 {Christmas} Card Throwdown.  As we have five Saturdays this month, we have a PICK A PREVIOUS challenge and April has opted for a THEME.  I had quite a few ideas in my head, but just couldn't get anything on a card.  But this morning when I woke up I knew exactly what to make - I dreamt this card!!!

To Be Jolly - photo by Deborah Frings - Deborah's Gems

Stamps: Waltzingmouse - Two Step Sprig, Tis the Season, Flurries
Inks: Memento - London Fog; Versafine - Onyx Black; Brilliance - Twilight
Accessories: White Lustre Card; Stampin' Up! Card/DP - Basic Black; Martha Stewart Glitters; Glue Pen


I've gone right back to October 2012 for my theme - we wanted Christmas Fairy Lights.  I'm also playing along with the current Merry Monday Challenge - MM#177 where the team would like to see Christmas lights and Glitter, and over at Time Out Challenges - TOC#43 the theme is Christmas with the optional twist of using Pink and/or Purple.

I don't actually have any Christmas light stamps, but going through my stamp catalogue I realised that this leaf sprig looked a bit like lights.  I stamped them directly on the card in pale grey and added glue to the leaves and applied lots of lovely glitters.  I stamped the sentiment on scrap card, carefully cut it out and adhered it some black design paper.  I attached the sentiment to the card with dimensional gel.  On the inside I cut a mat layer of black paper and stamped a Christmas greeting and some snowflakes on the white panel.

To Be Jolly inside - photo by Deborah Frings - Deborah's GemsTo Be Jolly sq - photo by Deborah Frings - Deborah's Gems

I'm really pleased that I went back to the October 2012 challenge, as looking at the list of players, I realise I didn't actually get to play along that week.  I'm really pleased with the shimmer and sparkle on my "Christmas Lights".  Do visit our blog to check out the previous themes the rest of the team have gone with.  

Before I go, I'd like to wish everyone a very Happy Halloween.

Photo credit
We're going to downtown Northville this evening so that Ben and Sophie can experience an American style Halloween - it should be lots of fun.  The weather forecast is not great, but I don't think that'll stop us having fun!

signature

Wednesday, 14 October 2015

ASM - Anything Goes ....

... Evening all!  It's time for our ever popular ANYTHING GOES challenge at Addicted to Stamps and More!  As it's only just over 10 weeks to Christmas, and I need still more cards, I decided to make a Christmas card:

Let it Snow - photo by Deborah Frings - Deborah's Gems

Stamps: Waltzingmouse - Opera Tags Christmas, Alpine Christmas, Warm Fuzzies, Tis the Season
Inks: Stampin' Up! - Bermuda Bay, Lucky Limeade
Dies: Spellbinders/WMS - Opera Tags
Accessories: White Lustre Card; SU Card - Bermuda Bay; Crafter's Companion EF - Star; Glitter; Thread; Quickie Glue Pen


I used the sketch from CAS Colours & Sketches - CASC&S#145 for the layout and, as there's lots of sparkly glitter on this card, I'm submitting to Addicted to CAS - ATCAS#74.

I stamped the gorgeous Opera Tag image in two shades of green and added the sentiment in the middle.  I used my glue pen to add glue to the image and then applied lots of glitter.  I cut another tag and adhered them together.  I embossed the panel with some stars, brushed the ink pad across to bring out the stars and finished by adding more glitter.  I found some thread in my stash that went with the colours I used, lay it on the card and then adhered the finished tag with dimensional gel.  On the inside I cut a mat layer of teal card and added a sentiment and snowflakes to the white panel.  I've taken a close up of the card to show all the lovely sparkle.

Let it Snow detail - photo by Deborah Frings - Deborah's GemsLet it Snow inside - photo by Deborah Frings - Deborah's Gems


Our sponsor for this week's challenge is Sweet Pea Stamps - where you can find a wonderful selection of both rubber stamps and digital stamps.  The winner of our challenge will get a prize of 4 digi images from the shop.  Now don't forget to visit the blog to see what the rest of the team have made to inspire you this week.  Have fun!!

signature

Saturday, 26 September 2015

52CCT - Technique ....

... Good morning!  Welcome to the last challenge in September (where has this month gone?) here at 52 {Christmas} Card Throwdown.  Fabiola has picked a super technique for us to use on our Christmas/Winter cards - she wants to see REAL STITCHING.  We're not accepting faux stitching this week.

I have to admit that it did make me think abit.  I remembered something that I did at school (a while ago) that involved maths - Bezier curves.  I didn't understand the maths then, and I don't now, but the curves make great string art!  And that's what I did on my card:

Merry Christmas - photo by Deborah Frings - Deborah's Gems

Stamps: Waltzingmouse - Tis the Season, Alpine Christmas
Inks: Versafine - Onyx Black; Kaleidacolour - Pastel
Accessories: White Lustre Card; Stampin' Up! Card - Black; Linen Embossed Card; Metallic Thread

I decided to make a fairly simple card.  I cut a square of linen embossed card (which has been in my stash for years) and lightly drew on the x and y axes of a graph, and then pricked holes at 1/8th inch intervals along both axes, ending up with 24 holes along each line.  I rubbed out the lines and, using metallic thread, started to sew.  I started on the y axis coming up at 24 and taking the thread down at 1 on the x axis, then on to 23 and down at 2 and carried on until this beautiful curve is created.  I love the beautiful shimmer on the curves.  I stamped a very bold Christmas greeting in black in the centre of the panel.  I used dimensional tape to adhere the finished panel to black card and then attached it to the card blank.  On the inside I cut a mat layer of black card and on the white panel added another Christmas message and finished with some multi-coloured snowflakes to echo the multi-coloured thread on the front.

Merry Christmas inside - photo by Deborah Frings - Deborah's Gems

I took a close up of the stitching so that you can see the colours on the thread and see how the curve is constructed.


You'll find more inspiration using REAL STITCHING from the rest of the Design Team on our blog.  You've got plenty of time to join in - deadline for submission is midnight Friday 2nd October (7.00pm EDT).  Do have a go!!  See you soon.

signature

Saturday, 8 August 2015

52CCT - Colours ....

.... Hi!  It's time for our colour challenge at 52 {Christmas} Card Throwdown and Julie has picked traditional RED AND GREEN.  I've made a quite clean and simple card - there's not much white space, but it is very quick and easy to make:

Gnome to Yours - photo by Deborah Frings - Deborah's Gems

Stamps: Waltzingmouse Stamps - Jolly Old Elf, Cabin Plaid Background, Tis the Season
Inks: Kaleidacolor - Fruitcake; Versafine - Onyx Black
Accessories: White Lustre Card; Stampin' Up! Card - Real Red; Martha Stewart Coarse Glitter - Crystal


I've used the layout from this week's CAS(E) this Sketch - CTS#135.  I inked up the plaid background with my Kaleidacolor pad - shades of red and green and stamped the card.  I then stamped Santa (the Chief Elf) using only the two shades of red.  I fussy cut him out and then added glitter to his beard, hat and gloves.  I finished the front by stamping the sentiment directly on the card.  On the inside I cut a mat layer of red card and stamped a bold Christmas greeting on the white panel.

Gnome to Yours inside - photo by Deborah Frings - Deborah's GemsGnome to Yours sq - photo by Deborah Frings - Deborah's Gems

Don't forget to visit our blog to see inspiration cards from the rest of the team.  And while we've got traditional colours for you this week - you don't have to be traditional in design - can't wait to see what you make.  Have fun!!

signature

Saturday, 13 June 2015

52CCT - Colours ....

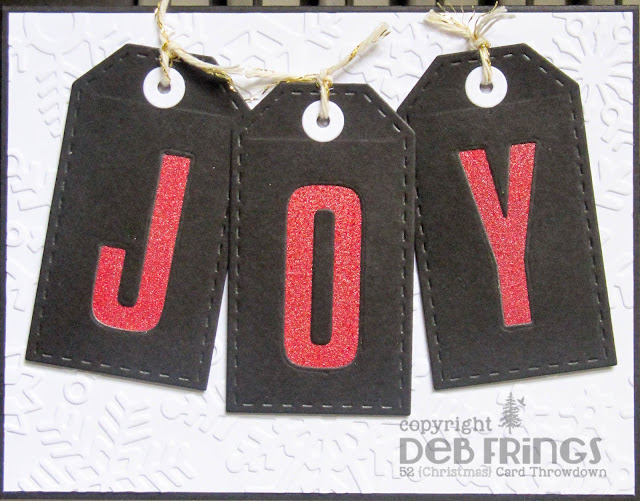
...  Good morning everyone!  It's time for our colour challenge at 52 {Christmas} Card Throwdown.  I think you'll enjoy this colour challenge - we want you to use BLACK, WHITE and ONE OTHER COLOUR on your Christmas or winter card.  I picked RED as my extra colour and went for a reasonably clean and simple card:

Joy - photo by Deborah Frings - Deborah's Gems

Stamps: Waltzingmouse - Tis The Season
Inks: Stampin' Up! - Real Red
Dies: WMS - Stitched Tag; Die-namics - High Rise Alphabet  Uppercase
Accessories: White Lustre Card; SU Card - Basic Black; Idea-ology - Deco Sheet Gold; Copics; Cuttlebug EF - Winter Wonderland; Bakers Twine


It seems that tag challenges are all over Blogland at the moment, we had one last week and this week Merry Monday - MM#162 wants us to use tags too!  Well I had to play along!  I made the base from black card.  I cut a panel of white card slightly smaller and embossed it with a snowflake pattern.  I die cut three black tags and cut out letters on each one to spell the word JOY.  I got to some gold deco paper at a recent show (ultra fine glitter paper) and used a red Copic to make my letters red.  I finished the tags with a white hole and some gold bakers twine.  I used dimensional gel to adhere the tags.  On the inside I cut a panel of white card and stamped a bold sentiment in red.

Joy inside - photo by Deborah Frings - Deborah's GemsJoy sq - photo by Deborah Frings - Deborah's Gems

I mentioned that I got a MISTI recently, well I'm so pleased that I used it to stamp the sentiment as the first impression really wasn't great.  But it was so easy to re-ink and stamp the sentiment - perfect on the second impression! Don't forget to visit the blog to check out what the rest of the team have made to inspire you.  You've got until Friday 19th July to play along.

By the time this post goes live, Jonathan, Kathryn and I will be in Arizona on holiday.  We spent Friday in Phoenix and today we'll be travelling towards Flagstaff.  So much to see this week!  That's all for now.

signature
Related Posts Plugin for WordPress, Blogger...