Showing posts with label WMS - Flurries. Show all posts

Saturday, 7 January 2017

CCT - Sketch ....

.... Good morning! I do hope that you've all recovered from your holiday celebrations. It always seems to me that it takes ages to get all the preparations done and then Christmas is gone in an instance!

The purpose of our challenges at our revamped Christmas Card Throwdown is to help in your preparations. Get a head start on the season by joining us on the first and third Saturday of each month, where we will provide you a variety of challenges including colours, themes, sketches, techniques and stash to help in your creative process.

The first challenge this year is a sketch - CCT01. It's quite a simple sketch - you can flip it, turn it, keep it very CAS or go full shabby chic - the choice is yours. However, we must be able to see the sketch in your finished card. Here's my take on the sketch:

Warm Winter Wishes - photo by Deborah Frings - Deborah's Gems

Stamps: Waltzingmouse - Scandi Doodle Christmas, Flurries; Stampin' Up! - Wonderland; Visible Image - Rays of Light
Inks: SU - Soft Sky, Crushed Curry; Versafine - Onyx Black; Memento - Tuxedo Black
Accessories: White Luste Card; Tim Holtz Watercolour Card; Clear Embossing Powder; Zig Clean Colour Brushes; Spectrum Noir Sparkle - Clear; Copics


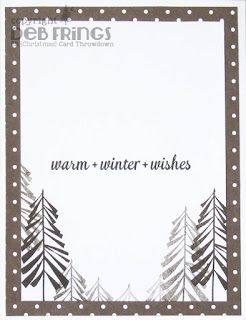
This card is not the one I had planned! I was going to create an envelope, but going through my stash of stamps I found this wonderful Christmas tree stamp and decided to use that instead. I stamped the image on watercolour card and heat embossed with clear powder. I used my Zig Clean Colour brushes and an aqua brush to colour the image. I find using watercolour paint a bit difficult, but using these pens gives a similar result and, for me, are much easier to use! I did use my clear Spectrum Noir sparkle brush to move some of the colours so the image has a lovely shimmer - sadly not visible above! Once the image was dry I fussy cut it out. I stamped some pale snowflakes all over the base of the card and added a star burst image behind the star. I ran the tree image through my Xyron to make it self-adhesive and then attached it to the card. On the inside I cut a mat layer of pale blue card. On the white panel I stamped a few more images from the Scandi Doodle set (this set is discontinued) and coloured them with a mixture of Copics and Zig Clean Colour. I finished by adding a simple sentiment.

Warm Winter Wishes inside - photo by Deborah Frings - Deborah's GemsWarm Winter Wishes sq - photo by Deborah Frings - Deborah's Gems

I took a close-up photo of the tree so you can see the details and, hopefully, a bit of the shimmer:

Warm Winter Wishes detail - photo by Deborah Frings - Deborah's Gems

Do visit our blog, Christmas Card Throwdown, to see our lovely new look and to see more inspiration cards from our newly expanded design team. Don't forget to visit them and leave some comments - we all love to receive them. As we now have challenges twice a month, it means you have longer to play. Deadline for submission to this challenge is midnight Friday 20th January, that's 7.00pm EDT.

I'm submitting this card to Love to Craft Challenge Blog - LTCCB#06 where it's ANYTHING GOES. I like this blog as you can submit any type of crafty project - it's worth a look! That's all for now!

signature

Saturday, 15 October 2016

52CCT - Theme & DT Call ....

... Hi! We're half way through October and it's only 10 weeks until Christmas! So I think our new challenge at 52 Christmas Card Throwdown - 52CCT41-16 might help to get you started on your cards. Of course, you may already have quite a stash. We have a theme for you this week - we want to see CHRISTMAS CRITTERS on your cards. Here's mine:

Warm Winter Wishes - photo by Deborah Frings - Deborah's Gems

Stamps: Waltzingmouse - Little Deer, Flurries; Uniko - Simply Said Christmas
Inks: Memento - Tuxedo Black; Versafine - Onyx Black; Distress - Tumbled Glass, Broken China, Mustard Seed
Dies: Die-namics - Wonky Stitched Circles #5; Lawn Fawn - Stitched Hillside Borders
Accessories: White Lustre Card; Stampin' Up! Card - Soft Sky;  Copics; Wink of Stella - Clear; Glitter


I had lots of fun making this card. I used the sketch from the current Fusion Challenge - FUSION#59 for the layout. I cut a panel of white card the same size as the base and die cut a circle at the top. I stamped the tree on the card base. I punched a small circle and masked off an area for the sun, then I blended some blues to create the sky. I added some yellow to the sun. I stamped the deer, cardinal, and pile of presents on some scrap white card and coloured them all with Copics.  The critter stamps I used for this card faced the wrong way, so to get them facing the right direction, I used the mirror stamping technique that I'd seen on Jennifer MacGuire's blog. I adhered the circle panel to the card, attached the critters and parcels and then die cut some snowy hills. I added lots of glitter for sparkle. On the inside I cut a mat layer of pale blue card and added another little critter in the corner and a greeting too.

Warm Winter Wishesinside - photo by Deborah Frings - Deborah's GemsWarm Winter Wishes sq - photo by Deborah Frings - Deborah's Gems

The little deer on the inside is exactly as the image stamps. Love the mirror technique, gives so many extra options for your stamps.

For more inspiration - do visit the blog to see more from the rest of the Design Team.

Don't forget that we're in the middle of a DT Call at 52 Christmas Card Throwdown. In order to be considered you have to do at least 3 of the 5 challenges this month. So if you've skipped the sketch and colours, you have to do the last three challenges this month. Full details are on the blog.

Kat and I have a crafting weekend planned. We are both attending classes by the awesome Dyan Reavley. Will share photos later. Have great weekend!

signature

Saturday, 31 October 2015

52CCT - Pick a Previous ...

....  Hi!  I'm rather late with my card for this week's challenge at 52 {Christmas} Card Throwdown.  As we have five Saturdays this month, we have a PICK A PREVIOUS challenge and April has opted for a THEME.  I had quite a few ideas in my head, but just couldn't get anything on a card.  But this morning when I woke up I knew exactly what to make - I dreamt this card!!!

To Be Jolly - photo by Deborah Frings - Deborah's Gems

Stamps: Waltzingmouse - Two Step Sprig, Tis the Season, Flurries
Inks: Memento - London Fog; Versafine - Onyx Black; Brilliance - Twilight
Accessories: White Lustre Card; Stampin' Up! Card/DP - Basic Black; Martha Stewart Glitters; Glue Pen


I've gone right back to October 2012 for my theme - we wanted Christmas Fairy Lights.  I'm also playing along with the current Merry Monday Challenge - MM#177 where the team would like to see Christmas lights and Glitter, and over at Time Out Challenges - TOC#43 the theme is Christmas with the optional twist of using Pink and/or Purple.

I don't actually have any Christmas light stamps, but going through my stamp catalogue I realised that this leaf sprig looked a bit like lights.  I stamped them directly on the card in pale grey and added glue to the leaves and applied lots of lovely glitters.  I stamped the sentiment on scrap card, carefully cut it out and adhered it some black design paper.  I attached the sentiment to the card with dimensional gel.  On the inside I cut a mat layer of black paper and stamped a Christmas greeting and some snowflakes on the white panel.

To Be Jolly inside - photo by Deborah Frings - Deborah's GemsTo Be Jolly sq - photo by Deborah Frings - Deborah's Gems

I'm really pleased that I went back to the October 2012 challenge, as looking at the list of players, I realise I didn't actually get to play along that week.  I'm really pleased with the shimmer and sparkle on my "Christmas Lights".  Do visit our blog to check out the previous themes the rest of the team have gone with.  

Before I go, I'd like to wish everyone a very Happy Halloween.

Photo credit
We're going to downtown Northville this evening so that Ben and Sophie can experience an American style Halloween - it should be lots of fun.  The weather forecast is not great, but I don't think that'll stop us having fun!

signature

Saturday, 17 October 2015

52CCT - Theme ....

......  Good morning!  Halfway through October already - time is flying by.  But it does bring us to our new challenge at 52 {Christmas} Card Throwdown.  April has picked a really fun theme for us this week - THE WILD WOODS.  I had fun making my card:

Season's Tweetings - photo by Deborah Frings - Deborah's Gems

Stamps: Waltzingmouse - Frosty in the Meadow, Little Deer, Flurries
Inks: Versafine - Onyx Black, Vintage Sepia; Stampin' Up! - Early Espresso; Distress - Spiced Marmalade, Ripe Persimmon, Dusty Concord, Tumbled Glass, Weathered Wood, Hickory Smoke
Accessories: White Lustre Card; SU DP - Early Espresso; Copic Markers; Signo White Pen; Clear Embossing Powder


I had lots of fun creating my wood.  I started by stamping some of the tree trunks directly on the card using second generation impressions.  Then I stamped a couple which I embossed with clear powder.  Then I created the background using Distress inks - I went for an late evening sunset with a warm glow at the bottom of the image and the night sky starting to come in at the top.  I stamped another three trees in darker brown, heat embossed them with clear powder and cut them out.  I stamped the little deer and the bird on white card, coloured with Copic markers, cut them out and edged them with a black marker.  I adhered the extra trees and cute animals to the card.  I used a white gel pen to add some accents and some snow falling - see the snow on his nose!  I finished the front with a pun sentiment.  On the inside I cut a mat layer of design paper and added a greeting to the white panel.

Season's Tweetings inside - photo by Deborah Frings - Deborah's GemsSeason's Tweetings sq - photo by Deborah Frings - Deborah's Gems

As this card has features furry animals I'm submitting it to the current challenge at Cupcake Inspirations Challenge - CIC#331, and the sunset glow means I'm playing along with Inkspirational - INK#93 where the cue word is GLOW.

Do visit our blog to see what the rest of the team have made to inspire you.  Have fun and see you soon.

signature

Saturday, 3 October 2015

52CCT - Sketch ....

....  Hello!  Welcome to 52 {Christmas} Card Throwdown where we aim to inspire you to create your Christmas cards well in advance of the Big Day!  If you've been playing along since January, then you'll have a decent pile of cards.  But it's not too late to get going and our host this month, April, has a super sketch for us.  Go CAS, dress it up, or flip it,  just so long as we can see the sketch in your card.  Here's my take:

Warm Winter Wishes - photo by Deborah Frings - Deborah's Gems

Stamps: Waltzingmouse - Scandi Doodle Christmas, Flurries
Inks: Memento - Tuxedo Black; Versafine - Onyx Black
Accessories: White Lustre Card; Stampin' Up! DP - Chocolate Chip; Copic Markers; Wink of Stella - Clear; Staedtler - Triplus Fineliners


One of my all time favourite stamp companies is Waltzingmouse Stamps.  Claire (the owner) designs fabulous sets, always packed full of detailed images and her service is second to none.  Claire had a small Christmas release in September and I got my stamps this week.  One of the images - the lovely Christmas wreath with partridges is just perfect for our sketch.  So I've gone ultra clean and simple with my card.

I simply stamped the image on the card base, coloured it with Copic markers and added a touch of sparkle with a clear Wink of Stella brush.  I used one of the smaller images to add the flowers coming down from the wreath.  I stamped the birds again on some scrap card, coloured them in, cut them out and adhered them with some dimensional gel - only a little, as I want to keep the card reasonably flat for posting.  I finished the front with a lovely sentiment from another of my WMS sets.  On the inside of the card I cut a panel of design paper for the mat and stamped the pear tree and sentiment on the white panel.  I've used the colours from this week's Colour Throwdown - CTD#362 as they're just perfect.

Warm winter wishes inside - photo by Deborah Frings - Deborah's GemsWarm winter wishes sq - photo by Deborah Frings - Deborah's Gems

I also took a photo of all the lovely sparkle - you have to see it in sunshine - looks wonderful.

Warm winter wishes detail - photo by Deborah Frings - Deborah's Gems

Please do visit our blog to see the inspiration cards from the rest of the design team - they're super.  You've got until midnight BST Friday 9th October (7.00pm EDT) to play along.  Have fun!

signature

Saturday, 6 June 2015

52CCT - Sketch ....

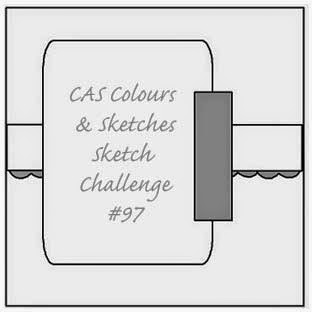
....  Hello!  It's time for our first challenge of the month at 52 {Christmas} Card Throwdown.  As it's the first Saturday of the month, it's our Sketch challenge.  I kept to the sketch, but if you need to flip it, turn it, feel free - but we must be able to see the sketch in your card.  Here's my take:

Making a List - photo by Deborah Frings - Deborah's Gems

Stamps: Waltzingmouse - Santa's Coming to Town, Flurries, Opera Tags Christmas
Inks: Versafine - Onyx Black, Olympia Green; Stampin' Up! - Real Red, Certainly Celery
Dies: WMS - Stitched Tag, Folding Tag (Star)
Accessories: White Lustre Card; SU DP - Real Red; Clear Embossing Powder; Ribbon; Washi Tape


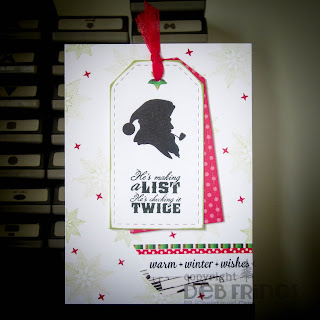
I'm playing along with a couple of challenges with this card.  The colours come from this week's Colour Throwdown - CTD#345 (so perfect for a Christmas card).  And over at Jingle Belles - JB:15:12, the ladies would like us to make a card with a shaker or to feature Santa or both!!  As you can see I decided to make Santa the feature of my card, but on tags, not as a shaker.  I stamped some snowflakes and stars randomly over the base.  I die cut two tags, one red and the other white.  On the white tag I stamped a Santa silhouette and simple greeting.  The sentiment is actually a very dark green, although it looks black in the photo.  I heat embossed both images with clear powder.  I covered a scrap of white card with green Washi tape and die cut a little star for the tag.  I edged the tag with soft green ink.  I created the sentiment banners by adding two strips of Washi tape to the top of white card and then stamped the sentiment.  The bottom banner is covered with musical Washi.  I attached the tags with dimensional tape.  On the inside I cut a mat layer of red design paper and added a simple Christmas greeting on the white panel.

Making a List inside - photo by Deborah Frings - Deborah's GemsMaking a List Sq - photo by Deborah Frings - Deborah's Gems

Do visit the blog to check out what the rest of the team have made.  You've got plenty of time to join in - deadline for submission is midnight (BST) Friday 12th June (that's 7.00pm EDT).  Have fun! That's all for now - see you soon.

signature

Saturday, 25 April 2015

52CCT - Technique Take 2 ...

....  Hello and good morning!  I made a boo-boo yesterday and my post for this week's 52 {Christmas} Card Throwdown challenge went up early - silly me!!!!  So, those of you who've seen the post have a head start on the challenge.  I decided that I had to make another card - Louise has given us the challenge of using the Triple Stamping technique, and this is my Take Two card:

Happy Winter - photo by Deborah Frings - Deborah's Gems

Stamps: Waltzingmouse - Warm Fuzzies, Flurries, Tis The Season
Inks: Stampin' Up! - Lost Lagoon, Night of Navy, Crushed Curry, Melon Mambo; Versafine - Onyx Black; Memento - Tuxedo Black, Grey Flannel
Dies: Spellbinders - Ovals Lg (S4-110) #3 and #5, Ovals Sm (S4-112) #3 and #5
Accessories: White Lustre Card; SU Card - Lost Lagoon, Night of Navy, Crushed Curry, Melon Mambo; Copic Markers; Wink of Stella - Clear


This card is quite different from the one that went up yesterday.  I've used the colours from this week's Colour Me Card Challenge - CMCC#68 - totally non-traditional and the layout is based on the sketch over at Jingle Belles - JB:15:09.  I'm not sure whether this works with the Triple Stamp technique, but I had fun.  On the inside I cut a mat layer of yellow card and on the white panel stamped the larger robin and a Christmas greeting.

Happy Winter inside - photo by Deborah Frings - Deborah's GemsHappy Winter sq - photo by Deborah Frings - Deborah's Gems

Don't forget to visit our blog and check out the cards the rest of the team have made to share with you.  That's all for now - have fun!!

signature

Saturday, 13 December 2014

WMSFC Finale ...

...  It is with much sadness that I have to tell you that this will be the last challenge at Waltzingmouse Fanatics.  Tara and I have really enjoyed hosting this challenge.  Kathy joined the team a few months ago and I'd like to thank her for the wonderful cards she's made for our challenges. We have decided that as this is our last challenge we're going to go with something that everyone likes:

ANYTHING WALTZINGMOUSE GOES!

The winner of our final challenge will get a super prize from Claire Brennan - details below.  Here's my card:

Season's Greetings - photo by Deborah Frings - Deborah's Gems

Stamps: Waltzingmouse - Nutcracker Sweet, Flurries
Inks: Distress - Weathered Wood; Memento - Tuxedo Black; Versafine - Onyx Black
Dies: Spellbinders - Mega Rectangles Sm (S4-144) #4, Mega Rectangles Lg (S4-142) #3
Accessories: White Lustre Card; Gold Mirri Card; Stampin' Up! Card - Smoky Slate; Copic Markers; Martha Stewart - Ornament Border Punch; Glamour Dust


WMSFC#33 - photo by Deborah Frings - Deborah's Gems

The idea for this card comes from my photo on the challenge graphic; I took it at Bronners - a huge Christmas shop in Frankenmuth, Michigan.  They had a wonderful display of Nutcrackers soldiers and Claire has the perfect set of stamps.  This week's challenge at CAS - Colours & Sketches - CAS#104 is to make a Christmas card using one of their previous sketches - I used one from October this year. 

I stamped the image on white card, coloured it with Copic Markers and the cut it out with a die.  While still in the die I masked off the image and sponged on a dark background.  I added some glitter and white snowflakes.  I layered the completed image on to gold mirri card.  I used a snowflake stamp to cover the background - first and second generation impressions.  I stamped the greeting on white card, layered it on gold mirri and attached it behind the image.  I punched an ornament border along gold card and then adhered a strip of white card on which I stamped a simple pattern.  The main image has been attached with dimensional tape.  For the inside I cut a mat layer of grey card and lightly inked the edges before adhering it to the card.  On the white panel I stamped more snowflakes, a subtle impression of the soldier and a greeting.

Seaon's Greetings inside - photo by Deborah Frings - Deborah's GemsSeaon's Greetings sq - photo by Deborah Frings - Deborah's Gems

Claire Brennan, designer and owner of Waltzingmouse Stamps, is offering the winner a £20 prize voucher.  The voucher is valid until March 2015 and is for use at Claire's online store.  In order to be eligible for the prize your project MUST include at least one Waltzingmouse image, sentiment or digi.

We have extended the deadline for submission of your project - we might all be a bit busy at Christmas!  You have until Thursday 1st January 2015 to upload your projects - winners will be announced on Saturday 3rd January.

Don't forget to check out the fabulous inspiration projects from Tara and Kathy.  Finally, thanks go to all our friends and supporters.  Wishing you a Merry Christmas and a Happy New Year.  Bye for now!

signature
Related Posts Plugin for WordPress, Blogger...