Showing posts with label US - Jolly Christmas. Show all posts

Friday, 24 November 2017

Uniko Challenge - Christmas ....

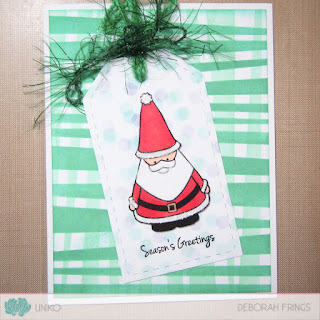
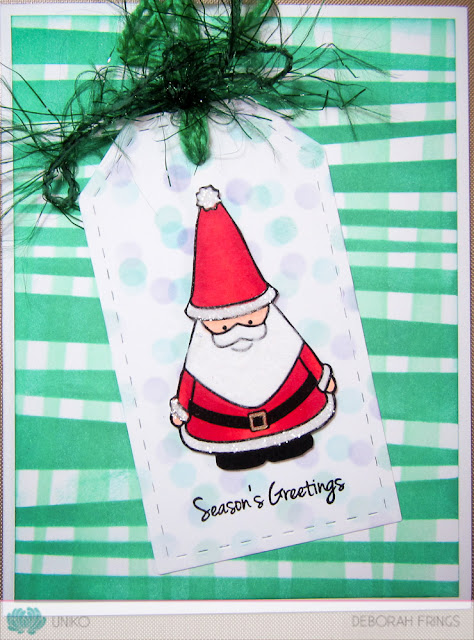
... Hello! Yesterday was Thanksgiving here in the States - Kat has a couple of days off school and Jonathan is off work - and we've had a very relaxing time. We went out to lunch at a local golf club, where the food is amazing, it was just super. And I got to spend some time playing in my craft room. It's time for our new challenge at Uniko and the theme is Christmas. I had fun making my card:

Season's Greetings - photo by Deborah Frings - Deborah's Gems

Stamps: Uniko - Jolly Christmas, Festive Sentiments, Most Wonderful, Reach for the Stars
Inks: Versafine - Onyx Black; Distress - Cracked Pistachio, Lucky Clover, Evergreen Bough, Tumbled Glass, Wilted Violet
Dies: Waltzingmouse Stamps - Stitched Tags #3
Accessories: White Lustre Card; Stampin' Up! Card - Emerald Envy; Uniko Stencils - Wonky Stripes, Scattered Polka Dots; Clear Embossing Powder; Copics; White Flock; Martha Stewart Coarse Crystal Glitter; Green Fibres


Plaids are very on-trend at the moment, so I decided to use the Wonky Stripes stencil to create my own fun plaid. I taped the stencil to the card and sponged on pale green ink, then I turned the stencil and repeated the process with a bold, bright green. I used my ordinary distress inks for this card. I stamped Santa on some scrap card, coloured him with Copics and put the image back in the MISTI, restamped in Versafine and embossed with clear powder and then carefully cut him out. I added some gold ink to the belt buckle, used white flock for his beard and coarse crystal glitter for the trimming on his clothes. I used a die to cut out the tag and sponged on some dots using a few shades of ink, stamped the greeting, attached Santa with some dimensional pads and finished the tag with some green fibres from my stash. On the inside, I cut a mat layer of green card and added a greeting to the white panel, along with some stars!

Season's Greetings inside - photo by Deborah Frings - Deborah's GemsSeason's Greetings sq - photo by Deborah Frings - Deborah's Gems

I'm submitting this card to Merry Monday - MM#266 where they want to see Santa, and also to Happy Little Stampers Mixed Media - HLSMM#11 where they want to see a tag.

Don't forget to visit the Uniko blog to check out more inspiring projects from the rest of the team. We are joined this month by Sue of Sue's Card Craft - her card is just fabulous! If you do decide to play along with our Christmas challenge there are prizes too:

  • Main winner - picked by DT - £25 e-gift certificate
  • Random Uniko stamps winner - £4 - in stock clear stamp set of winner choice
  • Top 3 - chosen by DT - 150 loyalty reward points

You've got plenty of time to join in with us. Deadline for submission is midnight (GMT) Friday 29th December - that's 7.00pm EDT in the States.

It's Black Friday today and I plan to check out some of the many Crafty sales going on today! See you again soon.

signature

Saturday, 6 August 2016

52CCT - Sketch ....

.... Morning! It's August and it's time for our sketch challenge at 52 Christmas Card Throwdown - 52CCT31-16. Kaja is our host this month; she has a super sketch and here's my take:


Stamps: Clearly Besotted - All Occasion Sentiments; Uniko - Jolly Christmas
Inks: Memento - Tuxedo Black; Versafine - Onyx Black; Stampin' Up! - Crushed Curry
Accessories: White Lustre Card; Kaisercraft DP - Holly Jolly; Copics; Glitter; White Flock; Gold Washi; Wink of Stella - Clear


I've gone for a very clean, simple look for my card. I covered the card with some kraft design paper. I stamped the Christmas tree and Santa on some white card, coloured them with Copics and fussy cut them both out. I added glitter and white flock to the Santa image. I added a touch of clear Wink of Stella to the star. I added a strip of gold washi tape down the card, stamped the sentiment and adhered the tree and Santa. Done! I've not decorated the inside yet.

Do visit our blog to see more inspiration from the rest of the team. Have fun!

signature

Wednesday, 9 December 2015

Deck the Halls - 12DOC ....

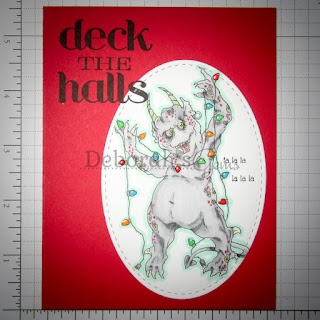
.... Hello again!  We've reached day 5 of the 12 Days of Creepmas sponsored by Smeared Ink.  I don't make 3D projects and tend towards clean and simple.  This card is a cute Creepmas card and is certainly clean and simple!

Deck the Halls - photo by Deborah Frings - Deborah's Gems

Stamps: Rick St Dennis Digi - Creepmas Tree Lights; Stampin' Up! - Christmas Messages, One Tag Fits All; Uniko - Jolly Christmas
Inks: Versafine - Onyx Black
Dies: Lil Inkers - Dual Stitched Ovals #4
Accessories: White Lustre Card; SU Card - Real Red; Copic Markers; Wink of Stella - Clear; Glossy Accents


I think this is one of my favourite images from Rick - he's a cute little demon who just wants to put up the lights!  Shame he gets into such a mess.  I printed him on white card, coloured him with Copic markers and cut him out with a stitch edge die.  I added clear sparkle to the lights, his eyes and horns and added glossy accents to the lights and his eyes.  I finished by drawing an eerie green glow around him.  I used bold red card for the base and adhered the image flat to the card.  I used my stamp-a-ma-jig to position the bold sentiment in the corner of the card, and added a few words on the image.  He's singing as he works!!  On the inside I cut a panel of white card and added some Christmas lights in the corner along with a Christmas greeting.

Deck the Halls inside - photo by Deborah Frings - Deborah's GemsDeck the Halls sq - photo by Deborah Frings - Deborah's Gems

I'm submitting this card to Left of Centre - LOC#107 where the theme is Baa! Humbug! with Rick St Dennis.  I'm also playing along with Cardz for Guys - C4G#100 where the team want us to make Christmas cards with traditional colours, and you can't get much more traditional than red!!  I took a close-up photo of the image to show how the glossy accents really adds great detail:

Deck the Halls detail - photo by Deborah Frings - Deborah's Gems

I guess that some of you might be wondering what I plan to do with my Creepmas/Christmas cards. Fortunately I have several friends and some member of my family who just love the quirky nature of these cards.  They will be winging their way soon!  Listed below is the full 12 Days of Creepmas Blog Roll - do drop by and check out the creations.


Fiona
Black Dragon
Susan R
Jessica
Suzi
Airless Chambers
Deborah
Susan S
Val
Sarah
Kat
Leigh
Lady Brayton
Sue

That's all for today - I really need to write some Christmas cards today and get them in the post - most have a very long journey to the UK!  See you tomorrow.

signature

Thursday, 12 November 2015

25 Tags of Christmas ....

... Hello!  I'm playing along with Tracey McNeely's 25 Tags of Christmas challenge.  This year is the challenge's 5th Anniversary.  Bev at Uniko is one of the sponsors and several of the DT have made tags to play along!  I don't often make tags, so this was a fun way to get me started and I actually ended up making three tags.  Here's a photo of all three together:

25 Tags of Christmas - photo by Deborah Frings - Deborah's Gems

Stamps: Uniko - Peace on Earth, Rustic Christmas, Jolly Christmas; Waltzingmouse - Seasons of Love
Inks: Memento - Tuxedo Black; Stampin' Up! - Marina Mist, Old Olive, Real Red
Dies: Uniko - Snowflakes; Waltzingmouse - Stitched Tag
Accessories: White Lustre Card; Copic Markers; Glitter; Ribbons; Wink of Stella - Clear


I used my Waltzingmouse Stitched Tag die to cut six white blanks - one for the front and one for the back.

Santa Tag - photo by Deborah Frings - Deborah's GemsDove Tag - photo by Deborah Frings - Deborah's GemsDove - I stamped the image and sentiment in black.  I used my Copic markers to add a touch of colour to the dove's wings and used a glue pen to colour the bird and added lots of glitter.  Once dry I adhered the front and back together and finished by adding some ribbons.

Santa - I stamped the image directly on the card, coloured it with Copic markers and added glitter to the white parts.  Once dry, I added lots more sparkle by using my clear Wink of Stella Brush on the rest of the image.  I adhered front and back together and finished with more ribbons.

Snowflake - I stamped the sentiment at the base of the tag. Next I used the largest of the snowflake dies to make an impression in the tag.  I ran a glue pen around the impression line and then added blue glitter to add definition to the snowflake.  I glued front and back tags together and finished the tag with ribbons.

On the back of each tag I added some lines on which to write a message as well as a few Christmas stars.

Snowflake Tag - photo by Deborah Frings - Deborah's GemsReverse of  Tag - photo by Deborah Frings - Deborah's Gems

Full details of the challenge can be found here on Tracey's blog - there are lots of opportunites to win prizes by taking part.  And I really must make some more tags too!  That's all for now! 

signature

Thursday, 26 December 2013

Family Christmas cards ....

....  Hello everyone, time for another scheduled post.   I do hope that you all had a super day yesterday.  Today I can share with you the cards I made for my family.  First, the card I made for Jonathan:

Jonathan's Card - photo by Deborah Frings - Deborah's Gems

Stamps: Waltzingmouse - Festive Foliage; Stampin' Up! - Christmas Messages
Inks: SU - Cherry Cobbler, Pistachio Pudding, Pink Pirouette
Dies: WMS - Mistletoe Dies
Accessories:  White Lustre Card; SEI DP - Berry Melody; SU Card - Pistachio Pudding


I made this card just before we flew back to the UK.  When I saw the sketch at CAS(E) this Sketch! - CTS#58 - I knew that I had the layout.  Jonathan likes the colours red and green and in my stash of papers I found this lovely sheet of stylised snowflakes and used that for the background.  In the sketch there is some holly; in my card I opted for some mistletoe - appropriate for my husband!  And the sentiment is just perfect (and part of the reason I got this set).  I stamped the mistletoe and berries onto white card and cut them out with the matching dies - thank you Claire!  For the inside I cut a mat layer of pale green card and on the white panel stamped some more mistletoe hanging down and the partner to the sentiment above.

Jonathan's Card inside - photo by Deborah Frings - Deborah's Gems

Next up is Kathryn's card - again I made it just before we left the States.

Kathryn's Card - photo by Deborah Frings - Deborah's Gems

Stamps: Funstamps - Scribble Snowman; My Favourite Things - Ornament Banner Builder
Inks: Stampin' Up! - Melon Mambo, Island Indigo
Dies: Die-namics - Ornament Banner, Fishtail Flags Layers Stax #2, Fishtail Flags Stax #2
Accessories: White Lustre Card; SU Card - Melon Mambo; Glitter Paper; Promarkers and Copics


For the layout I used the sketch from Seize the Sketch - STS#10, sadly I'm too late to submit the card, but I love the layout.  I made a really bright, vibrant card.  I made the base from Melon Mambo and cut a panel of white glitter card - to suggest a field of snow.  I used my all time favourite snowman stamp, colouring the image with a mixture of Promarkers and Copics.  I die cut the ornament banner and stamped on the snowflake ornaments.  I finished the front with a clean, simple and bold sentiment.  For the inside I simply cut a white panel and stamped another snowman - he's much more subtle inside!  I think the sentiment is totally appropriate for our girl.

Kathryn's Card inside - photo by Deborah Frings - Deborah's Gems

And last, but by now means least, the card we gave to Ben.  You saw this one yesterday.  I made it last Friday, day we flew back to the UK.  I'd chatted, via Facebook, with Ben in the morning and he told me he hadn't received the card we posted to him.  I couldn't leave him without a card.

Ben's Card - photo by Deborah Frings - Deborah's Gems

Details for the Santa card are on yesterday's post.  Below is the card we sent to Ben at the beginning of November, but didn't get to him. I actually made this as my card for 52CCT at the beginning of August - if you click the link you'll find all the details there.  I had originally thought it was going to be for Jonathan, but actually it works perfectly for our boy too!!


Ben's Card - photo by Deborah Frings - Deborah's Gems


That's all for now - our Boxing day plans include playing games, chatting, eating and drinking - a perfect way to spend the day!

signature

Tuesday, 24 December 2013

Jolly Santa ....

.... Hi, this is another of my scheduled posts.  Last Friday I was busy in the morning getting ready to fly back to the UK - I got it all sorted before lunch, so rather than pace about the house, I made a card.

Jolly Santa - photo by Deborah Frings - Deborah's Gems

Stamps: Uniko Studio - Jolly Christmas, Christmas Background Builders; Stampin' Up! - Christmas Messages
Inks: Memento - Tuxedo Black, Grey Flannel; SU - Pear Pizzazz, Real Red
Accessories: White Lustre Card; My Mind's Eye DP - Snowed In; Promarkers; Glitter


I used the layout from CAS(E) this Sketch - CTS#58.  I stamped the Santa image twice, coloured in his jacket and hat and cut out the beard and pom-pom from the other stamp.  I glittered all the white on the image.  On the inside I used the same paper for a mat layer and stamped another Santa and sentiment.

Jolly Santa inside - photo by Deborah Frings - Deborah's Gems

As I type this I can see out my office window - while it's much warmer than it's been recently, above freezing for the first time in two weeks, it's really horrible outside.  We've got fog and light rain.  That's all for now!

signature
Related Posts Plugin for WordPress, Blogger...