Showing posts with label US - Most Wonderful. Show all posts

Tuesday, 15 June 2021

C24C - Trees and Ornaments ....

... Good morning! I hope that you all had a good weekend - it was wonderful here in north Wales with bright sunshine and high temperatures. For me, it was also fun as it was the start of Euro 2020!! I did find time to make my card for our new challenge at Christmas 24 - C24C#36. For the next couple of weeks we want to see your Christmas cards that feature Trees AND Ornaments. Here's my take:


Stamps: Penny Black - Xmas Constellation; MFT - Bitty Holiday Wishes; Uniko - Most Wonderful
Inks: Gina K - Applemint, Key Lime, Lucky Clover, Jelly Bean Green, Grass Green, Christmas Pine; Versafine Clair - Nocturne
Dies: Gina K - Master Layouts 2
Accessories: White & Black Card; Gina K Card - Lucky Clover; Gems from stash

I'm submitting this card to Addicted to Stamps and More - ATSM#407 where the theme is Christmas, and to Merry Little Christmas Challenge Blog - MLCCB#35 where it's always Anything Christmas Goes.


I've been watching a lot of Gina K videos recently and at the beginning of June, Gina did some wonderful ink blending on video and I was inspired have a go. I die cut a panel of white card and masked of a ½" border all the way round the panel and then set to work blending a lot of green inks. Once I was happy with the blending, I removed the masking paper and stamped this lovely abstract Christmas tree in the middle of the panel. I added greeting above and below the image and layered the panel onto black card. I made a notecard from some co-ordinating card and adhered the panel in the centre. I finished the front by adding lots of iridescent gems to the little stars and dots on the stamped image - these are my Christmas ornaments. Inside the card, I cut a mat layer of black card. On the white panel I stamped the abstract Christmas tree in lime ink and added a greeting in black ink.


I love the way Gina K inks blend so smoothly and the depth of colour they give. This is such a pretty tree too - I've had it ages, but it's been a while since I inked it up. I took a close-up photo to show the pretty iridescent gems - they really glow in the light:


That's all from me today - do visit our Christmas 24 Challenge blog to see more inspiration from the team. I look forward to visiting your blogs to see your creations. Have fun!!

signature photo Signature.png

Friday, 8 December 2017

Uniko Challenge Reminder - Christmas ....

..... Hello and good morning! According to the United States Postal Service the last posting date for Christmas first class to Europe and the UK was yesterday - 7th December!!!  Good thing I made this card a while ago and it's in the post then :) I'm here this morning with a reminder card for our current challenge at Uniko - US#44 - we want to see Christmas cards.

Rejoice - photo by Deborah Frings - Deborah's Gems

Stamps: Uniko - Peace on Earth, Most Wonderful, Festive Sentiments, Reach for the Stars
Inks: Versafine - Onyx Black; Gina K - Black Onyx, Christmas Pine; Delicata -Silvery Shimmer
Dies: Die-namics - Pierced Ovals #3, Cross Stitched Oval Stax #4
Accessories: White Lustre Card; Stampin' Up! Card -Smoky Slate; Copics; Wink of Stella - Clear; Clear Embossing Powder


I kept this card really simple to focus on the pretty dove. I die cut white card to create the oval frame and adhered it flat to the card base. I added lots of sparkles all over it with a clear Wink of Stella brush. I stamped the dove on white card with a pale grey ink, coloured it with Copics, put it back in the MISTI and restamped in Versafine and heat embossed with clear powder. I carefully cut out the dove. I stamped the leaf on the white oval and adhered the dove on top, I used some dimensional pads on the wings to give the bird some real dimension. I adhered the oval to the card with dimensional tape. On the inside, I cut a mat layer of pale grey card and added a greeting and some stars to the white panel.

Rejoice inside - photo by Deborah Frings - Deborah's GemsRejoice sq - photo by Deborah Frings - Deborah's Gems

I based the layout of this card on a sketch from Christmas Card Throwdown - CCT#21.

Don't forget to visit the Uniko blog to see more inspiration projects from the rest of the design team. That's all from me for now. Bye!

signature

Friday, 24 November 2017

Uniko Challenge - Christmas ....

... Hello! Yesterday was Thanksgiving here in the States - Kat has a couple of days off school and Jonathan is off work - and we've had a very relaxing time. We went out to lunch at a local golf club, where the food is amazing, it was just super. And I got to spend some time playing in my craft room. It's time for our new challenge at Uniko and the theme is Christmas. I had fun making my card:

Season's Greetings - photo by Deborah Frings - Deborah's Gems

Stamps: Uniko - Jolly Christmas, Festive Sentiments, Most Wonderful, Reach for the Stars
Inks: Versafine - Onyx Black; Distress - Cracked Pistachio, Lucky Clover, Evergreen Bough, Tumbled Glass, Wilted Violet
Dies: Waltzingmouse Stamps - Stitched Tags #3
Accessories: White Lustre Card; Stampin' Up! Card - Emerald Envy; Uniko Stencils - Wonky Stripes, Scattered Polka Dots; Clear Embossing Powder; Copics; White Flock; Martha Stewart Coarse Crystal Glitter; Green Fibres


Plaids are very on-trend at the moment, so I decided to use the Wonky Stripes stencil to create my own fun plaid. I taped the stencil to the card and sponged on pale green ink, then I turned the stencil and repeated the process with a bold, bright green. I used my ordinary distress inks for this card. I stamped Santa on some scrap card, coloured him with Copics and put the image back in the MISTI, restamped in Versafine and embossed with clear powder and then carefully cut him out. I added some gold ink to the belt buckle, used white flock for his beard and coarse crystal glitter for the trimming on his clothes. I used a die to cut out the tag and sponged on some dots using a few shades of ink, stamped the greeting, attached Santa with some dimensional pads and finished the tag with some green fibres from my stash. On the inside, I cut a mat layer of green card and added a greeting to the white panel, along with some stars!

Season's Greetings inside - photo by Deborah Frings - Deborah's GemsSeason's Greetings sq - photo by Deborah Frings - Deborah's Gems

I'm submitting this card to Merry Monday - MM#266 where they want to see Santa, and also to Happy Little Stampers Mixed Media - HLSMM#11 where they want to see a tag.

Don't forget to visit the Uniko blog to check out more inspiring projects from the rest of the team. We are joined this month by Sue of Sue's Card Craft - her card is just fabulous! If you do decide to play along with our Christmas challenge there are prizes too:

  • Main winner - picked by DT - £25 e-gift certificate
  • Random Uniko stamps winner - £4 - in stock clear stamp set of winner choice
  • Top 3 - chosen by DT - 150 loyalty reward points

You've got plenty of time to join in with us. Deadline for submission is midnight (GMT) Friday 29th December - that's 7.00pm EDT in the States.

It's Black Friday today and I plan to check out some of the many Crafty sales going on today! See you again soon.

signature

Tuesday, 21 November 2017

25 Tags of Christmas ...

... Hi! It's day 21 of Tracey McNeeley's 25 Days of Christmas Tags and today Uniko is sponsoring the challenge. I've made some very simple, but fun Christmas tags:

Trio of Christmas Tags - photo by Deborah Frings - Deborah's Gems

Stamps: Uniko - Background Blocks Falling Snowflakes, Festive Sentiments, Most Wonderful, Peace on Earth
Inks: Versamark; Gina K - Black Onyx; Distress - Salty Ocean, Mermaid Lagoon, Chipped Sapphire, Cracked Pistachio, Evergreen Bough, Lucky Clover, Shaded Lilac, Wilted Violet Dusty Concord
Dies: Lil Inkers - Dotted Tags
Accessories: Strathmore Smooth Bristol Card; Ribbons; Clear Embossing Powder; Grey Mirri card

For this set of tags, I used my Lil Inker dotted dies to cut the card. I stamped the snowflakes on each tag in Versamark and heat embossed with clear powder. Then I coloured the tags with Distress inks to reveal the falling snow - I love this technique. There's a couple of tiny dies in the tag set that cut a hole in the tags and also cut out hole reinforcers - I used mirri card to create them. I finished the front of each tag with a simple greeting in black and a simple ribbon treatment. Here's a close up look at each tag:


Don't forget to visit Tracey's blog to see more inspiration from the rest of the Uniko design Team. This challenge runs throughout November and there are opportunities to win prizes. Full details of the 25 Days of Christmas Tags challenge can be found on Tracey's blog here.

That's all from me today - see you again soon.

signature

Sunday, 12 November 2017

More Plaid ...

.... Morning! I had fun making yesterday's plaid card and plaids are very on trend at the moment, so I made a couple more cards. First up is a very simple card:

Peace - photo by Deborah Frings - Deborah's Gems

Stamps: Concord & 9th - Plaid Background; Uniko - Stunning Snowflakes, Festive Sentiments, Most Wonderful
Inks: Gina K - Kraft, Red Velvet
Dies: Die-namics - Peace
Accessories: White Lustre Card; Gina K Card - Kraft, Black Onyx; Saved Deer


This card came together so quickly. I adhered the plaid background to the card base. I die cut the word 'peace' and used it on one of my Uniko cards yesterday, I found the leftover negative space on my desk and decided to use it on this card. I finished the front with a sparkly stag - another saved element - I got this on one of last year's Christmas cards. On the inside, I stamped a Christmas greeting and some snowflakes on the white panel. I'm submitting this card to Merry Monday - MM#264, for their red and kraft challenge. I'm also playing along with City Crafter Challenge Blog - CCCB#287 where they want us to use the word 'love' or 'peace'.

Peace inside - photo by Deborah Frings - Deborah's GemsPeace sq - photo by Deborah Frings - Deborah's Gems

This next card features another plaid, along with a very pretty poinsettia:

Merry Christmas - photo by Deborah Frings - Deborah's Gems

Stamps: Magenta - Poinsettia; Uniko - Festive Sentiments, Most Wonderful; Concord & 9th - Plaid Background
Inks: Gina K - Kraft, Cherry Red; Versafine - Onyx Black; Versmark
Accessories: White Lustre Card; Gina K Card - Red Velvet; Clear and Gold Embossing Powders; Zig Clean Colour Brushes; Wink of Stella - Clear, Gold; Tim Holtz Water Colour Card


I changed the plaid on this card by stamping the thin lines twice. I adhered it directly to the red card base. I stamped this fun poinsettia in Versamark on watercolour card, embossed it with gold powder and coloured it with Zig brushes. I added a touch of sparkle to the red petals. I carefully cut it out and attached it to the card with dimensional pads. I stamped the sentiment directly on the panel and heat embossed it with clear powder. On the inside, I stamped a Christmas greeting and the poinsettia.

Merry Christmas inside - photo by Deborah Frings - Deborah's GemsMerry Christmas sq - photo by Deborah Frings - Deborah's Gems

I'm submitting this card to The Card Concept - CC#81, I think this is in the clean and graphic style. I'm also submitting it to Addicted to Stamps and More! - ATSM#267 where it's Make Your Mark week.

Finally, as I mentioned earlier, plaids are very on trend at the moment and the theme at Inkspirational - INK#147 is TREND. Another trend in this set of cards is that they are all for Christmas:

Plaid Christmas - photo by Deborah Frings - Deborah's Gems


I've had so much fun making these plaid cards, that I think I'm going to make a whole lot more. They come together really quickly and if I change the colours and decorations I should be able to get a whole lot more made today! That's all for now. See you soon.

signature

Saturday, 11 November 2017

Plaid and Snowflake ....

.... It's been another really cold day here in Northville, so I decided to spend the day indoors and play in my craft room. This morning I organising my Gina K ink pads - I used Jennifer McGuire's tip of labelling each side of the pad so that I can always see the name of the ink. At the moment they are all stored in a box, but I'm going to get a new ink pad holder from Stamp 'n' Storage soon.

This afternoon I decided to make a card for this week's Merry Monday challenge - MM#264, where the team want us to use Red and Kraft on our Christmas card:

Believe - photo by Deborah Frings - Deborah's Gems

Stamps: Concord & 9th - Plaid Background; Uniko - Most Wonderful, Stunning Snowflakes, Festive Sentiments
Inks: Gina K - Kraft, Cherry Red; Versamark
Dies: Uniko - Snowflake Trio
Accessories: White Lustre Card; Gina K Card - Kraft; White Embossing Powder; Kaleidoscope Embossing Powder; Gem


I cut a piece of kraft card onto which I stamped the large plaid in kraft ink and added a thin stripe in dark red. I had a spare die cut snowflake left on my desk from my Uniko session yesterday. I covered it in Versmark and heat embossed it with white powder. I repeated this three times to give a lovely enamel type finish and then added a final coat of iridescent powder for a subtle sparkle. I stamped the sentiment directly on the panel and heat embossed it with white powder. I attached the snowflake with dimensional pads. I finished the front with a bold red gem in the centre of the snowflake. On the inside, I cut a mat panel of kraft card and on the white panel added a Christmas greeting and some more snowflakes.

Believe inside - photo by Deborah Frings - Deborah's GemsBelieve sq - photo by Deborah Frings - Deborah's Gems

That's all for today. Thanks to everyone who stopped by to see my Uniko revisit and thanks for all the lovely comments, they are much appreciated. See you tomorrow!

signature

Uniko - Revisit and Blog Hop ...

.... Good morning from an extremely cold and frosty Northville! I'm here this morning with a few projects for the Uniko Revisit and DT Blog Hop.  As well as running Uniko on her own, Bev is the mum to two very active little boys, so generally, we have new releases every other month and, in the off month, we revisit previous releases. This month's revisit is another look at the dies and stencils that were released last month.

I'm starting off with a card that showcases the stencil - Scattered Polka Dots:

Merry Christmas - photo by Deborah Frings - Deborah's Gems

Stamps: Festive Sentiments, Most Wonderful, Stunning Snowflakes
Inks: Stampin' Up! - Emerald Envy, Tranquil Tide; Versamark; Delicata - Silvery Shimmer
Dies: Die-namics - A2 Rectangles Set 1 #10, A2 Stitched Rectangles Set 2 #8
Accessories: White Lustre Card; Silver Mirri Card; SU Card - Tranquil Tide; Silver Embossing Powder; Uniko Stencil - Scattered Polka Dots


I taped the polka dot stencil to white card and sponged on the inks - I used the darker green on one side and the emerald green on the other and blended them together in the centre. I used a stitched edge die to cut out the finished panel. I used a plain die to cut a mat layer of metallic silver mirri card. I positioned the stencilled panel in the MISTI and stamped the sentiment in Versamark and heat embossed with silver powder. I was watching one of Jennifer McGuire's videos earlier this week where she showed her thick embossing technique for sentiments and I used it on this sentiment. I do like the effect. I attached the finished panel to the mirri card with dimensional tape. On the inside, I cut a mat layer of dark green card and on the white panel added a Christmas greeting in green, along with a few silver snowflakes. I'm submitting this card to CAS Colours & Sketches - CASC&S#248 - I just adore the colours!!

Merry Christmas inside - photo by Deborah Frings - Deborah's GemsMerry Christmas sq- photo by Deborah Frings - Deborah's Gems

Next up, I have a couple of cards made using the Designer Dies Snowflake Trio:

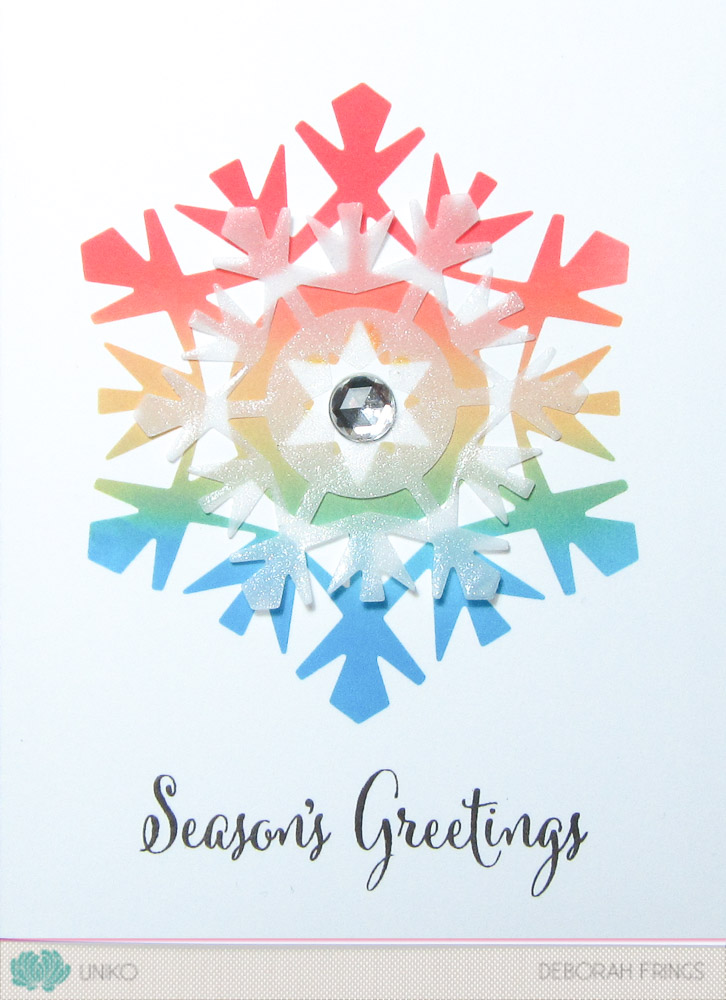
Season's Greetings - photo by Deborah Frings - Deborah's Gems

Stamps: Uniko - Simply Said Christmas, Stunning Snowflakes
Inks: Gina K - Black Onyx; Distress Oxides - Candied Apple, Fossilized Amber, Salty Ocean
Dies: Uniko - Snowflake Trio
Accessories: White Lustre Card; Gina K Card - Black Onyx; Vellum; Wink of Stella - Clear; Gem; Inkadinkado - Masking Paper


I cut a piece of masking paper to the size of the card base and then die cut the largest snowflake, being very careful to keep all the little pieces. I also die cut another large snowflake from some scrap card. I removed the die cut snowflake mask from the panel and attached it to the front of the card. I used blending foam to add red, yellow, and blue inks, and where they blended it created orange and green. I carefully removed all the masking paper to reveal the finished rainbow snowflake. I die cut a smaller snowflake in vellum, covered it with clear Wink of Stella, added tiny amounts of glossy accents to the small points on the inside star and adhered it on the rainbow snowflake. I finished the front with a single large, clear gem. On the inside, I cut a mat layer of black card and on the white panel stamped a simple greeting and some colourful little snowflakes. I'm submitting this card to AAA Cards - AAA#102 where the team want to see ink blending, and also to Less is More - LIM#353&354 where they want to see Firework colours.

Season's Greetings inside - photo by Deborah Frings - Deborah's GemsSeason's Greetings sq - photo by Deborah Frings - Deborah's Gems

With the left-over die cut snowflake mask, I made another card:

Peace - photo by Deborah Frings - Deborah's Gems

Stamps: Uniko - Stunning Snowflakes
Inks: Gina K - Black Onyx; Distress Oxides - Candied Apple, Fossilized Amber, Salty Ocean
Dies: Uniko - Snowflake Trio; Die-namics - Peace
Accessories: White Lustre Card; Gina K Card - Black Onyx; Wink of Stella - Clear; Glossy Accents


I adhered the snowflake mask to the front of the card and applied distress inks, blending to create a rainbow from red to blue. With the mask in place, I spritzed on some water to create a softly distressed look. I carefully removed the mask to reveal a clean, crisp white snowflake. I die cut the word 'peace' from black card and adhered the letters to the card. I added clear Wink of Stella to each letter and topped it with Glossy Accents - I really like the sparkly, enamelled look that this gives. On the inside, I cut a mat layer of black card and on the white panel stamped a sentiment and added rainbow snowflakes. I'm submitting this card to City Crafter Challenge Blog - CCCB#387 where they want to see the word 'LOVE' or 'PEACE' used. I'm also submitting this is AAA Cards - AAA#102 - there's lots of ink blending on this one!!!

Peace inside - photo by Deborah Frings - Deborah's GemsPeace sq - photo by Deborah Frings - Deborah's Gems

My last card was made using the new Flower Power #1 - #6 Dies, along with the Wonky Stripes Stencil:

Happy Birthday - photo by Deborah Frings - Deborah's Gems

Stamps: Uniko - Flower Power #2, Flower Power #6, Simply Said
Inks: Distress Oxide - Fossilized Amber, Salty Ocean; Gina K - Lipstick, Cherry Red, Black Onyx; Versamark
Dies: Uniko - Flower Power #1 - #6; Die-namics - A2 Rectangles Set 1 #3, A2 Stitched Rectangles Set 2 #3
Accessories: White Lustre Card; Gina K Card - Black Onyx; Uniko Stencil - Wonky Stripes; Clear Embossing Powder


First, I have to give credit to Jane for the idea of using washi tape on the stencil to mask areas. I created the little block pattern by using the masked stencil and blended leftover yellow and blue distress inks, which resulted in this lovely soft green. I used dies to cut a tiny panel in black card and from the stencilled panel. I used the two-step rose from Flower Power #6 and cut it out with the matching die. The leaves are from Flower Power #2. I stamped them in Versamark, heat embossed and used the leaf die (which works for all the Flower Power leaves) to cut them out. I added some sparkle to the leaves. I finished the front with a tiny, simple birthday sentiment. On the inside, I simply added one of the die cut roses. I'm submitting this one to CASology - CAS#274 where the cue word is 'TINY'.

Happy Birthday inside - photo by Deborah Frings - Deborah's GemsHappy Birthday sq - photo by Deborah Frings - Deborah's Gems

That's all from me today. Don't forget to visit the rest of the team and follow along with the Blog Hop. Here's the list:

Deborah (that's me!)

Make sure to comment as you go along the Blog Hop for your chance to win ALL the products being revisited. You've got until midnight (GMT), that's 7.00pm EDT in the States, on Sunday 18th November to comment. The winner will be announced on Sunday 19th November.

I do hope you like my creations - let me know which is your favourite. Have a good weekend, see you soon.

signature
Related Posts Plugin for WordPress, Blogger...