Showing posts with label US - Simply Said. Show all posts

Thursday, 30 April 2026

Hubby's Birthday Card

.... Morning! Today is Jonathan's 62nd birthday, and this is the card I made for him:


Stamps: PaperArtsy - Kate Crane KC012; Uniko - Simply Said, Birthday Wishes
Inks: Versafine Clair - Nocturne; Versafine - Black Onyx; Gina K - Soft Stone
Dies: Waffle Flower - Nesting Postage Layers #3
Accessories: White & Black Card; Copic Markers; LF - Clear Embossing Powder

I got a new stamp set last weekend featuring some fab toadstools. I used it for this card. I stamped a number of the toadstools directly onto an A2 white note card in soft grey ink. I die cut the postage stamp backing and white topper. I used my MISTI to stamp the main image onto white card. I removed it from the MISTI, used Copics to add colour, restamped with Versafine ink and embossed the image with clear powder. Then I fussy cut it out. I added the 'postage stamp' to the card at an angle, adhered the toadstool and finished with sentiments in black ink. I added a couple of words ' to my' in black fine liner. Jonathan does enjoy a pun!!! On the inside, I cut a piece of white card slightly smaller than A2 size, edged it with a blue marker, added a birthday greeting and another toadstool.


I'm submitting this card to:

Cardz 4 Guyz - C4G#385 where they want a clean and simple card (mostly)
Seize the Birthday - STB#325 - I've done an anything goes as long as it's birthday


That's all from me today. I'll be back soon. 

signature photo Signature.png

Thursday, 25 April 2024

Happy Birthday Photographer

... Good afternoon! I'm here to share another birthday card for my hubby, Jonathan. This is the one that I've made for my mum to give him. Jonathan's main hobby is photography and I have a few photography stamp sets which always come out to play for Jonathan's card. Here it is:


Stamps: Concord & 9th - Oh, Snap!; Uniko - Simply Said, Simply Said Birthday; There She Goes - Oh Snap; Gina K - Birthday Cheer Mini
Inks: Versamark; Versafine - Onyx Black; Gina K - Wild Dandelion, Fresh Asparagus, Ocean Mist, Moonlit Fog
Dies: Concord & 9th - Oh, Snap!; Memory Box - Distressed Windham Collage
Accessories: White Card; SU Card - Costal Cabana; Clear Embossing Powder; Copic Markers

I'm submitting this card to The Male Room - TMR#185 where they want to see embossing, Color Throwdown - CTD#790, and to Freshly Made Sketches - FMS#633.


This is a US A6 card which measures 4½" x 6¼". I cut a piece of aqua card to be slightly smaller than the note card and used a Memory Box die to cut the patterned corners (it's been ages since I used this die). I coloured some scraps of white card with a bright yellow Copic marker and glued them behind the die cut corners. I used Versamark ink to randomly stamp cameras, film, and pins on the card to create a subtle background. I used my MISTI to stamp the Polaroid camera and photo on white card, removed them from the MISTI and coloured with Copic markers. I used the matching dies to cut out the images. I stamped a greeting on the photo along with instructions to 'pull here'. I put the photo through the slot on the camera, and used dimensional pads to adhere it to the card.


For the inside, I cut a mat layer of aqua card. On the white panel I stamped a row of polaroid photos and stamped the word 'click' inside each one. I finished the panel with a bold, black birthday greeting.


That's it for today. See you soon.

signature photo Signature.png

Thursday, 19 March 2020

Floral Circle ....

... Morning! With all of life's craziness, spending some time in my craft room really helps me to keep grounded, keep sane. I made a card this morning for my mother-in-law:


Stamps: Altenew - Hello Sunshine; Uniko - Background Builders Vines, Background Builders Vine Winter Additions, Simply Said; Lawn Fawn - Happy Happy Happy
Inks: Gina K - Passionate Pink, Red Velvet, Soft Stone, Black Amalgam
Dies: Die-namics - Cross-Stitched Circle Stax # 2 & #3
Accessories: White Card; SU DP - Smoky Slate; Vellum

I'm submitting this card to Addicted to CAS - ATCAS#180 where the key word is Circle, Less is More - LIM#415 to use red, raspberry and grey, and to Cardz for Galz - C4Glz#117 where they want Spring Flowers. Now, in my head this was really clean and simple, but it's turned out to be a little less CAS, I'm still playing along though!!


I used my MISTI and Gina K wreath builder stencil to create the wreath of spring flowers. I used cross-stitch edged circle die to cut the vellum and four white circles.  I stamped the greeting on the top circle and layered the other white circles to give some depth. I layered the stamped panel on soft grey floral design paper and adhered the whole panel to the front of the card. On the inside, I cut another mat of grey floral paper and added a simple greeting and some more flowers. 


I'm safe to share this card here as my mother-in-law doesn't do computers, so she won't see it until the card arrives this weekend. We spoke to her and my FIL yesterday, they are keeping well and self-isolating. My MIL says all is good she has plenty to keep her occupied in her garden.

I know that things are changing almost hourly now, and our new world reality is quite scary, but we will get through this. Look after yourself and your family, keep in touch with family and friends and find ways to keep occupied. My daughter has said she can read for pleasure now! Take care, that's all for now.

signature photo Signature.png

Saturday, 24 March 2018

Uniko - Blog Hop and Revisit ...

... Hello! Thanks so much for stopping by. It's time for our Uniko Blog Hop & Revisit. On months when there is no new release, we revisit a previously released stamp set. This month Bev has picked Fun Flowers and the newly released Fun Flowers Stencil. I had fun with both the stamp set and the stencil and ended up making two cards. Here's the first:

Make a Wish - photo by Deborah Frings - Deborah's Gems

Stamps: Uniko - Birthday Sentiments, Fun Flowers
Inks: Gina K - Lovely Lavender, Wild Lilac; Versafine - Onyx Black; Versamark
Dies: Spellbinders - Classic Scallop Border (E8-001)
Accessories: White Lustre Card; SU Card - Elegant Eggplant; Vellum; Clear Embossing Powder; Cosmic Shimmer EP: Mallow Flame Aurora, Pink Violet Blaze, Tropic Violet Lustre, Tropic Bilberry Blaze


I started by taping the stencil to white card and tapping a Versmark pad all over the panel. I removed the stencil and added several different embossing powders and heat set the powders. You can't see it in the photo, but the embossed images have a lovely lustre to them. I cut a strip of shimmer vellum on which I stamped and embossed the sentiment. I used some Spellbinder dies to cut the scallop border. I attached the sentiment strip and then layered the panel on dark purple card and adhered it to the card base. On the inside, I cut a mat layer of dark purple card and added a simple birthday greeting and some more fun flowers in lilac. I'm submitting this card to The Flower Challenge - TFC#18 where it's Anything Goes.

Make a Wish inside - photo by Deborah Frings - Deborah's GemsMake a Wish sq - photo by Deborah Frings - Deborah's Gems

My second card is smaller, being a 4-bar card:

Happy Birthday - photo by Deborah Frings - Deborah's Gems

Stamps: Uniko - Fun Flowers, Simply Said
Inks: Gina K - Blue Lagoon, Jelly Bean Green; Versafine - Onyx Black; Distress - Spun Sugar, Festive Berries
Accessories: White Lustre Card; Copic Markers; Dylusions Paint Pen; Uniko Stencil - Fun Flowers; Nuvo - Aqua Shimmer Brush; Gem

I put the stencil on the card and lightly brushed on some pale pink and red inks, concentrating the colour towards the bottom right. I stamped a flower and some leaves, cut them out with my Scan'N'Cut and added colour with Copic markers and a red Dylusion paint pen. I covered them all with a light layer of clear shimmer. I added the flower and leaves with dimensional dots. I finished the card by added a sentiment and a little gem to the centre of the flower. I was going to submit this to Less is More as they want us to use stencils, but I forgot that they also want it to be one layer!!! Oops! I've not done the inside of this card as yet.

Don't forget to visit the Uniko Blog and the rest of the Design Team, comment along the way for your chance to win a £15 eGift Certificate.


You have until midnight (BST) Saturday 7th April to comment. That's all for now - see you again soon.

signature

Saturday, 17 March 2018

Good Luck ....

.... Good afternoon from a beautifully sunny, but very cold, Northville. I've had a fun morning playing in my craft room. It's St Patrick's Day today and in honour of the day, I've used a very old stamp set called Celtic Heritage to make a Good Luck card:

Good Luck - photo by Deborah Frings - Deborah's Gems

Stamps: Waltzingmouse Stamps - Celtic Heritage; Uniko - Simply Said
Inks: Gina K - Jelly Bean Green, Christmas Pine
Accessories: White Lustre Card; SU Card - Garden Green; WRMemory Keepers DP - Travel Light; SU Punches


This is a 4 bar size card - so a bit smaller than my usual. I started by stamping a lucky four leaf clover (with a hint of Celtic design) on a white circle and layered it on a scalloped dark green circle. I cut a panel of dark green card onto which I adhered some pretty patterned paper from my stash. I attached the panel to the card and added the clover panel on top. I finished the front by stamping a simple 'good luck' sentiment using words from two different stamp sets. On the inside, I cut a mat layer of the patterned paper and on the white panel added some more Celtic design elements, but left it blank for my own message. I'm submitting this card to CAS-ual Fridays Challenge - CFC#195 where they want to see greens, and also to MFT Wednesday Sketch Challenge - MFTWSC#376.

Good Luck inside - photo by Deborah Frings - Deborah's GemsGood Luck sq - photo by Deborah Frings - Deborah's Gems

A few weeks ago I sold a load of my old stamps at the annual yard sale at Scrappy Chic. It was both very sad and lots of fun going through my stash. I parted with many old wood mounted stamps that I've had for years and made room for new stuff. In the process, I rediscovered some of my old favourites - this being one! The stamp set came from Waltzingmouse Stamps (sadly now closed) that was owned by Claire Brennan. While Claire doesn't have her own company anymore, you can still get Claire's stamps from Gina K. It was so nice to rediscover some old favourites and you're probably going to see more old sets soon.

As a result of recycling so much of my stash, I have to update my catalogue system and I'm going to take the opportunity to set up an electronic catalogue too. I'm going to use the Evernote system - I've been watching an excellent video about the system by Kat Driggers - as I'll be able to see all my stash on my PC, phone and tablet! It's going to take a while, but I think it'll be worth it.

That's all for now - enjoy your weekend!

signature

Friday, 15 December 2017

Uniko - Pure Florals Rose .....

....  Hello! I can't quite believe how quickly this week has gone by. Today is the last of the Uniko Introductions. We are showcasing Pure Florals Rose - a wonderful addition to the series. I've made a couple of cards for today, here's the first:

Happy Birthday - photo by Deborah Frings - Deborah's Gems

Stamps: Uniko - Pure Florals Rose, Simply Said, Fontiments
Inks: Gina K - Kraft, Black Onyx, Red Velvet, Jelly Bean Green; Versafine - Onyx Black
Dies: Die-namics - A2 Stitched Rectangles Set 2 #9
Accessories: White Lustre Card; SU Card - Crumb Cake; Clear Embossing Powder; Zig Clean Colour Brushes; Nuvo Aqua Shimmer - Clear; Uniko Stencil - Lattice; Tim Holtz Watercolour Card

So glad my parcel arrived on Wednesday, I was able to use the Lattice stencil to make this lovely background. I taped the stencil to the white panel and lightly sponged on some kraft ink, keeping it darker in the corner and fading out towards the top of the card. I adhered the panel to a kraft card base. I stamped the small rose and leaves on watercolour card with Versafine ink and heat embossed with clear powder, this gives a line which makes it so easy to colour. I used my zig clean colour brushes to lay down some colour which I blended out with a clear glitter brush - sadly you can't see the sparkle in the picture above!! I stamped the little birthday sentiment on the white panel and then used dimensional pads to adhered the rose and leaves. On the inside, I cut a white panel on to which I stamped a simple sentiment and the outline images.

Happy Birthday inside - photo by Deborah Frings - Deborah's GemsHappy Birthday sq - photo by Deborah Frings - Deborah's Gems

I used the colours from this week's challenge at Global Design Project - GDP#117.

My next card is relatively CAS - well I think it is!!

With heartfelt sympathy - photo by Deborah Frings - Deborah's Gems

Stamps: Uniko - Pure Florals Rose, Pure Florals Lily
Inks: Gina K - Black Onyx; Stampin' Up! - Smoky Slate; Distress - Hickory Smoke; Delicata - Silvery Shimmer
Accessories: White Lustre Card; SU Card - Smoky Slate; Uniko Stencil - Broken Lines


This is a one-layer card. I used my MISTI to stamp the outline rose towards the top centre of the card and masked the rose. I taped the stencil to the card and sponged on dark grey ink, then I shifted the card slightly to the left and sponged on light grey ink. I removed the mask and put the card back into the MISTI. Then I stamped the solid rose in silver ink. I finished the front with a sentiment. I picked sympathy because Kat said that the grey rose made a lovely sympathy card! I agree. On the inside, I cut a mat layer of pale grey card and added a sentiment and another rose to the white panel.

With heartfelt sympathyinside  - photo by Deborah Frings - Deborah's GemsWith heartfelt sympathy sq - photo by Deborah Frings - Deborah's Gems

I'm submitting this to CASology - CAS#279 where they want to see GREY and this is much more CAS than the other one!

Don't forget to visit the Uniko blog to see more inspiration projects from the rest of the Design Team. And come back tomorrow - it's RELEASE DAY!!!

Yesterday was a snow day for Kat - she had a much-needed lie-in and spent the day working on a physics project. I was in my craft room making cards, but I did take the opportunity to get out my camera and take a photo of all the snow and the bright blue skies we had. I've hung large baubles from one of the trees in my front garden and it looks so pretty:


If you look closely at the ornament you can see my reflection!!!  That's all for now - see you soon.

signature

Saturday, 11 November 2017

Uniko - Revisit and Blog Hop ...

.... Good morning from an extremely cold and frosty Northville! I'm here this morning with a few projects for the Uniko Revisit and DT Blog Hop.  As well as running Uniko on her own, Bev is the mum to two very active little boys, so generally, we have new releases every other month and, in the off month, we revisit previous releases. This month's revisit is another look at the dies and stencils that were released last month.

I'm starting off with a card that showcases the stencil - Scattered Polka Dots:

Merry Christmas - photo by Deborah Frings - Deborah's Gems

Stamps: Festive Sentiments, Most Wonderful, Stunning Snowflakes
Inks: Stampin' Up! - Emerald Envy, Tranquil Tide; Versamark; Delicata - Silvery Shimmer
Dies: Die-namics - A2 Rectangles Set 1 #10, A2 Stitched Rectangles Set 2 #8
Accessories: White Lustre Card; Silver Mirri Card; SU Card - Tranquil Tide; Silver Embossing Powder; Uniko Stencil - Scattered Polka Dots


I taped the polka dot stencil to white card and sponged on the inks - I used the darker green on one side and the emerald green on the other and blended them together in the centre. I used a stitched edge die to cut out the finished panel. I used a plain die to cut a mat layer of metallic silver mirri card. I positioned the stencilled panel in the MISTI and stamped the sentiment in Versamark and heat embossed with silver powder. I was watching one of Jennifer McGuire's videos earlier this week where she showed her thick embossing technique for sentiments and I used it on this sentiment. I do like the effect. I attached the finished panel to the mirri card with dimensional tape. On the inside, I cut a mat layer of dark green card and on the white panel added a Christmas greeting in green, along with a few silver snowflakes. I'm submitting this card to CAS Colours & Sketches - CASC&S#248 - I just adore the colours!!

Merry Christmas inside - photo by Deborah Frings - Deborah's GemsMerry Christmas sq- photo by Deborah Frings - Deborah's Gems

Next up, I have a couple of cards made using the Designer Dies Snowflake Trio:

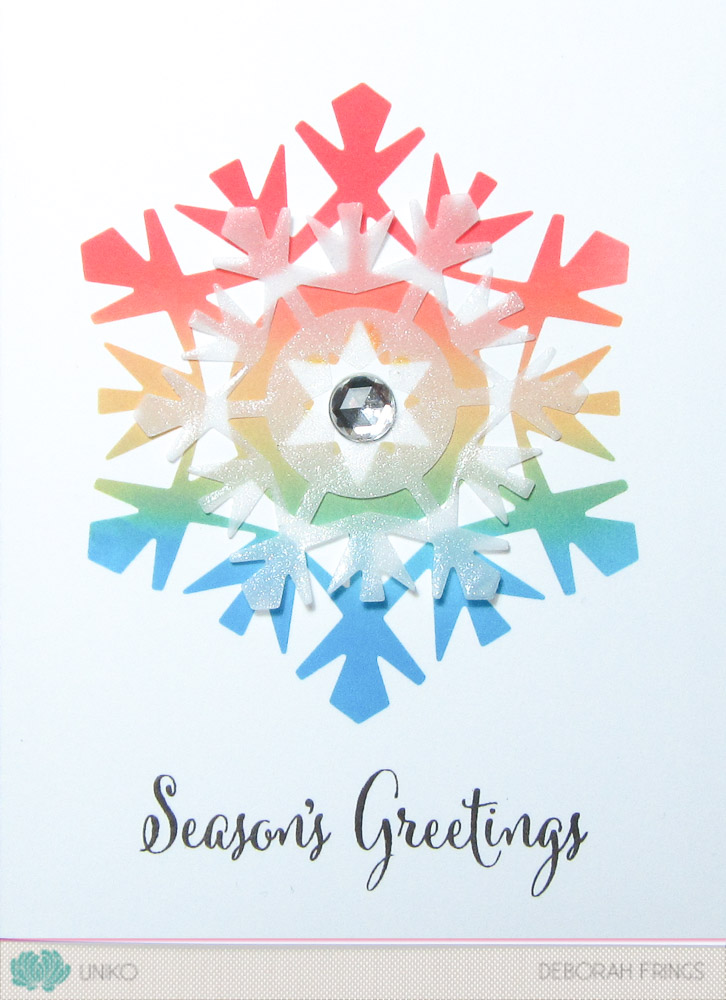
Season's Greetings - photo by Deborah Frings - Deborah's Gems

Stamps: Uniko - Simply Said Christmas, Stunning Snowflakes
Inks: Gina K - Black Onyx; Distress Oxides - Candied Apple, Fossilized Amber, Salty Ocean
Dies: Uniko - Snowflake Trio
Accessories: White Lustre Card; Gina K Card - Black Onyx; Vellum; Wink of Stella - Clear; Gem; Inkadinkado - Masking Paper


I cut a piece of masking paper to the size of the card base and then die cut the largest snowflake, being very careful to keep all the little pieces. I also die cut another large snowflake from some scrap card. I removed the die cut snowflake mask from the panel and attached it to the front of the card. I used blending foam to add red, yellow, and blue inks, and where they blended it created orange and green. I carefully removed all the masking paper to reveal the finished rainbow snowflake. I die cut a smaller snowflake in vellum, covered it with clear Wink of Stella, added tiny amounts of glossy accents to the small points on the inside star and adhered it on the rainbow snowflake. I finished the front with a single large, clear gem. On the inside, I cut a mat layer of black card and on the white panel stamped a simple greeting and some colourful little snowflakes. I'm submitting this card to AAA Cards - AAA#102 where the team want to see ink blending, and also to Less is More - LIM#353&354 where they want to see Firework colours.

Season's Greetings inside - photo by Deborah Frings - Deborah's GemsSeason's Greetings sq - photo by Deborah Frings - Deborah's Gems

With the left-over die cut snowflake mask, I made another card:

Peace - photo by Deborah Frings - Deborah's Gems

Stamps: Uniko - Stunning Snowflakes
Inks: Gina K - Black Onyx; Distress Oxides - Candied Apple, Fossilized Amber, Salty Ocean
Dies: Uniko - Snowflake Trio; Die-namics - Peace
Accessories: White Lustre Card; Gina K Card - Black Onyx; Wink of Stella - Clear; Glossy Accents


I adhered the snowflake mask to the front of the card and applied distress inks, blending to create a rainbow from red to blue. With the mask in place, I spritzed on some water to create a softly distressed look. I carefully removed the mask to reveal a clean, crisp white snowflake. I die cut the word 'peace' from black card and adhered the letters to the card. I added clear Wink of Stella to each letter and topped it with Glossy Accents - I really like the sparkly, enamelled look that this gives. On the inside, I cut a mat layer of black card and on the white panel stamped a sentiment and added rainbow snowflakes. I'm submitting this card to City Crafter Challenge Blog - CCCB#387 where they want to see the word 'LOVE' or 'PEACE' used. I'm also submitting this is AAA Cards - AAA#102 - there's lots of ink blending on this one!!!

Peace inside - photo by Deborah Frings - Deborah's GemsPeace sq - photo by Deborah Frings - Deborah's Gems

My last card was made using the new Flower Power #1 - #6 Dies, along with the Wonky Stripes Stencil:

Happy Birthday - photo by Deborah Frings - Deborah's Gems

Stamps: Uniko - Flower Power #2, Flower Power #6, Simply Said
Inks: Distress Oxide - Fossilized Amber, Salty Ocean; Gina K - Lipstick, Cherry Red, Black Onyx; Versamark
Dies: Uniko - Flower Power #1 - #6; Die-namics - A2 Rectangles Set 1 #3, A2 Stitched Rectangles Set 2 #3
Accessories: White Lustre Card; Gina K Card - Black Onyx; Uniko Stencil - Wonky Stripes; Clear Embossing Powder


First, I have to give credit to Jane for the idea of using washi tape on the stencil to mask areas. I created the little block pattern by using the masked stencil and blended leftover yellow and blue distress inks, which resulted in this lovely soft green. I used dies to cut a tiny panel in black card and from the stencilled panel. I used the two-step rose from Flower Power #6 and cut it out with the matching die. The leaves are from Flower Power #2. I stamped them in Versamark, heat embossed and used the leaf die (which works for all the Flower Power leaves) to cut them out. I added some sparkle to the leaves. I finished the front with a tiny, simple birthday sentiment. On the inside, I simply added one of the die cut roses. I'm submitting this one to CASology - CAS#274 where the cue word is 'TINY'.

Happy Birthday inside - photo by Deborah Frings - Deborah's GemsHappy Birthday sq - photo by Deborah Frings - Deborah's Gems

That's all from me today. Don't forget to visit the rest of the team and follow along with the Blog Hop. Here's the list:

Deborah (that's me!)

Make sure to comment as you go along the Blog Hop for your chance to win ALL the products being revisited. You've got until midnight (GMT), that's 7.00pm EDT in the States, on Sunday 18th November to comment. The winner will be announced on Sunday 19th November.

I do hope you like my creations - let me know which is your favourite. Have a good weekend, see you soon.

signature
Related Posts Plugin for WordPress, Blogger...