Showing posts with label Funstamps - Scribble Snowman. Show all posts

Thursday, 17 December 2020

Plaid Snowmen ...

... Good Morning! Three days on the trot - go me!! I like to make special Christmas cards for my family and this is the one I made for our son:


Stamps: Funstamps - Scribble Snowman; Waltzingmouse Stamps - Cabin Plaid Background; Uniko - Snowflake Serenade
Inks: Gina K - Key Lime, Sea Glass, Soft Stone; Versafine - Onyx Black; Versafine Clair - Nocturne
Dies: Stampin' Up! - Word Bubble Framelits
Accessories: White Card; Uniko Stencil - Let It Snow; Taylored Expressions - Masking Ovals; Clear Embossing Powder; Nuvo - Clear Aquashimmer Brush

I'm submitting this card to several challenges and they are:


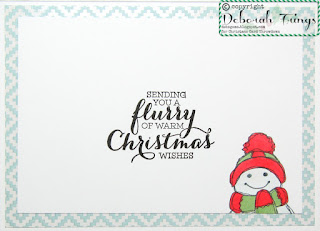
This card feature three of my all time favourite snowguys! I stamped a plaid background in soft lime and soft teal and on top of that I stamped the Scribble snowman and fussy cut them out. On white card I stamped three more snowmen and cut them out. I carefully cut out two hats and scarfs in white and adhered them to the plaid snowmen, adding a bit of colour the hats and scarfs. On the white snowman I added a green plaid hat and teal plaid scarf. I wanted to keep the card fairly simple, but still have some snowflakes in the background. I used a snowflake stencil over which I placed the Taylored Expression large oval mask and softly inked in some snowflakes. I adhered the two plaid snowmen flat to the card and used dimensional pads to adhere the white snowman. I made the greeting by typing the sentiment on my PC and used a speech bubble die to cut it out. I lightly brush green and blue ink around the edge of the bubble and used dimensional pads to attach it to the card. I finished the card by adding lost of subtle sparkle to the snowmen. On the plaid snowguys I added sparkle to the hat and scarves, and on the white snowman, I added it all over the body. On the inside, I cut a panel of white card, stamped a greeting added a swirl of soft blue and green snowflakes, and finished with a cute snowguy peeking in from the bottom of the card.


You can't see the sparkle in the photos above, so I took a close up to show all the lovely shimmer on the snowguys. You can also see the pretty plaid patterns too.


It's going to be a busy weekend. We don't put our decorations up early. No, not even this year!!! The tree goes up on Saturday and we decorate everywhere then. I'm also going to be making some homemade marzipan for our Christmas cake, I might even do a few homemade mince pies too. All a special treat for my hubby!

Anyhow, that's all for now. See you again soon. Thanks for stopping by.

signature photo Signature.png

Saturday, 15 August 2020

C24C - Jolly Snowman ....

.... Good morning! I must apologise for not commenting on your projects for our last challenge - I've been away on holiday. We stayed in the UK, but I've not been doing much on the computer. I'm getting back into the swing of things now and have made a fun card for our new challenge at Christmas 24 Challenge - C24C#16. We want your Christmas cards to feature FANCY FOLDS. Here's my card:


Stamps: My Favorite Things - Bitty Holiday Wishes; Funstamps - Scribble Snowman
Inks: Memento - Tuxedo Black; Gina K - Cherry Red
Accessories: White Card; Carta Bella DP - Snow Fun; Copic Markers; Glitter

I'm submitting this card to The Holly & Ivy Christmas Challenge - H&ICC#76 where it's Anything Goes as long as it's Christmas.


I'm going to own up to being a boring card maker - I tend to stick to rectangular or square cards, so doing fancy folds really pushes me out of my comfort zone. I decided to make a triple stepper card and had fun making it. It was reasonably quick to make too. I started by cutting a panel of white card 8½" × 5½". I then followed the layout shown below. I know that in the UK and Europe we use metric and A6 cards, but I'm still using up US stash of cards, so I've done measurements for a standard US A2 card.


Once the cut and folds were done I decorated the panels with some winter themed paper. I also stamped my favourite scribble snowman on white card, coloured him with Copic markers and fussy cut him out. I adhered him to the long panel on the front and added glitter to the image. I added a small picture panel to the back stepper section made up of 4 layers, with the largest measuring 2⅝" square. I stamped the greeting on a piece of plain design paper using red ink. The inside is blank so that I can write my own message. Here are a couple more photos of the card with different views of the steps.


When the card is folded flat, it will fit in a standard US A2 envelope. It does have some depth so you do have to be careful of postage costs!


I think this challenge is lots of fun and I'm looking forward to visiting your blogs to see your creations. Have fun. That's all for now, see you again soon. Don't forget to visit our blog to see more inspiration projects from the rest of the design team.

signature photo Signature.png

Saturday, 18 February 2017

CCT - Technique .....

... Good morning! It's time for our new challenge at Christmas Card Throwdown - CCT04. For the next couple of weeks we have a technique challenge for you to use on your Christmas cards. We want to see Sunburst backgrounds (if you're not sure what this is, check out the video at the end of this post). You can do the technique with inks, but we want to see you use design papers - a great way to use up scraps! Here's the card I made:

Merry Christmas - photo by Deborah Frings - Deborah's Gems

Stamps: Stampin' Up! - Star of Light, Flurry of Wishes; Funstamps - Scribble Snowman
Inks: Memento - Tuxedo Black; Versafine - Onyx Black
Accessories: White Lustre Card; Kaisercraft DP - North Pole; Copics; Spectrum Noir Sparkle - Clear


Most of the sunburst techniques use triangular panels that are of equal size, but it is possible to vary the size of the triangles - it's just a bit more fiddly! I took the opportunity to use up lots of the scraps that I have in the North Pole design paper set. I covered the front of the card with Stick-It, a very thin and sticky double sided adhesive sheet. I then started to layer on the triangles. Once I'd finished with the background, I stamped my favourite snowman on some scrap white card, colour him with Copics taking card to use the colours from my background. I cut him out, edged him with a black marker and then added lots of sparkle to the snowman with a clear Spectrum Noir brush. I used a panel of design paper on which to stamp the sentiment and then attached it flat to the card. I used dimensional gel to attach the snowman. On the inside I cut a mat layer of design paper and on the white panel added a bold Christmas greeting along with a snowman peeking in from the bottom!

Merry Christmas inside - photo by Deborah Frings - Deborah's GemsMerry Christmas sq - photo by Deborah Frings - Deborah's Gems

I'm submitting this card to Merry Monday - MM#235 where they want to see snow folk on our cards. Don't forget to visit Christmas Card Throwdown to see more inspiration projects from the rest of the team. You've got plenty of time to join the fun - deadline is midnight GMT Friday 3rd March. Now, here's that video about the sunburst technique:


signature

Sunday, 27 November 2016

Snowmen ....

.... Good evening! We've almost come to the end of our long holiday weekend - it's been so nice to spend time with Jonathan and Kat. Mind, we still did our own things too! I think I've mentioned that I need quite a few Christmas cards as I send lots to family and friends in the UK. Well, I counted up the number I've made so far - 88 - and that's despite being on a Christmas card challenge!!! Go figure. Anyway I'm still about 30 short! So I spent yesterday making cards. I made a set of 8 cards featuring my all-time favourite snowman:


Stamps: Funstamps - Scribble Snowman; Clearly Besotted - All Occasion Sentiments; Penny Black - Majestic; Uniko - Most Wonderful
Inks: Stampin' Up! - Daffodil Delight, Crushed Curry, Wisteria Wonder, Emerald Envy, Peekaboo Peach, Melon Mambo, Cajun Craze, Pacific Point, Green Galore, Lucky Limeade, Smoky Slate; Distress Archival - Black Soot
Dies: Die-namics - Oval Stax #4
Accessories: White Lustre Card; SU Card - Daffodil Delight, Wisteria Wonder, Emerald Envy, Peekaboo Peach, Melon Mambo, Cajun Craze, Pacific Point; Bazill Card - Lime Crush; Wink of Stella - Clear; Zig Real Brushes; Tim Holtz Water Colour Card; Sizzix/SU EF - Softly Falling


I had so much fun making this set of cards. I stamped the snowman on water colour card and used my Zig Real Brushes to add colour. Once dry I fussy cut them out, edged them with a black marker and added sparkle to all the snow areas with a clear Wink of Stella brush. I made cards to match the colour on the hats and scarves and then stamped the tree to match. Next I cut white card slightly smaller than the base and used my MISTI to stamp the sentiment at the bottom. I cut out an oval on each card and then embossed some snow falling. I adhered each panel directly to the card and then used dimensional gel to adhere the snowmen. On the inside of each I cut a white panel on which I stamped a Christmas greeting in the matching ink and added a little snowman peeking in at the bottom. Here's the inside of the yellow card:


I'm submitting the yellow card to this week's Addicted to Stamps and More! - ATSM#221 where it's ANYTHING GOES. I'm submitting the blue card to Cardz 4 Guyz - C4G#147 where they want to see snowmen (and where I got the idea) and also to Inkspirational - INK#122 where the cue word is CHILL. Finally, I'm submitting the lilac one to TIME OUT Challenge - TOC#71 where they want Christmas cards with the option of glitter/sparkle - and I think you can see the sparkle best on this card.

Edited to add: I've been wandering around blogland and found a new challenge - well, new to me! It's called A Gem of a Challenge - AGOC#183  and this week's challenge is SNOWMEN/WOMEN - I'm going to add my card there too - it's a perfect fit! :)


 Here's a look at them all together - they look fab - bright and colourful!


I now have 96 cards with this set - still a few more to make. I think I'll be concentrating on some quick and easy cards. Last posting date from the States to the UK is Thursday 8th December - so I'd better get my skates on!! That's all for this evening.

signature

Saturday, 18 July 2015

52CCT - Theme .....

.... Hello, good morning!  It's time for our new theme challenge at 52 {Christmas} Card Throwdown and Tanja has picked the theme of snowman.  I had so much fun with this theme, here's my card:

Christmas Wishes - photo by Deborah Frings - Deborah's Gems

Stamps: Funstamps - Scribble Snowman; Uniko - Stunning Snowflakes
Inks: Versamark; Versafine - Onyx Black; Memento - Tuxedo Black, London Fog
Dies: PTI - Wet Paint Holiday
Accessories: White Lustre Card; Stampin' Up! - Basic Black; Copic Markers; Wink of Stella - Clear; Perfect Pearls - Pewter; Peel Offs


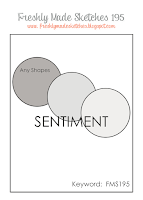
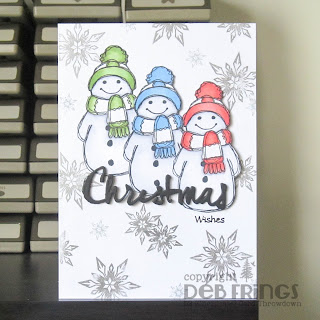
I used the sketch from this week's Freshly Made Sketches - FMS#195 for the layout and the colours are from Colour Me Card Challenge - CMCC#80.  I stamped snowflakes randomly over the card in Versamark and used pewter Perfect Pearls to bring them out.  I stamped the snowman three times on white card and coloured them with Copic Markers.  I cut them out, edged them with a black marker and added some sparkle to the hats and scarves with a clear Wink of Stella brush.  I adhered the first snowman flat to the card, and used dimensional gel for the other two.  I die cut the word Christmas four time in black, glued them together and attached it to the card.  I finished with a peel off which I coloured black.  On the inside I cut a mat layer of black card and stamped a Christmas greeting on the white panel, along with some more snowflakes.

Christmas Wishes inside  - photo by Deborah Frings - Deborah's GemsChristmas Wishes Sq - photo by Deborah Frings - Deborah's Gems

Here's a close up of the sparkle on the hats and scarves - looks so nice when the sun shines!!

Christmas Wishes detail - photo by Deborah Frings - Deborah's Gems

Don't forget to visit our blog to check out the inspiration cards from the rest of the team.  It's so nice to be back in the States and play in my craft room.  I did miss playing along for the past few weeks!  That's all for now - have fun!

signature

Thursday, 26 December 2013

Family Christmas cards ....

....  Hello everyone, time for another scheduled post.   I do hope that you all had a super day yesterday.  Today I can share with you the cards I made for my family.  First, the card I made for Jonathan:

Jonathan's Card - photo by Deborah Frings - Deborah's Gems

Stamps: Waltzingmouse - Festive Foliage; Stampin' Up! - Christmas Messages
Inks: SU - Cherry Cobbler, Pistachio Pudding, Pink Pirouette
Dies: WMS - Mistletoe Dies
Accessories:  White Lustre Card; SEI DP - Berry Melody; SU Card - Pistachio Pudding


I made this card just before we flew back to the UK.  When I saw the sketch at CAS(E) this Sketch! - CTS#58 - I knew that I had the layout.  Jonathan likes the colours red and green and in my stash of papers I found this lovely sheet of stylised snowflakes and used that for the background.  In the sketch there is some holly; in my card I opted for some mistletoe - appropriate for my husband!  And the sentiment is just perfect (and part of the reason I got this set).  I stamped the mistletoe and berries onto white card and cut them out with the matching dies - thank you Claire!  For the inside I cut a mat layer of pale green card and on the white panel stamped some more mistletoe hanging down and the partner to the sentiment above.

Jonathan's Card inside - photo by Deborah Frings - Deborah's Gems

Next up is Kathryn's card - again I made it just before we left the States.

Kathryn's Card - photo by Deborah Frings - Deborah's Gems

Stamps: Funstamps - Scribble Snowman; My Favourite Things - Ornament Banner Builder
Inks: Stampin' Up! - Melon Mambo, Island Indigo
Dies: Die-namics - Ornament Banner, Fishtail Flags Layers Stax #2, Fishtail Flags Stax #2
Accessories: White Lustre Card; SU Card - Melon Mambo; Glitter Paper; Promarkers and Copics


For the layout I used the sketch from Seize the Sketch - STS#10, sadly I'm too late to submit the card, but I love the layout.  I made a really bright, vibrant card.  I made the base from Melon Mambo and cut a panel of white glitter card - to suggest a field of snow.  I used my all time favourite snowman stamp, colouring the image with a mixture of Promarkers and Copics.  I die cut the ornament banner and stamped on the snowflake ornaments.  I finished the front with a clean, simple and bold sentiment.  For the inside I simply cut a white panel and stamped another snowman - he's much more subtle inside!  I think the sentiment is totally appropriate for our girl.

Kathryn's Card inside - photo by Deborah Frings - Deborah's Gems

And last, but by now means least, the card we gave to Ben.  You saw this one yesterday.  I made it last Friday, day we flew back to the UK.  I'd chatted, via Facebook, with Ben in the morning and he told me he hadn't received the card we posted to him.  I couldn't leave him without a card.

Ben's Card - photo by Deborah Frings - Deborah's Gems

Details for the Santa card are on yesterday's post.  Below is the card we sent to Ben at the beginning of November, but didn't get to him. I actually made this as my card for 52CCT at the beginning of August - if you click the link you'll find all the details there.  I had originally thought it was going to be for Jonathan, but actually it works perfectly for our boy too!!


Ben's Card - photo by Deborah Frings - Deborah's Gems


That's all for now - our Boxing day plans include playing games, chatting, eating and drinking - a perfect way to spend the day!

signature
Related Posts Plugin for WordPress, Blogger...