Showing posts with label Penny Black. Show all posts

Wednesday, 25 March 2020

Simply Marvellous ....

... Good Morning! I hope that everyone is keeping well and healthy. Life has become very strange for us all now. Mum is a high-risk individual, so has to stay indoors (or her garden) for the next 12 weeks. I have to be very careful to keep my distance when I go out for supplies.

During our new world situation, I find that spending time in my craft room really helps me keep sane. So, I'm here today with my DT card for Seven Hills Craft Blog. I've made a clean, simple and floral card.


Stamps: Altenew - Ornate Foliage, Across the Pond, Dot Botanicals
Inks: Altenew; Gina K - Applemint, Black Onyx
Accessories: White Card; My Mind's Eye DP - Kiss & Tell; Nuvo - Clear Aquashimmer Brush

I'm submitting this card to Cardz 4 Galz - C4Glz#117 and to Penny Black and More - PBM#03, where they both want to see Spring Flowers.


In November last year I was lucky enough to attend an Altenew workshop at my local hotel with Lydia Evans. It was such a fun event. I stamped the front panel of this card there but didn't make it into a card until the other week. I cut the panel down to 5" × 3¾" and layered it on some pink dotty paper from my stash and adhered the whole panel to the front of the card. You can't see it in the picture above, but I added sparkle to the flowers with a clear aquashimmer brush - it's so pretty in real life! I really love the words in this set - they are all made specially for us Brits!! On the inside, I cut another mat layer of the dotty paper and on the white panel I stamped a dotty botanical image and tiny sentiment. There's lots of white space for my own personal message.


I'm keeping this card for my stash. That's all for today, do stop by again soon. Wherever you are, keep safe.

signature photo Signature.png

Saturday, 23 November 2013

52CCT - Acrylic block background ....

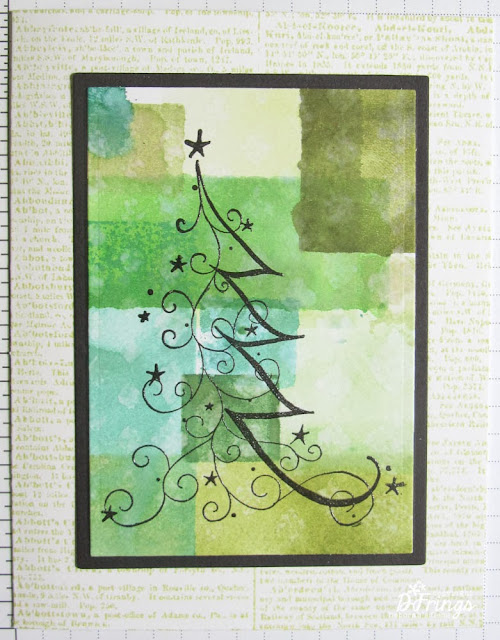
.... Morning everyone, it's time for our technique challenge at 52 {Christmas} Card ThrowdownLouise wants us to create a background using the acrylic block technique.  By that, she means inking acrylic blocks, spritzing with water and stamping on to card - hey presto a quick and easy background.  I've included a link at the bottom of this post to a tutorial that I found on U-tube (there are lots more).  Here are my cards - yes, I got carried away and made a couple of cards:
Xmas Constellation - Photo by Deborah Frings - Deborah's Gems
Card Size: 4¼" × 5½"
Merry Christmas Constellation - Photo by Deborah Frings - Deborah's Gems
Card Size: 4½" × 6¼"
Stamps: Penny Black - Xmas Constellation; Stampin' Up! - More Merry Messages, Dictionary
Inks: Distress - Forest Moss, Pine Needles, Shabby Shutters, Peeled Paint, Evergreen Bough, Mowed Lawn; Stampin' Up! - Garden Green, Wild Wasabi, Coastal Cabana, Pistachio Pudding; Versafine - Onyx Black
Dies: Spellbinders - A2 Matting Basics A (S5-131) #5, A2 Matting Basics B (S5-132) #5, Wonky Rectangles (S4-306) #6
Accessories: White Lustre Card; Clear Embossing Powder; Black Card; Sakura Micron Pen; Kanban Sentiment Strip; My Favourite Things - MPD Graduated Diamonds Stencil; Signo White Gel Pen

I had lots of fun with this technique and ended up getting quite inky!  But that was half the fun.  I used several different sized acrylic blocks - long and thin, tiny squares, and a couple of different sized rectangles.  I inked the backs, spritzed and stamped.  I overlapped some of the stamped images dried them with a heat gun and then added more.  The top card has a somewhat smoother finish to the stamped blocks because I added more water to the acrylic blocks; the bottom card has a slightly blotchy look because of less water.  On the top card, if you look closely, you might just see a subtle patten of graduated diamonds.  I achieved this effect by spritzing water through a stencil and allowing it to react with the stamped blocks.  I didn't add any texture to the background on the bottom card.  I stamped the Christmas tree on each background and heat embossed with clear powder.

On the first card I used the Matting Basics to cut a rectangular image which I matted onto black card.  I stamped the Dictionary background on the card base and then adhered the Christmas tree.  It has the look of a painted canvas.

On the larger card I decided to have a bit of fun with placement of the image.  For this card I die cut the tree using the Wonky Rectangles and, after stamping the dictionary background, adhered the image directly to the card.  I put the die over the top of the image and lightly drew round the die.  Then, using a Micron pen I created a "Zentangle" type frame.  I finished the front of this card with a greeting that I found in my scrap stash - just happened to be the right colour!

For the inside of each card I cut a mat layer in black and on the white panel stamped the Christmas tree and added a sentiment.

Xmas Constellation inside - Photo by Deborah Frings - Deborah's Gems
Inside of top card
Merry Christmas Constellation inside - Photo by Deborah Frings - Deborah's Gems
Inside of bottom card
I think this is only the second time I've tried this technique - it was lots of fun and I'll certainly use it again.  Don't forget to check out the inspiration cards from the rest of the team.  I'm looking forward to seeing what you make with this technique.  See you soon.


Wednesday, 23 October 2013

Attitude ....

.... Hello again!!  I'm back with a very clean and simple, and one layer, card for a couple of challenges:

Stamps:  Penny Black - Fantasy Tree; My Favourite Things - Clearly Sentimental about New Beginnings
Inks: Versafine - Vintage Sepia; Versamark; Stampin' Up! - Cherry Cobbler
Accessories: White Lustre Card; SU Card - Cherry Cobbler; Doodlebug Sprinkles; Vellum; Clear Embossing Powder


I've adapted the sketch for a square card.  I stamped the tree directly onto the card base and embossed it with clear powder.  I didn't want to hide the tree so I stamped the sentiment onto vellum and embossed that too.  I ran the vellum through my Xyron to make it self-adhesive and applied to the card.  I finished off the front with some enamel dots in co-ordinating colours.  I've left the inside very plain - simply a mat of red and on the white panel a tree - allowing space for me to write a message.  Chrissie and Jen want to see more than just leaves, so I thought this was a good opportunity to get out this stamp - I've neglected it a bit of late!


It's a gorgeous day here - with lots of sunshine and blue skies, mind there are a few dark clouds that keep coming over, but no snow or rain yet!!  Strange to think that in Chicago they had the first snowfall of the season yesterday, albeit only a dusting!  Bye for now!

Tuesday, 29 November 2011

CAS-ual Fridays .....

.... this is another in my series of scheduled posts.  The card I'm sharing was made for the current CAS-ual Fridays - CFC29 challenge, and because last week was Thanksgiving, the challenge is running for two weeks.


I like this sketch - there are so many possibilities.  I've gone for a very simple look on my card.  I've used two types of Coredination card - Gemstone card and Whitewash card - both have the same base colour.  I used the Gemstone card to make a mat and then cut a smaller piece of the Whitewash card.  I found a lovely damask style embossing folder and used this on the Whitewash card - it looks like velvet flocked paper!  I added a very simple sentiment.  This is a birthday card for my stash.


Stamps:  Penny Black - Sentiments
Inks:  Stazon - Jet Black
Cuttlebug:  Textile Texture Folder
Accessories:  Coredinations card - Gemstone and Whitewash

That's all for now.  Do check back on 1st December - I've a post scheduled for the start of the December St Luke's Charity Card Challenge - it's a lovely one!!!  See you soon.

Wednesday, 26 October 2011

Love leaves memories ....

...  I heard yesterday evening that my friend's husband died - he had been ill for a while, and my friend had to close her shop to be with her husband.  Sadly, I didn't hear until I spoke to her yesterday.  So I've made this card for her and gave it to her this morning.


I CASEd my own card made for the For Your Inspiration challenge - I thought the leaves and verse were just perfect.  However, I did change the colours, my inspiration coming from Kim and Lynne (at the bottom of the post).  Actually, I can see this design working in other colours too - shades of brown, green, grey and lavender would all work beautifully.  And I think Claire's verse is just lovely.

Stamps: Penny Black - Japanese Maple; Waltzingmouse - Irish Blessings
Inks:   Kaleidacolour - Blue Breeze
Spellbinders: Classic Squares Lg (S4-126) die #7
Accessories: Martha Stewart punch; Card from stash

That's all for now.  I'm just about to head off to the local cinema to take Kathryn to see "Monte Carlo" starring Selena Gomez.  Kathryn absolutely adores Selena (she's one of the young actresses in the Disney studio) and it look like it could be fun.  Light, frothy stuff - a fun way to spend the afternoon.  Afterwards, we might even have a bit of time to pop into Hobbycraft for a quick look round - no buying of course!!!!
 
When I get home, I'll have some time to play in my craft room.  I've got a few cards I need to make - and soon.  Birthdays coming up!!  See you soon.

Monday, 10 October 2011

OLW67 - Thoughtsgiving ....

... this week's One Layer Wednesday - OLW67 challenge is being hosted by Jennifer at Styles Ink.  When I logged on last Wednesday I couldn't get to Jennifer's blog - it was being hacked, but fortunately Jennifer's husband is a computer whiz and repelled the hackers!  Good man!!!

The theme for OLW67 is to "to make and send/deliver a “Thinking of You” card to someone who is struggling with any kind of battle. I would also like all participants to make a five dollar (or more!) donation to the cancer research/cause of their choice." 

Edited:  I forgot to mention that my chosen cancer charity is Cancer Research UK - and I've donated.  They do really good work.  Jennifer - thanks for the nudge!!  Something I do on a regular basis is give blood, and a few years ago I went that extra stage and got added to the bone marrow donor list.  I've been called twice for additional blood tests - but so far haven't donated anything.  If you can - this is a great way to help. 
I've got a crafty friend in the village who is really having a tough time at the moment.  Last year her Mum died and since then her Dad has not been very good, and recently they've been told that her Dad is really ill.  Not only that, her son has got life threatening problems too.  And the icing on the cake is that my friend also has chronic health issues, which aren't getting better.  Yet, despite all this, she is cheerful, thoughtful of others and caring - so I've made my card for her.

I used one of my favourite stamps, which has not seen much ink lately, for this card.  I started off by using a bit of die cut waste as a stencil for the card.  I sponged several colours on the stencil to create a garden/sky scene.  Using my stamp-a-ma-jig, I positioned the tree in the center of the garden and then added a simple sentiment directly above.  I added some colour to the tree by using Flower Soft which I've had in my room for ages and this is the first time I've used it.  As we're now well into Autumn I decided that my tree would have the golden colours of autumn for the leaves.


Stamps:  Penny Black - Fantasy Tree; HOTP - Sentiments
Inks:  Memento - Tuxedo Black; Distress - Bundled Sage, Shabby Shutters, Peeled Paint, Tumbled Glass, Stormy Sky, Chipped Sapphire
Spellbinders:  Lotus Pendant (S4-269) - I used the waste left to create the lovely starry shape
Accessories:  Flower Soft - Autumn; Card from stash

I have to tell you guys how impressed I am with my decorators.  They were here bang on time - 8.30am and immediately set to work.  They've almost finished Ben's bedroom - it will need an extra coat on two walls as Ben's drawn on the walls!! Kids!!!  The guys will be back tomorrow morning for more! 

Yesterday I told you that we hope to be off to the States in the New Year.  Several of you commented on the crafty opportunities available to me!!  Now, you must realise that this in no way influences my decision to want to go to America!!!  :) :)  Yes, right!  Even Jonathan realised that I might go mad on crafty purchases - PTI goodies with no shipping charges, Micheal's stores and all sorts of stuff at prices much cheaper than in the UK.  Of course, I want to go to the US.

That's all for now - off to see my friend (above) and deliver her card.  See you all later.

Friday, 22 July 2011

For your inspiration .....

.... the challenge at For Your Inspiration for the next two weeks is this wonderful autumnal photo.  Stunning!!


This one was about as easy as it gets.  I have a super stamp which feature falling leaves - and the picture above just brought it to mind.  So I had a rummage and inked it up with a lush red ink and stamped it out.  I used my square nesties to cut the image out and to make a suitable mat - dark green to echo the other trees in the image.  I felt this would make a perfect sympathy card, so I added a lovely sentiment from Irish Blessings.  Finally, I punched out a few leaves and added them to the card.


Stamps:  Penny Black - Japanese Maple; Waltzingmouse - Irish Blessings
Inks:  Distress - Barn Door, Fired Brick, Rusty Hinge; Memento - Tuxedo Black
Spellbinders: Classic Squares Lg (S4-126) die #7
Accessories:  Martha Stewart punch; Card from stash

Last night's performance by Kathryn and her friends at Bugsy Malone was absolutely brilliant.  The show was really good fun - all the kids performed so well.  I don't think that any of them had any nerves at all.  The costumes looked super, the dancing was excllent and the singing was superb!  Can't wait to see it again on Saturday.  That's all for now - I'm going to try and pop up one more card today before I go to collect Ben - he's here for a two week holiday!!!

Tuesday, 28 September 2010

No crafting today ...

... instead I went hunting for a new tap.  Not the most thrilling of jobs and also not very successful.  All I want is a lovely new kitchen tap that has an extendable hose, so that I can reach the corners of the drainer, in an nice antique brass finish.  No such luck.  As far as I can see, I can only get this type of tap in stainless steel or chrome.  And the price - anyone would think they were made of gold!  So I'm going to stick with my current tap - until I win the lottery and have a complete redesign!!  Well, I can dream, can't I?

I've been finalising numbers for my Stampin' Up! party on Saturday, should be a reasonably good turnout.  I've been keeping an eye on Splitcoaststampers for new stamps and things that might be in the new UK catalogue.  One of my favourite sets, which I saw well over a year ago, is the Fifth Avenue Florals - a wonderful rose outline stamp along with two further flowers and some words.  But it wasn't in the 2009 catalogue - so here's hoping it'll be in 2010.  There are others, but I'll just have to be patient!! 

I like to try out different techniques - and in 2008 I used gilding flakes for the first time.  I'd watched a demo by Dawn Bibby and thought the effect was stunning.  So I decided to make a Valentine card for Jonathan.


In my stash of peeloffs (of which I have far too many, and must reorganise) I found a beautiful black heart which I wanted to use as the focus of the card.  There are various methods that can be used to achieve this effect.  For the heart above I used a piece of double sided adhesive sheet, then I removed the top protective layer and carefully placed on the black peeloff.  Next I added some of my gilding flakes (a mixture of red, gold and silver) and rubbed with a toothbrush to burnish the flakes into place and remove any excess.  I worked over a large box to catch the excess - I don't waste anything.  I wanted a simple but striking background, so ran some red mirri card through my bug - I used the Love Language set, and rounded the corners of the card.  I used the same set for the hearts and words - these were done in shiny black mirri card.  Finally I added a strip of black ribbon.  I'm still pleased with this card.

Reviewing my cards - I realise that I have already done some cards in the one layer style favoured by Susan Raihala of Simplicity.  I used the Fantasy Tree stamp by Penny Black for several Christmas cards.  I followed some layouts that had been featured in one of the craft magazines (sorry, can't remember which one).  I was very pleased with the result.


That's all for tonight.  I'll be back again tomorrow.

Related Posts Plugin for WordPress, Blogger...