Showing posts with label WMS - Compliments of the Season II. Show all posts

Tuesday, 22 November 2016

Christmas tree ...

.... This has to be one of the quickest cards I've made recently. It started life as part of a 12" x 12" scrapbook page. While at Stampeddler last Saturday I got a few large sheets - not what I usually do, but they are just lovely. Here's my card:

Christmas Tree - photo by Deborah Frings - Deborah's Gems

Stamps: Waltzingmouse - Compliments of the Season II
Inks: Stampin' Up! - Real Red, Emerald Envy; Memento - Tuxedo Black
Accessories: White Lustre Card; Copics; Wink of Stella - Clear; Gold Marker; SU Card - Pool Party


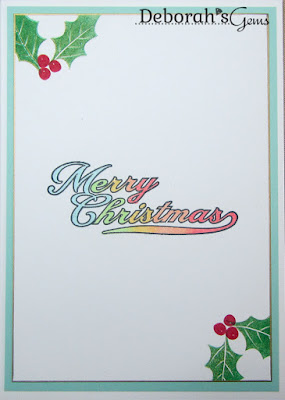
I simply cut out the section of design paper to fit my card. I edged it with a gold marker and attached it to the card. I added some sparkle using a clear Wink of Stella and I also added some actual glitter for the snow on the branches of the tree. On the inside I cut a mat layer of pale aqua card and on the white panel stamped some holly and a greeting. I'm submitting this one to Christmas Card Challenges - CCC#49 - I'm not playing along with the optional colours, just making a much needed Christmas card. I'm also submitting to Winter Wonderland Challenge Blog - WWCB where the team want to see poinsettia or falling snow. I think this might pass - it has snow on the branches.

Christmas Tree inside - photo by Deborah Frings - Deborah's Gems

Oh yes, it more than meets the requirements of our current challenge at 52 Christmas Card Throwdown - 52CCT46-16 where we want to see Old Fashioned Christmas. That's all for now!!

signature

Sunday, 20 November 2016

Simple Elegance ...

.... Morning all! It's so much colder this weekend. I can't quite believe that we had almost record warmth - for November - on Friday, but this morning it's freezing! Literally!! And yesterday, we even had a few flurries of snow, oh alright, it was sleet!! Anyway, I was having fun earlier this week making Christmas cards and I made a very simple blue ombre card. While I had that stamp out, I made another using more traditional colours for Christmas:

Joyous Christmas Wish - photo by Deborah Frings - Deborah's Gems


Stamps: Waltzingmouse - Compliments of the Season II; Uniko - Pure Florals Poinsettia, Stunning Snowflakes
Inks: Kaleidacolor - Fruitcake
Dies: Lil Inkers - Stitched Rectangles # 5
Accessories: Cream Lustre Card; Stampin' Up! Card - Cherry Cobbler; Gems


I'm submitting this card to Addicted to Stamps and More! - ATSM#220 where I took inspiration from the colours. And I'm also submitting to Addicted to CAS - ATCAS#101 where the cue word is OMBRE. This card has two ombre shades - green and red! I attached the die cut panel to the front of the card with dimensional tape. On the inside I cut a mat layer of red card and on the cream panel added a simple greeting and some snowflakes.

Joyous Christmas Wish inside - photo by Deborah Frings - Deborah's GemsJoyous Christmas Wish sq - photo by Deborah Frings - Deborah's Gems

My stash of Christmas cards has increased quite a bit in the last couple of weeks, but I still need lots more. So I think part of today is going to be spent in my craft room working on simple clean, simple and quick cards! The other part of the day will be spent watching my daughter sing at her first public recital. Her voice coach, Dorothy, has a recital for all her students each year. So looking forward to it! That's all for now!

signature

Thursday, 17 November 2016

Christmas Blues ....

... Good afternoon! I've been busy crafting all morning. While I play, I listen to the radio and we stream BBC Radio 2 - keeps us in touch with home! I've been listening to weather reports of snow and tornadoes, it's really making me appreciate our unusually warm November!! However, I do have a cool, blue Christmas card to share with you:

Joyous Christmas Wish - photo by Deborah Frings - Deborah's Gems

Stamps: Waltzingmouse - Compliments of the Season II; Uniko - Pure Florals Poinsettia, Stunning Snowflakes
Inks: Kaleidacolor - Blue Breeze
Dies: Lil Inkers - Stitched Rectangles #5
Accessories: White Lustre Card; Stampin' Up! Card - Pacific Point; Gems

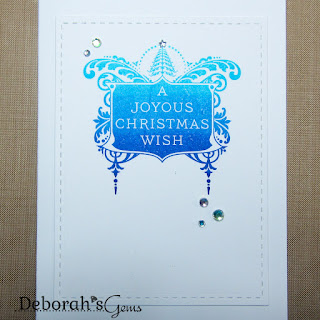
I really like the ombre effect that you get when stamping with Kaleidacolor ink pads and it works beautifully with this elegant Christmas stamp. I used a stitch edge die to cut out the panel and adhered it flat to the card. I finished the front by adding some pale aurora gems. On the inside I cut a mat layer of blue card and on the white panel added a greeting and some snowflakes.

Joyous Christmas Wish inside - photo by Deborah Frings - Deborah's GemsJoyous Christmas Wish sq - photo by Deborah Frings - Deborah's Gems

I'm submitting this card to CAS Colours & Sketches - CASC&S#200 where they want to see monochormatic shades of blue - and it's their 200th challenge and 4th birthday. As the inks form a lovely ombre effect, I'm also submitting to Addicted to CAS - ATCAS#101.

That's all for now as I really do need to get some housework type stuff done!!!  See you soon.

signature

Saturday, 28 May 2016

52CCT - Stash ....

... Morning! I can't quite believe that it's already the last Saturday in May! Fabiola has a stash challenge for us this week at 52 Christmas Card Throwdown - 52CCT21-16 - she wants us to use our dies and/or punches. I actually made two cards! Here's the first:

Merry Christmas 1 - photo by Deborah Frings - Deborah's Gems

Stamps: Waltzingmouse Stamps - Compliments of the Season II
Inks: Versafine - Onyx Black
Dies: Poppy Stamps - Mod Snowflake Background
Accessories: Stampin' Up! Card - Basic Black; SU Glimmer Paper - Silver; SU DP - Basic Black; White Lustre Card; SU Punch; Craftwork Cards - Sentiment Label


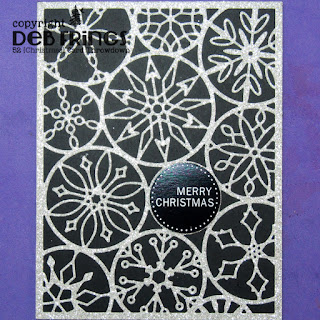
This is the first time I've used the snowflake background die - it's fabulous. I cut it from silver glimmer paper and used my precision cutting plate (which helps) on the Big Shot. I ran the die through several times to make sure that it cut through all the paper, but I still had a bit in the middle that didn't cut (can you guess where?) I adhered the die cut to a black card and simply added a greeting to the front. On the inside I cut a panel of white card and stamped a greeting, and added a punched snowflake in black design paper.

Merry Christmas 1 sq - photo by Deborah Frings - Deborah's GemsMerry Christmas 1 inside - photo by Deborah Frings - Deborah's Gems

I'm submitting this card to a couple of challenges - Jingle Belles - JB:16:11 where they don't want to see any blues (done), and Fab 'n' Funky - FNF#306 where they want to see Christmas cards (done).

My next card is very clean, crisp and simple:

Merry Christmas 2 - photo by Deborah Frings - Deborah's Gems

Stamps: Waltzingmouse Stamps - Compliments of the Season II
Inks: Versafine - Onyx Black
Dies: Poppy Stamps - Celestial Star Border
Accessories: White Lustre Card; SU Glimmer Paper - Silver; SU DP - Basic Black; SU Punch


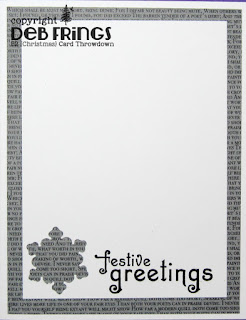
I used Jenni's card over at Muse - MUSE#167 as the inspiration for this card. I changed my card to portrait and opted for a monochromatic colour scheme. I die cut the stars from silver glimmer paper and adhered them directly to the card. The sentiment is bold black and contrasts beautifully with the silver stars. On the inside I cut a mat layer of black design paper and, on the white card, stamped a sentiment and punched out a snowflake to reveal the mat paper beneath.

Merry Christmas 2 inside - photo by Deborah Frings - Deborah's GemsMerry Christmas 2 sq - photo by Deborah Frings - Deborah's Gems

As there are stars on this card, I'm going to submit it to the current challenge at Left of Centre - LOC#131 where, if you're not making a left of centre card, then the team want to see stars.

Do visit our blog to see more inspiration from the rest of the team. That's all for now!

signature

Saturday, 16 April 2016

Festive ornaments ...

.....  Hello again! I was on a bit of a roll yesterday. After making my card for 52 Christmas Card Throwdown, I decided to have a go at another of the Merry Monday - MM#200 challenges. I picked the photo inspiration:

Festive Greetings - photo by Deborah Frings - Deborah's Gems


Stamps: Waltzingmouse - Festive Foliage, Compliments of the Season II
Inks: Memento - Grey Flannel; Distress - Iced Spruce
Dies: Lil Inkers - Dual Stitched Rectangles #3
Accessories: White Lustre Card; Kaisercraft DP - Silver Bells


I used most of the same supplies as for my 52CCT card, but changed the design paper. In the Silver Bells stack was a page full of pretty Christmas ornaments, so I cut out a couple of pink and one grey. I covered the base with pink paper, which just happens to have some Christmas foliage on it. I cut a large white panel and stamped some pine branches in two shades of grey for the background and then adhered the Christmas ornaments. I finished by adding a simple greeting. On the inside I cut a mat layer from more design paper and stamped some branches and a greeting on the white panel. This one almost works for our Christmas Foliage theme at 52 Christmas Card Throwdown, but the foliage is a bit too much in the background!

Festive Greetings inside - photo by Deborah Frings - Deborah's GemsFestive Greetings sq - photo by Deborah Frings - Deborah's Gems

That's all for now. Hopefully, I'll get some more unpacking done today and get rid of those awful packing boxes. See you tomorrow!

signature

52CCT - Theme ...

.... Good morning! I'm back this morning with a card for our new challenge at 52 Christmas Card Throwdown - 52CCT15-16. This week Patricia has picked CHRISTMAS FOLIAGE for our theme and I've had fun with it:

Merry Christmas - photo by Deborah Frings - Deborah's Gems

Stamps: Waltzingmouse - Festive Foliage, Compliments of the Season II
Inks: Stampin' Up! - Old Olive, Mossy Meadow, Real Red; Versafine - Onyx Black
Dies: WMS - Holly Dies; Lil Inkers - Dual Stitched Rectangles #2
Accessories: White Lustre Card; Kaisercraft DP - Home for Christmas


I used a couple of my favourite stamps sets from Waltzingmouse (now sadly closed) to make this card. This week's challenge at Merry Monday - MM#200 is a multi-challenge as it's their 200th challenge. I've used their colours and the sketch on this card. I covered the card with some foliage design paper and added a strip of kraft burlap paper. I die cut some white card onto which I stamped a bold Christmas greeting. I finished the front by stamping some holly leaves and berries, cutting them out with the matching die and adding a paper arrow from the design paper set. On the inside I cut a mat layer of the burlap paper and stamped more holly on the white card.

Merry Christmas inside - photo by Deborah Frings - Deborah's GemsMerry Christmas sq - photo by Deborah Frings - Deborah's Gems

It was a really lovely day yesterday with bright sunshine and warm temperatures. I'm still trying to work out the best location in the house to take photos of my cards, so I decided to go outside and take these photos in the sunshine. I ended up sitting out for a while! Bliss!! For more inspiration, do visit our blog to see what the rest of the team have made.  Have fun!

signature

Saturday, 5 March 2016

52CCT - Sketch ....

... Hello and Good Morning!  As I type this post I can see a winter wonderland from my office window - snow all over the ground and houses, but with sunshine and blue skies - so very pretty.  I just hate driving in it!!  Anyway, it puts me in the mood for making Christmas cards, which is good as it's time for our new challenge at 52 Christmas Card Throwdown - 52CCT01-16.  Our host this month is Julie and she has a super sketch for us to use.  You can flip, rotate, adapt and add embellishments, but we must be able to see the sketch in your design.  Here's my take:

Chief Elf - photo by Deborah Frings - Deborah's Gems

Stamps: Waltzingmouse - Free Spirit Boy, Compliments of the Season II, Chief Elf
Inks: Memento - Tuxedo Black; Versafine - Onyx Black
Dies: Die-namics - Wonky Stitched Squares Stax #4, Wonky Stitched Circles Stax #4
Accessories: White Lustre Card; Kaisercraft DP - Say Aloha; Copics; Wink of Stella - Clear


My card has a totally tropical feel, which is the theme over at this week's Merry Monday challenge - MM#194.  I thought it would be fun to make tropical style Christmas card and I used stamps from my all time favourite company - Waltzingmouse (who are, sadly, closing on 31st March).  Our sketch lends itself to using lots of design papers (and I have a huge stash!).  I used co-ordinating papers from Say Aloha to create the layers.  I used dies to cut the centre square and circle.  I stamped a fun Christmas sentiment in the centre of the circle. I stamped these lovely hibiscus flowers on scrap card, coloured them with Copics, cut out and added sparkle with a clear Wink of Stella brush.  I adhered them to the card with dimensional gel.  On the inside I cut a piece of design paper as a mat layer and on the white panel added a Christmas greeting and some more hibiscus flowers.

Chief Elf inside - photo by Deborah Frings - Deborah's Gems

As this card has multiple layers, I'm submitting it to the current challenge at Jingle Belles - JB:16:15. I am also linking up to our Farewell Blog Hop over at Waltzingmouse Fanatics.  If you're a fan of Claire's super stamps, please join us and share your work - Tara and I would like to show Claire just how much we Waltzingmouse Stamps and how much she'll be missed.

Don't forget to visit out blog to see more inspiration Christmas/winter cards from the rest of the team. As the sun is shining today (Friday morning) I've been able to take some photo of the fabulous sparkle you get with Wink of Stella:

Chief Elf detail 1 - photo by Deborah Frings - Deborah's GemsChief Elf detail 2 - photo by Deborah Frings - Deborah's Gems

That's all for now - have a great weekend!

signature

Saturday, 29 March 2014

52CCT - Pick a previous ....

... Hello!  It's the fifth Saturday of the month, and that means we have a "Pick a Previous" challenge here at 52 {Christmas} Card Throwdown.  we want you to check out all our previous colour challenges here, select one and make your card; don't forget to tell us which colour combination you used.  Here's my take:

Season's Greetings - photo by Deborah Frings - Deborah's Gems
 
Stamps: Stampin' Up! - Festive Flurry, Curly Cute, Delightful Dozen
Inks: SU - Midnight Muse, Bashful Blue; Versamark
Dies: Framelits - Festive Flurry
Accessories: White Lustre Card; SU Card - Midnight Muse, Bashful Blue; Gems; Clear Embossing Powder


There's a story behind this card, but more of that later.  I used our April 2013 colours - navy blue, light blue and white.  I used the inlaid die cut technique on this card.  I made the base from navy card and cut a panel of light blue.  I die cut the largest snowflake out of the light blue card and then inlaid the stamped snowflake.  After securing the die in place, I adhered the panel to the card base.  I added a simple sentiment, which I stamped on white card and layered on navy.  I finished the front by adding lots of gems to the snowflake, in light and dark blues.  On the inside I cut a panel of white card, I adhered the pale blue die cut snowflake on to which I stamped the snowflake in pale blue.  I finished by adding a Christmas sentiment.  I also made a small vellum snowflake which I used to decorate the flap on the envelope.


Now, the story behind the card is that this was the second card I made.  I spent most of Thursday morning making this card:

Festive Greetings - photo by Deborah Frings - Deborah's Gems

Stamps: Papermania - Bauble Decoration; Waltzingmouse - Compliments of the Season II; Stampin' Up! - Delightful Dozen
Inks: Memento - Tuxedo Black; SU - Night of Navy, Bashful Blue
Dies: Spellbinders - Labels 29 (S5-156) #6
Accessories: White Lustre Card; SU Card - Night of Navy; Double sided adhesive paper; Glitter; Copics

I stamped the bauble image onto white card and applied some double sided adhesive and then dipped it in glitter.  I spent ages burnishing the glitter into the card, it was really worth it as the card has a lovely shimmer.  Sadly, when I came back to the card after lunch I discovered bubbles where the adhesive had come away from the card!!!  You can't really see it in the photo above, but you can in the close up below.  I tried to cut a slit into the film and squeeze out the air and get it to restick, here's the result:

Festive Greetings closeup - photo by Deborah Frings - Deborah's GemsFestive Greetings inside - photo by Deborah Frings - Deborah's Gems

So, I made another card and I'm really pleased with it.  For more inspiration cards using previous colour challenge combinations, check out the cards from the rest of the team.  We are joined, for the final time, by our Guest Designer, Scraplady.  Do drop by and visit everyone and leave some comments, we all love comments!!  Looking forward to seeing your cards.

signature
Related Posts Plugin for WordPress, Blogger...