Showing posts with label Your Next Stamp. Show all posts

Sunday, 10 May 2020

So Sweet ....

.... Good afternoon! We've had the most glorious weather for the past couple of days, but today it's a bit dull and grey, so I've been working in my craft room. I normally tend towards the clean and simple style, but today I've a card that is more!!


Stamps: Gina K - Petite Patisserie; Stampin' Up! - Bike Ride
Inks: Gina K - Dusty Rose, Kraft, Sandy Beach, Soft Stone, Jelly Bean Green, Black Amalgam; Distress Oxide - Tumbled Glass
Dies: SU - Build a Bike; Die-namics - Stitched Fishtail Flags STAX #1
Accessories: White Card; SU Card - Strawberry Slush; Copic Markers; Nuvo - Clear Aqua Shimmer Brush; Gems

I'm submitting this card to Inkspirational - INK#212 where it's a photo inspiration challenge, Your Next Stamp - YNS#138 where they want to see layers, and Fusion - FUSION#0920. I've taken the Thank you theme from the Fusion photo for my card.


I've had this card in mind ever since I saw the photo at Inkspirational. I had a great time building this scene. I stamped the bike on white card, die cut with the matching dies, assembled it and added some gems to the wheel nuts. I stamped the cake shop directly on the card, added the cake stands and coloured it with Copic markers. I drew in a cobbled road with Copic markers and created the sky by tearing a shape into paper and used distress oxide lightly blended over the top. I adhered the bike to the card front, using dimensional pads. I finished by adding the sentiment strip and patisserie shop sign with dimensional pads. On the inside, I cut a mat layer of dark pink card and on the white panel I stamped a larger display of cakes and a sentiment.


I also took a couple of close-up shots to show the dimension on the bike and shop sign:


That's all from me today - I've got another online class with Dyan Reaveley tonight - should be lots of fun and I'll share the pages soon. Bye for now.

signature photo Signature.png

Wednesday, 22 April 2020

SHC - Happy Anniversary ...

... Morning! It's been a bit quite on the blog this week. That's because I've been so busy working on my Dylusions Day-by-Day dyalog - it's such good fun. I'll share some photos soon. However, I'm here today with my card for Seven Hills Craft blog. I've made a bold, bright and somewhat different anniversary card:


Stamps: Concord & 9th - Stripes and Sayings; Avery Elle - Sentimental Too; Lil Inkers - It's Today, Right?
Inks: Gina K - Lipstick, Lucky Clover, Black Amalgam; Versafine Clair - Nocturne, Cheerful, Summertime, Paradise; Distress Oxide - Wilted Violet; Versamark
Accessories: White Card; SU - Basic Black Card; White Embossing Powder; Copic Marker

I'm submitting this card to Your Next Stamp - YNS#137 where they want to see stripes.


I had a very disturbed night on Monday and woke up on Tuesday with the idea for this card. I'd been dreaming of rainbows and hearts, and I put together to make this. I started with a blank white card and used my MISTI to stamp the black stripes. I used Versafine Clair Nocturne ink - it's a very black pigment ink and gives great coverage. I made sure to dry the ink using a heat gun before moving on. I the Stripes and Sayings set there a lovely heart strip and I used that to fill in between the black stripes. This is very easy to do in a MISTI - I put the heart strip in position and then simply move the card up and down to stamp the various colours. I then cut a panel of black card which I adhered to the bottom of the card base. It does make it look as though I used a black card base, but I didn't. I stamped the simple word Love in the corner and heat embossed with white powder. On the inside, I cut a mat layer of black card and on the white panel added a simple sentiment along with a cute couple.


So, as you may have gathered today is our wedding anniversary. We've been married for 19 years today and the time has simply flown by. It's been a fun and crazy journey so far, and I am really looking forward to whatever comes next. Here's a picture of us at our wedding:


It was a wonderful day, if a bit chilly. Well, that's all from me today. Do drop by tomorrow. See you soon.

signature photo Signature.png

Thursday, 8 August 2019

Happy Birthday .....

.... Morning!! Over the past year I've used up most of my card stash and I really need to make some new cards, especially birthday cards. Here's a fun card I made yesterday:


Stamps: Lawn Fawn - Stuck on You, So Much to Say; Newton's Nook - Cuppa Cactus
Inks: Distress Oxide - Victorian Velvet, Shabby Shutters, Twisted Citron, Crushed Olive, Mowed Lawn, Rusty Hinge, Vintage Photo; Memento - Tuxedo Black; Gina K - Black Onyx
Dies: Newton's Nook - Cuppa Cactus Dies
Accessories: White Lustre Card; SU - Basic Black; BoBunny DP - Garden Party; Copic Markers; Nuvo - Aquashimmer Brush; Visible Image Stencil - Two Tone

I used several challenges to create this card. The theme of cacti comes from Cupcake Inspiration Challenge - CIC#475, from Your Next Stamp - YNS#119 I got the idea to add Lots of Squares, the layout is based on the sketch from last week's Paper Players - PP452 challenge. I'm also submitting this to AAA Birthday - AAAB#04 where they want birthday cards for boys.


I made the card base from black card. I cut a panel of white card onto which I stencilled lots of squares using several shades of green Distress Oxide inks. On the smaller white panel I stamped a number of different cacti using Distress Oxide inks; they blend so beautifully. On a scrap I stamped the cacti in cups, coloured them with Copic markers and cut them out with the matching dies. I used dimensional tape to add the cups to the card, you can see the dimension in the photo below. I used a scrap of design paper from my stash and finished by adding a simple, bold birthday sentiment. On the inside I cut a panel of white card and added another cactus. I left the panel blank for writing my own message.


That's all for today. I'm really enjoying being back in my craft room!! See you soon.

signature

Friday, 9 February 2018

Season's Greetings ....

... Hello from a very, very snowy Northville. We're all home today. The school district called a snow day last night, so Kat has spent the day just chillin! Jonathan's office also called a snow day, but he's had to work from home. The main thing is we're all safe and warm in the house. I've spent a large part of today in my craft room, but you'll have to wait until Sunday to see most of the cards!! But I do have a simple Christmas card to share with you this afternoon:

Season's Greetings - photo by Deborah Frings - Deborah's Gems

Stamps: Uniko - Winter Foliage, Big & Bold Wish, Rustic Wreath, Essentially Christmas, Simply Said Christmas
Inks: Gina K - Christmas Pine, Red Velvet; Versafine - Onyx Black; Delicata - Golden Glitz; SU - Emerald Envy
Dies: Die-namics - Pierced Oval Frames #2
Accessories: White Lustre Card; SU Card - Emerald Envy; Gold Canvas Finish Mirri Card; Copics; Shimmer Pen


I got the idea for this card from the inspiration photo over at Merry Monday - MM#276. The colours are from Your Next Stamp - YNS#82 and I'm also playing along with Addicted to Stamps and More! - ATSM#278 where they want to see Holiday cards.

I die cut an oval of white card and placed it into my MISTI. I stamped the holly leaves and berries, covered them with masks and then stamped the candles. I added some pine branches at the top of the image, added berries and lots of stars. I finished by colouring the candles in two shade of pink and added sparkle with my Wink of Stella brush. I adhered the finished panel behind the gold frame and attached the whole lot to the front of the card. I finished with a simple Christmas greeting. On the inside, I cut a mat layer of green card and on the white panel I stamped a greeting and added some branches and berries.

Season's Greetings inside - photo by Deborah Frings - Deborah's GemsSeason's Greetings sq - photo by Deborah Frings - Deborah's Gems

It's been snowing since about 3.00am this morning and we've got about 6 inches of snow on the ground. As it's not expected to stop until about 8.00pm this evening, we're likely to end up with about 8 inches on the ground. This is one of the times that I'm very, very grateful to have a company come round and clear the snow. However, I'm not expecting them until tomorrow!

I took a few photos of all the snow around the house:

Winter 1 - photo by Deborah Frings - Deborah's Gems

This is a view from the back bedroom across the swimming pool - although you would never know it! The winter wonderland beyond the fence is Northville Commons, the park area behind our house. I have played a bit with this photo to bring out all the texture.

Winter 2 - photo by Deborah Frings - Deborah's Gems

This is a view looking down onto our patio - I always leave the furniture out. I'll have to get new cushions in the spring - but you can see the piles of snow on the table, chairs, and sunbeds!!

Winter 3 - photo by Deborah Frings - Deborah's Gems

This is the postbox over the road - I've played a bit so that you can see the snow falling and the texture of the tyre marks on the road. That's all for now. Do stop by on Sunday for a special celebration. See you soon.

signature

Thursday, 28 December 2017

For Kat .....

.... Hello again! We had a good trip from Leicester to Fleet, and today we get to spend time with my Mum, Aunt and Uncle. We had a lovely Indian dinner last night and a very restful evening. And we are almost at the end of our visit home - time always flies by when we're here. Today, I'm sharing the card that I made for Kat for Christmas:

Merry Christmas - photo by Deborah Frings - Deborah's Gems

Stamps: Concord & 9th - Magnolia Wreath; Hero Arts - Happy Holly Days
Inks: Gina K - Applemint, Powder Blue, Innocent Pink, Dusty Rose, Black Onyx; Versamark; Delicata - Silvery Shimmer
Dies: Concord & 9th - Magnolia Wreath
Accessories: White Lustre Card; Gina K Card - Applemint, Powder Blue, Innocent Pink, Dusty Rose; Silver Embossing Powder; Shimmer Spritz - Frost


This card was entirely inspired by the colours and pretty wreath photo at the current Your Next Stamps challenge - YNS#79. I had fun making the wreath. I stamped the pale green leaves, heat set the ink and then stamped next layer and embossed with silver powder. I cut out the wreath with the matching die. I stamped the layering leaves in pale blue and silver, cut them out and adhered them to the wreath. I die cut the little flowers, berries and leaves from coloured card and added them to the wreath. Before attaching the wreath to the card, I stamped some pale green fir branches directly on the white card and added a simple greeting in black. After attaching the wreath I spritzed the card with frost shimmer spray. On the inside, I cut a mat layer of pale green card and added a greeting on the white panel along with some holly and berries.

Merry Christmas inside - photo by Deborah Frings - Deborah's GemsMerry Christmas sq - photo by Deborah Frings - Deborah's Gems

Well, that's Christmas over again for another year. We have one more day here in the UK and then we're heading home. It is not always the easiest time of year, but I do hope you have all had a good time. See you again soon.

signature

Sunday, 11 June 2017

Uniko - Blog Hop and Revisit ....

... Hi! Good morning! Surprise, a post two days in a row :)))) I'm here today with the Uniko DT Blog Hop, Revisit and Giveaway. Bev releases new stamps every other month, and in the month where there is no new release the Design Team gets to revisit a previously released set. This month we're revisiting ORIGINALLY ORGANIC - one of my favourite stamp sets - and Bev has released matching dies too. Here's my card:

Friends - photo by Deborah Frings - Deborah's Gems

Stamps: Uniko - Originally Organic, Originally Organic Additions
Inks: Versamark; Versafine - Onyx Black
Dies: Uniko - Originally Organic
Accessories: White Lustre Card; Kaisercraft DP - Bombay Sunset; Copics; Wink of Stella - Clear; Gold Embossing Powder; Alton Glitter Tape


I used the sketch from the current Your Next Stamp - YNS#66 challenge along with all the colours too. My new Kaisercraft design papers were just the right colour and I do like the opulent gold border. I used my MISTI to stamp the flower bouquet in pale grey and coloured it with Copic markers. Then, using the MISTI again for accurate stamping, I stamped it in Versamark and heat embossed with gold powder. Then I used the matching die to cut it out - so much quicker and easier than using scissors!! I stamped the sentiment and then adhered the flower image using dimensional tape. On the inside I cut a may layer using more design paper and on the white panel, stamped a portion of the flower image and a greeting. I added a touch of sparkle to the flowers on the front and on the inside using a clear Wink of Stella brush.

Friends inside - photo by Deborah Frings - Deborah's GemsFriends sq - photo by Deborah Frings - Deborah's Gems

I'm also submitting this card to The Flower Challenge - TFC#09 where this month it's ANYTHING GOES.

Now do visit the rest of the team, follow the links below:


Don't forget to leave comments as you go along the Blog Hop - you've got until midnight (BST) Sunday 18th June.  You'll be in with the chance to win the Originally Organic clear stamp set and the matching dies. If you already own the prize, then you will get a £15 e-Gift voucher. Have fun!!

signature

Thursday, 24 November 2016

Happy Thanksgiving ....

... to all my American friends. Even though we've been in the States for 4 years, we still can't quite get used to this holiday! However, it is a huge event and I want to wish all my American crafting buddies the very Happiest of Holidays!

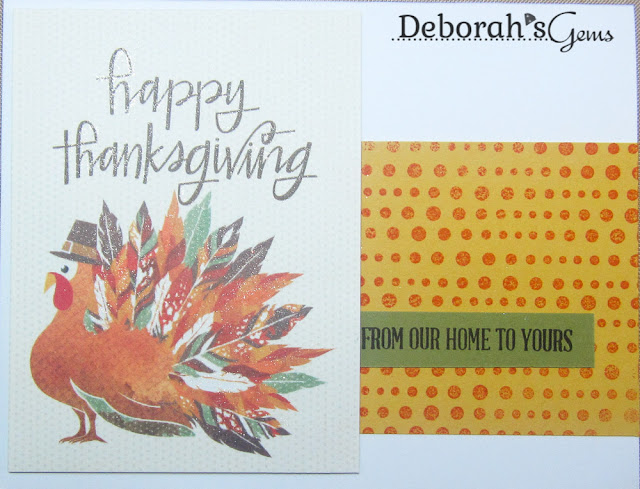
I also want to share with you a card that I made for Kat's voice teacher - Dorothy. Kat gave the card to Dorothy last Sunday at the music recital, so I'm safe to share it now:

Happy Thanksgiving - photo by Deborah Frings - Deborah's Gems

Stamps: MFT - Lots of Dots; Uniko - Rustic Christmas; Stampin' Up! - Water Colour Wishes
Inks: SU - Pumpkin Pie. Chocolate Chip
Accessories: White Lustre Card; SU Card - Old Olive, Hello Honey; Photoplay - Falling Leaves; Wink of Stella - Clear


This is another card made from the sheet of 12" x 12" design paper. I think this is such a fun image of a turkey - he looks sort of bemused!!! I used the sketch from Your Next Stamp - YNS#52 and the colours are from Colour Q Challenge - cQc#368.  I cut a panel of yellow card and stamped these fun dots in orange. There was a scrap of green card on my desk so I used that for the greeting. I used dimensional tape to add the image. I also added a touch of sparkle with a clear Wink of Stella brush to the words and the turkey's feathers. On the inside I kept it very simple with a mat layer of yellow card and a greeting on the white panel.


That's all for today. We are going to have a quiet morning watching the Thanksgiving Day Parade from Detroit on TV and then later we're going out for lunch.

Happy Thanksgiving!!!

signature
Related Posts Plugin for WordPress, Blogger...