Showing posts with label WMS - Ocean Bound. Show all posts

Wednesday, 10 June 2015

TMR - Add a Tag ...

.... Good morning all!  Where is this week going?  Time is simply flying by.  Anyway, with it being Wednesday it does mean that it's time for our new challenge at The Male Room.  For the next couple of weeks we have a technique challenge to add a tag to your masculine project.  I've got a Father's Day card to share with you:

Happy Father's Day - photo by Deborah Frings - Deborah's Gems

Stamps: Waltzingmouse - Woodgrain, Ocean Bound, Man of the Hour
Inks: Stampin' Up! - Pool Party, Crushed Curry; Versamark
Dies: Die-namics - Fishtail Flags Stax #5; WMS - Ocean Bound Anchors
Accessories: White Lustre Card; SU Card - Night of Navy, Pool Party, Crushed Curry; Cuttlebug EF - D'Vine Swirls; SU Ribbon - Pool Party; White Embossing Powder


I got the inspiration for this card from the new challenge at Fusion - FUSION#36.  I really like the nautical theme photo and I've used the sketch too.  I started by stamping a wood grain background on the card.  I cut a white fishtail banner which I embossed to resemble waves and then lightly ran an ink pad over the top to bring out the waves.  I die cut a tag in navy, added a little yellow star, die cut an anchor and added a Father's Day sentiment.  I attached the tag with dimensional tape.  I finished the front with another anchor leaning against the tag.  I die cut the anchor and then stamped the imaged on top.  A note about the stamping - I got my new Misti last week and it's just fabulous.  It makes it so much easier to stamp on dies like this and if the image isn't quite perfect you can restamp in exactly the same place - love my Misti!!!  Anyway, back to the card.  On the inside I cut a mat layer of aqua card and stamped a simple image on the white panel, leaving lots of room for message.

Happy Father's Day inside  - photo by Deborah Frings - Deborah's GemsHappy Father's Day sq - photo by Deborah Frings - Deborah's Gems

I'm really looking forward to seeing your creations - don't forget you can make any masculine style project - card, ATC, scrapbook page, even a 3D project - but you MUST use a tag. 

I am very pleased to announce that we have a new member of the Design Team - Chris of Dot Dot Stamping.  Chris was our Guest Designer during May and now becomes a full member of the team.  Do drop by and say Hi and check out what the rest of the team have made too!

That's all for now.  Have fun and see you soon.

signature

Wednesday, 4 March 2015

TMR - DT Call and sketch ....

... Good morning from a cold, grey and snowy Northville!  It's time for our new challenge at The Male Room but, before I get to that, we've had several people move on from the team, most recently Jacqueline has had to step down - I miss you ladies.  I'd like to say how much I've enjoyed working with them and to thank Jacqueline for picking me to join the team.  That does mean we're short DT members - so we're having a DT CALL.  If you're interested check out the blog for full details.

Our challenge for the next couple of weeks is to create a masculine project based on a sketch that Jacqueline drew for us - here's my card:

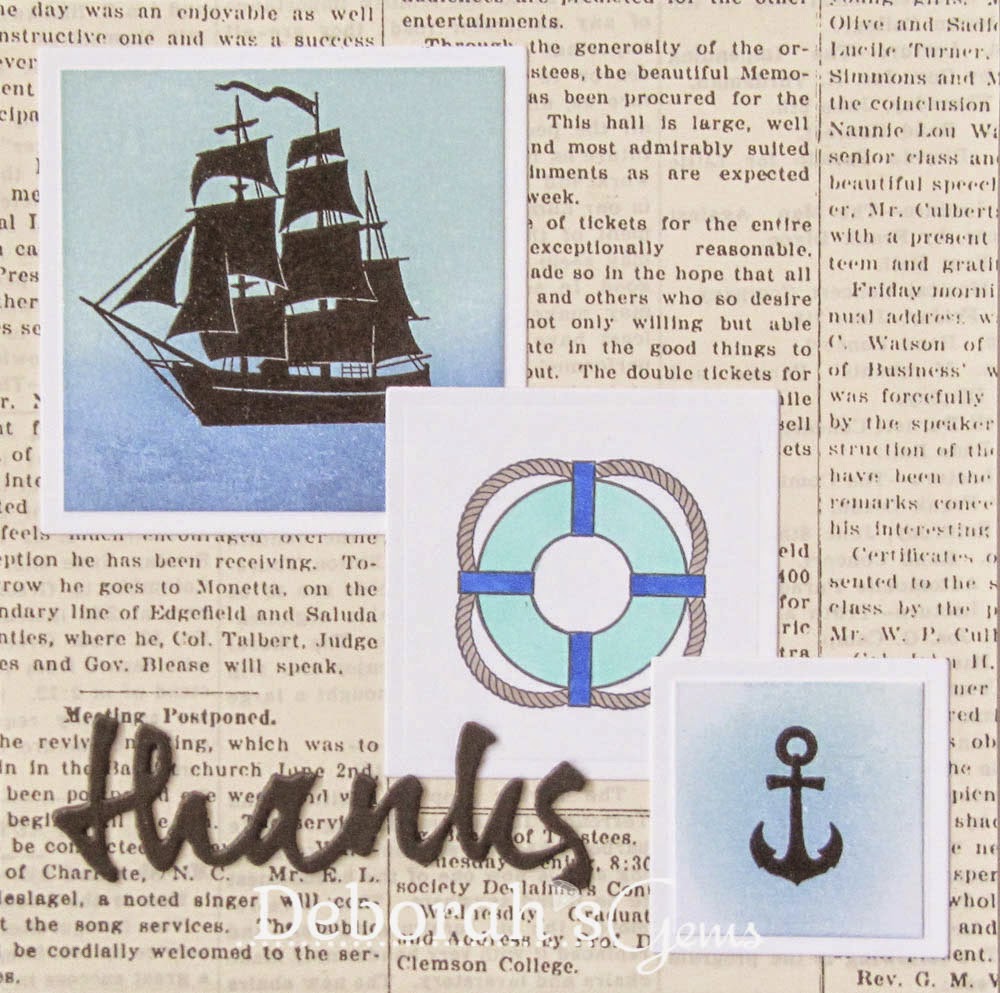
Nautical thanks - photo by Deborah Frings - Deborah's Gems

Stamps: Waltzingmouse - Ocean Bound
Inks: Versafine - Onyx Black; Memento - Tuxedo Black; Stampin' Up! - Brocade Blue, Soft Sky
Dies: Spellbinders - Squares Lg (S4-126) #3, #4, and #5; PTI - Wet Paint Cuts I
Accessories: White Lustre Card; SU Card - Basic Black; SU DP - Typeset; Copic Markers; Clear Embossing Powder


I used the colours from Colour Q - cQc#282 and the theme of sailing from Cardz 4 Guys - C4G#60 along with our sketch to make this card.  I covered the card with newsprint design paper.  I die cut three squares and stamped the ship and anchor onto two with Versafine ink and embossed with clear powder.  I then inked over the images using two shades of blue.  On the centre square I stamped a life saver which I coloured with Copic markers.  I finished the front with a die cut sentiment - cut three times, adhered together to give a nice thick sentiment.  On the inside I cut a mat layer of newsprint and on the white panel added a ship's wheel. 

Nautical thanks inside - photo by Deborah Frings - Deborah's Gems

Don't forget to visit the blog to see what the rest of the team have created to inspire you.  You have until Tuesday 17th March midnight GMT (8.00pm EDT) to play along.  Don't forget to check out the details of the DT CALL if you're interested.  Have fun!

signature

Wednesday, 29 October 2014

TMR - Wood .....

.... Hello!  You guys certainly had lots of fun with our Halloween theme last time.  And now it's time for our new challenge at The Male Room.  For the next couple of weeks we'd like you to use the theme WOOD on your projects.  You can use real wood or you can go faux, but your project has to have a masculine feel.  I had fun and actually made two cards:

Super Hero - photo by Deborah Frings - Deborah's Gems

Stamps: Waltzingmouse - Man of the Hour, Wood Grain, USA 1776; Stampin' Up! - Happiest Birthday Wishes
Inks: SU - Blackberry Bliss
Dies: Lil Inkers - Stitched Rectangles #3
Accessories: White Lustre Card; SU Card - Blackberry Bliss; EK Success Punch - Notebook; BARC Wood Paper - White Birch


I used the sketch from CAS - Colours & Sketches - CASC&S#97 for the layout.  I kept the card really clean and simple.  The wood on this card is both real - the die cut panel is wood paper and faux - stamped chevron arrows. I stamped the main sentiment directly on the wood - you can see a little feathering where the ink has been absorbed by the wood, but it's quite sharp.  I stamped the birthday sentiment on some scrap card, cut it to size and adhered it behind the wood panel.  I made the horizontal strip by stamping the chevrons on white card, cutting to size and then adhering them to a punched border.  The wood panel was adhered with dimensional tape.  On the inside I cut a panel of blackberry card.  On the white card I stamped a firework burst (fourth generation image) and then a birthday greeting.

Super Hero inside - photo by Deborah Frings - Deborah's Gems

 My next card has a nautical theme and has a real wood panel too. 

Oh the Places - photo by Deborah Frings - Deborah's Gems

Stamps: Waltzingmouse - Tying the Knot, Ocean Bound
Inks: SU - Island Indigo, Mossy Meadow
Dies: WMS - Ocean Bound
Accessories: White Lustre Card; SU Card - Island Indigo; BARC Wood Paper - Cherry


For this card I used the sketch from CAS(E) this Sketch - CTS#97.  I cut a two inch piece of cherry wood for the central panel and used the die to cut out two ship wheels.  I stamped two wheels in blue and green and then cut them out with the die, I adhered them to the card with dimensional tape.  I added some interest to the front by stamping ropes down the edge of the card and the wood panel.  I finished the front with a simple sentiment stamped on white card, trimmed to size and then cut flags in both ends - attached with dimensional tape.  On the inside I made mat of blue card and stamped a simple greeting on the white card.

Oh the Places inside - photo by Deborah Frings - Deborah's Gems

For more inspiration projects featuring wood check the blog to see what my team mates have made.  Have fun!

signature

Saturday, 23 August 2014

WMSFC - Sketch ...

...  Hello again!  I'm back with my last scheduled post - we'll be getting home this evening.  It's time for our new challenge at Waltzingmouse Fanatics.  For the next couple of weeks Tara and I would to see your creations based on our sketch; you are free to rotate/flip the sketch, but we must be able to see it in your work.  You MUST use at least one Waltzingmouse image, sentiment or digi on your project.  Here's my take:

The Places - photo by Deborah Frings - Deborah's Gems

Stamps: Waltzingmouse - Tying the Knot, Ocean Bound
Inks: Stampin' Up! - Coastal Cabana, Island Indigo, Smoky Slate
Accessories: White Lustre Card; Kaisercraft DP - Check In; SU Punch - Circle 1"


My first thought was flowers, but going through my stash of design papers, I came across this lovely map and that led me in a totally different direction.  I cut the paper to cover the card base.  I cut a piece of white card to for the diagonal, stamped the ropes and fussy cut the loops.  Next I stamped the sentiment.  I stamped the large ship's wheel in dark teal, fussy cut it out and adhered it with dimensional tape.  The two little wheels were punched out using a circle punch and attached with tape.  The inside is blank for my message.

Don't forget to visit Tara to see what she's made with our sketch.  You have until Thursday 4th September, 5.00pm BST (Noon EDT) to play along with us.  Don't forget you must use at least one Waltzingmouse image, sentiment or digi.  Have fun!!!  See you soon.

signature

Saturday, 5 April 2014

WMSFC - Theme ...

.... Hi again!  I'm back with our new challenge for Waltzingmouse Fanatics.  This time we have a theme for you to play with.  Typography is a hot trend at the moment, and Claire's stamps contain some of the most wonderful sentiments and in lots of pretty fonts.  We would like your project to contain sentiments from AT LEAST TWO different sets of stamps.  I've made a thank you card - with lots of thanks!!

Thank you - photo by Deborah Frings - Deborah's Gems

Stamps: WMS - Fine Feathers, Charm Squares, Funky Feathers, Teeny Trees, Big Day-Today, Asian Gardens, Victorian Frippery, Ocean Bound, Country Labels 4, Say It Loud
Inks: Stampin' Up! - Primrose Petals, Coastal Cabana, Calypso Coral, River Rock, Basic Black
Accessories: White Lustre Card; SU Card - River Rock; SU Ribbon - Calypso Coral; SU DP - River Rock


I used the sketch from Freshly Made Sketches - FMS#130 and the colours from Colour Q - cQc#235.  I cut a small panel of white card and then laid out all the thank you stamps to work out the best pattern pressed down my Fiskars stamp holder to keep them in the same position.  I did try to use my markers to colour the sentiments, but it wasn't very nice, so I stamped this in stages.  I used masking tape to cover some stamps inked up and then stamped, and repeated with all the colours.  I finished the front with a mock button and a ribbon.  On the inside I cut a mat layer of design paper and added a simple sentiment in the corner, leaving me enough space for a message.

Thank you inside - photo by Deborah Frings - Deborah's Gems

For more inspiration with our texty theme, don't forget to check out Tara's card.  As always you can make any project you like, but you MUST use at least TWO sentiments from different WMS sets.  The deadline for submission is Thursday 17th April, 5.00pm (Noon EDT).  Looking forward to seeing what you make!  Have a good weekend.

signature

Wednesday, 5 March 2014

TMR - Colour ....

.... Hi!  It's time for our new challenge at The Male Room.  This week it's not a theme that we have for you, we would like you to make your masculine style card using the colours:

Blue, Green and Brown

The Places - photo by Deborah Frings - Deborah's Gems

Stamps: Waltzingmouse - Free Spirit Boy, Ocean Bound
Inks: Versafine - Vintage Sepia; Stampin' Up! - Early Espresso; Kaleidacolor - Cappuccino Delight
Accessories: White Lustre Card; SU Card - Early Espresso; SU Markers - Wild Wasbi, Marina Mist; Clear Embossing Powder; Copics


The inspiration for this card came from Renee's card during the recent WMS Release Blog Hop.  I saw the way she'd coloured the circles on my favourite stamp and decided to CASE it.  I stamped the image onto white card and heat embossed with clear powder, and then used lots of different green and blue Copic markers to colour it in.  I used the layout from this week's CAS(E) this Sketch - CTS#66, and of course, this card fits with our current Waltzingmouse Fanatics challenge - one for the boys.  I cut a brown mat for the circle image and adhered it to the card base.  I finished the front with a simple sentiment in brown and drew the lines in by hand (using a ruler of course!).  On the inside I cut a mat of brown and stamped a second generation image of the circles, adding some faux stitched detail in the corners.  I left the centre blank for me to write a message - this one is for our boy, Ben!

The Places inside - photo by Deborah Frings - Deborah's Gems

For more inspiration using the colours of blue, green and brown - check out the cards from the rest of the Design Team.  I went for more muted shades of blues and greens, but you can go as bright as you like!  Looking forward to seeing your creations!

signature
Related Posts Plugin for WordPress, Blogger...