Showing posts with label Simon Says Wednesday Challenge. Show all posts

Wednesday, 29 November 2017

Mixed Media .....

.... Hi! Hope you're all having a good week, it's been lovely here in Northville, in fact, it was really warm yesterday and didn't feel much like autumn!! I don't have a card for you today, I've got a page from my small Dylusions journal. After Dyan came to our local craft shop, Scrappy Chic, two years ago, those of us who attended her classes set up an Art Journal club. We're called the Scrappy Chic Kitchen Roll Sprayers Art Journal Club and we still meet on the last Sunday of each month. Last Sunday the challenge was to create a Christmas something - tag, page, card, etc. I thought it was time to create a page instead of just making backgrounds!!!

Christmas - photo by Deborah Frings - Deborah's Gems

Stamps: Dylusions - Christmas Backgrounds, Bordering on the Edge, Christmas Words
Inks/Paints: Dylusions Paints - Polished Jade, Cut Grass; Distress Ink - Pine Needles; Archival Ink - Paradise Teal
Accessories: Dylusions Small Journal; Dylusions Holiday Colouring Sheets; Zig Clean Colour Brushes; Sakura Stardust Pens; Stencils; Wink of Stella - Clear; Ranger - Collage Glue Stick; Stabilo - Black Watercolour pencil


I used a background that I made ages ago using the baby wipe technique and I'm fairly sure that the colours I used were Polished Jade, Cut Grass and Lemon Zest (although you can't see much of the lemon). I added a simple border and some holly using a stencil and stamp. These fun Santa characters come from the Holiday Colouring Sheets booklet. I used Zig brushes to colour them and then carefully cut them out along with the ornament and fir branch border. I used the collage glue stick to adhere the images to the page. I drew around all the images with a black watercolour pencil and smudged it out with a water brush. I added lots of sparkle to the beards with a clear Wink of Stella brush and finished the page with a simple Christmas greeting. It was such fun making this page. I'm going to submit it to the following challenges:

Christmas detail - photo by Deborah Frings - Deborah's GemsChristmas sq - photo by Deborah Frings - Deborah's Gems

You can see all the sparkle on the beards in the detail photo above. I really must create more finished pages - it really is lots of fun. That's all for now. See you again soon.


signature

Saturday, 20 May 2017

CCT - Colours ....

.... Good afternoon all! I have to apologise to my team mates as I'm very late with my post for our new challenge at Christmas Card Throwdown - CCT10. We have a colour challenge for the next couple of weeks - YELLOW, KRAFT AND GOLD - not traditional colours, but that's the whole idea of a challenge. I've made a sparkling ornament for my card:

Deck those halls - photo by Deborah Frings - Deborah's Gems

Stamps: Waltzingmouse Stamps - Vintage Ornaments, Nutcracker Sweet
Inks: Versafine - Onyx Black; Versamark; Stampin' Up! - Crushed Curry, Crumb Cake
Dies: Elizabeth Craft - Beaded Oval Frames #2; Spellbinders - 2011 Heirloom Ornaments (S4-334) #4
Accessories: White Lustre Card; SU Card - Crumb Cake; Zig Clean Color - Bright Yellow, Yellow, Lemon Yellow; Spectrum Noir Sparkle - Clear; Copics; Gems; Tim Holtz Water Colour Card; White Embossing Powder; Gold Mirri Card


I decided to have a bright, sparkly ornament as the focal point of my card. I made the card base from kraft card, cut a panel of white slightly smaller and adhered that on top. I stamped the ornament in Versamark on some scrap water colour card and heat embossed with white powder. I coloured it with three shades of yellow from my Zig Clean Colour set with the lightest in the centre and the darkest on the edge, and blended them together with a clear Spectrum Noir sparkle brush. I stamped the words in the centre and cut it out with a matching die. I die cut a beaded oval frame from some brushed gold mirri card which I adhered flat to the card. To finish the front I added some gems and snowflakes. On the inside white panel I stamped a simple greeting and added some more snowflakes.

Deck those halls inside - photo by Deborah Frings - Deborah's Gems

I'm submitting this card to Addicted to Stamps and More! - ATSM#242 where they want us to make our mark, and also to Simon Says Wednesday Challenge - SSWC where they want to see a bit of sparkle. Sadly you can't see the sparkle really well in these photos - but I assure you it shimmers so much in the sunlight!!

Don't forget to visit our blog to see more inspiration from the rest of the Design Team. You've got plenty of time to join in with the challenge - deadline is midnight (BST) Friday 2nd June, 7.00pm EDT. Have fun!!

signature

Friday, 5 May 2017

Uniko - Pure Florals Lily ....

.... Morning! It's the last day of our Uniko Introductions today. This is going to be a very popular set - Bev has added another wonderful flower to the Pure Florals range - the Lily. I have to say right up front that the Stargazer lily is one of my all time favourite flowers - so much so, that I had them in my wedding bouquet. So I'm absolutely thrilled to have this set to play with. Here's the card I made:

Congrats Wedding - photo by Deborah Frings - Deborah's Gems

Stamps: Uniko - Pure Florals Lily (Digi), All Occasion Sentiments #1, Simply Said II, Fontiments Birthday
Inks: Versafine - Onyx Black; Stampin' Up! - Cherry Cobbler
Accessories: White Lustre Card; SU Card - Cherry Cobbler; Copic Markers; Spectrum Noir Sparkle - Clear


Once again, this is a digital image and I've approximated the size of the flower. I printed the large lily on white card, coloured it with Copic markers and then carefully cut it out. I based the colours on Stargazer lilies - the petals on these flowers range from almost totally white with just a hint of pink down the centre, through to totally pink petals with very dark centres of the petals. I cut a mat layer of dark red card on to which I layered a panel of white card. I stamped the large congrats across the centre and added the little words in matching ink. Before attaching the lily, I added some glitter to the flower and then used dimensional gel to adhere it. On the inside I cut a mat layer of dark red card and on the white panel I stamped a simple sentiment. I also printed a smaller lily which I coloured pale pink and attached that to the the white panel. I'm submitting this card to the Simon Says Wednesday Challenge where thye want a hint of pink. I'm also playing along with a challenge that's new to me - Creative with Stamps - CWS#14 where they want to see flowers.

Congrats Wedding inside - photo by Deborah Frings - Deborah's GemsCongrats Wedding sq - photo by Deborah Frings - Deborah's Gems

There are some wonderful sentiments in this set, but I mixed the image with some older sentiments to make a wedding card. Do visit the Uniko blog to see more inspiration projects from the rest of the team.

Remember I said that I had this flower in my wedding bouquet - well, here's a picture of me taken just over 16 years ago! Where has all that time gone?


Me and my gorgeous bouquet in the back garden before our wedding.


Jonathan and me in the grounds of the hotel where we had our wedding. It was a wonderful day!

Now - just a quick reminder that tomorrow is RELEASE DAY!! You will be able to get all the new stamps sets from the Uniko store from 9.00am BST. And, as usual, there will be a DESIGN TEAM BLOG HOP AND GIVEAWAY. See you soon!

signature

Sunday, 12 February 2017

Let the cute begin ....

.... Morning! It's been a nice lazy time here today. Jonathan is watching the football. Sadly, Leicester are not doing well at the moment. Kat is doing homework and that means I get to play. So I've made a cute baby card:

Cute begin - photo by Deborah Frings - Deborah's Gems

Stamps: Stampin' Up! - Best of Brides & Babies; Uniko - Sweet Baby
Inks: Memento - Tuxedo Black; Versafine - Onyx Black; SU - Pacific Point
Dies: Lil Inkers - Diamond Lace Coverplate, Wonky Rectangles #2
Accessories: White Lustre Card; SU Card - Pacific Point; Copics; Clear EmbossingPowder; Spectrum Noir Sparkle - Clear


The challenge over at Simon Says Wednesday Challenge - SSWC0902 is to make a "CUTE" card, so I knew just what image I wanted to use. I'm also submitting the card to Happy Little Stamps Anything Goes with Dies - HLSAG02 and also to their CAS challenge - HLSCAS02 where they want us to use blue. I made the card from blue card and cut a panel of white card exactly the same size. I die cut a dotty pattern using one of my new coverplate dies and adhered it to the card. I used my MISTI to stamp this image on some scrap card. I coloured it with Copics and then put it back in the MISTI and restamped using Versafine which I heat embossed with clear powder, this gives a really crisp black outline. I used a fun shaped die to cut out the sentiment and attached it with dimensional tape. On the inside I cut a panel of white card on which I stamped a bold greeting and a cute little teddy bear.

Cute begin inside - photo by Deborah Frings - Deborah's GemsCute begin sq - photo by Deborah Frings - Deborah's Gems

This card is going into my stash as I'll be needing it in May - a friend of our is expecting her first baby then and we already know that she's having a boy!

It's almost time to get some lunch for us all, but after that, it's back to play! See you soon.

signature

Wednesday, 1 February 2017

TMR - Theme ....

... Morning! I hope your week is going well - mine is going fast!! Winter has made a return to Michigan. Most of Janaury has been unseasonably mild, but we've had several inches of snow this week. It's very pretty, but I have to admit that I'm looking forward to spring. The only advantage is that it gives me the perfect excuse to stay in the warm and play in my craft room. Today is the 1st of February and also time for our new challenge at The Male Room - TMR#53. For the next couple of weeks our theme is NUMBERS. We want you to use numbers - as creatively as you like - on your masculine projects. I made a birthday card:

Happy Birthday - photo by Deborah Frings - Deborah's Gems

Stamps: Visible Image - The Ripple Effect; Stampin' Up! - Word Play
Inks: Distress - Blueprint Sketch, Salty Ocean, Mowed Lawn, Lucky Clover; Versafine - Onyx Black
Dies: Winnie & Walter Cutaways - The Big, The Bold & Party; The Big, The Bold & Happy
Accessories: White Lustre Card; Kaisercraft DP - Attitude!; Clear Embossing Powder


This card is really quick to make. I started with a piece of design papers that had numbers embossed on it. I wasn't keen on the base colour, so I added shades of blue and green with my distress inks. I love the way the numbers now pop from the background. I cut the panel to size and adhered it flat to the card. Next I die cut the greeting from plain white card - I kept it really simple by simply adhering the words to the card. It will post easily too! On the inside I cut a mat layer of dark design paper and on the white panel I stamped a grungy ripple circle using all the inks that I'd used on the front. I finished by adding a bold greeting in black and embossed it with clear powder. I'm submitting this card to the Simon Says Wednesday Challenge where it's ANYTHING GOES!!

Happy Birthday inside - photo by Deborah Frings - Deborah's Gems

This card is going into my stash - Kat has several friends at school who have birthdays coming up! It's good to be prepared!

Don't forget to visit our blog to see more inspiration from the Design Team. There's plenty of time to join in with us - deadline is midnight (GMT) Tuesday 14th February, 7.00pm EDT in the States.

signature

Saturday, 28 January 2017

Warm Winter Wishes ....

.... Good morning! Winter's back! We had some snow yesterday - not a lot, but it was quite cold and it gave me an idea for a Christmas card:


Stamps: Stampers Anonymous Tim Holtz - Fresh Brew; Uniko - Simply Said Christmas, Stunning Snowflakes
Inks: Stampin' Up! - Early Espresso; Distress - Tumbled Glass
Dies: Sizzix - Coffee Cup
Accessories: Cream Lustre Card; SU Card - Early Espresso; SU Punch; Copics; Spectrum Noir Sparkle - Clear


I got the idea for the card from this week's Merry Monday Challenge - MM#232 where they have a fun inspiration photo. I made the base from dark brown card. I cut a panel of cream card slightly smaller and embossed it with coffee cups, rounded the corners and lightly inked the edges. I adhered it flat to the card. Next I stamped the cup coffee on a cream tag. I did two more copies - one on white card where I coloured the cup band and added a logo, and one on cream which I die cut out. I randomly stamped some snowflakes on the tag, and then adhered the cup and band. I finished the tag by edging it with a brown marker and adding a ribbon. I finished off with a fun greeting. On the inside I cut another panel of cream card, stamped a Christmas greeting and added a few more snowflakes.

Warm Winter Wishes inside  - photo by Deborah Frings - Deborah's GemsWarm Winter Wishes sq - photo by Deborah Frings - Deborah's Gems

We're half-way through our colour challenge at Christmas Card Throwdown - CCT#02 to use AQUA, BROWN AND CREAM. I decided that these colours worked perfectly for this card. You've still got plenty of time to join in with us - deadline for submission is midnight (GMT) Friday 3rd February, that's 7.00pm EDT.

I'm also submitting the card to Simon Says Wednesday Challenge - SSWC2501 where the theme is ANYTHING GOES.

That's all for now - I'm planning to spend the day in my craft room. Not sure whether it's going to be cards, art journal or, perhaps, some tidying up! Jonathan is off to a photo shoot and Kat is planning to chill - it was tough last week with her finals. Have a good weekend, see you soon!

signature

Thursday, 5 January 2017

TMR - Theme ....

..... Good afternoon, I really am running late! I hope that everyone has recovered from their New Year celebrations. A change in my holiday plans meant that I didn't get back to the States until 2nd January and I was so jet-lagged that I couldn't stay awake, never mind make a project for our new challenge at The Male Room - TMR#51 where the theme is ANYTHING GOES. I did manage to pull myself together late yesterday afternoon and make a card but am only now posting it! This is not the way I meant to start the year!!! Here's the card:

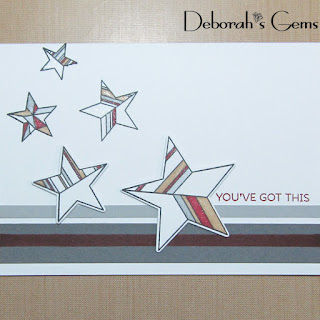
You've Got This - photo by Deborah Frings - Deborah's Gems

Stamps: My Favourite Things - Stars Above, Essential Sentiments
Inks: Stampin' Up! - Cherry Cobbler; Memento - Tuxedo Black
Dies: Die-namics - Stars Above
Accessories: White Lustre Card; SU Card - Basic Grey, Smoky Slate; Copics; Spectrum Noir Sparkle - Clear


I used the sketch from Freshly Made Sketches - FMS#269 but I turned it to make a horizontal card. The challenge over at House of Cards - HOC01 is to add a house and/or be inspired by the colours; well I decided to play with the colours as I think they are great for a masculine style card. I'm also submitting this card to Simon Says Wednesday Challenge - SSWC04/01 where they want us to see New Something - mine is new stamps!

I started by cutting two strips of card, light and dark and adhering them to the card. I used a dark burgundy Copic marker to add an extra line on the thick dark grey strip of card. I stamped the simple sentiment in burgundy ink and then stamped the stars falling towards the sentiment. I used Copic markers to colour areas of the stars and added some sparkle with a clear Spectrum Noir brush. The two largest stars were stamped again on scrap card, coloured in and cut out with the matching die. I adhered them both with dimensional tape. On the inside I cut a mat layer of pale grey card. On the white panel I added a message and some more stars.

You've Got This inside - photo by Deborah Frings - Deborah's GemsYou've Got This sq - photo by Deborah Frings - Deborah's Gems

I took a close-up photo of the sparkle on the big star - the shimmer in the Spectrum Noir brushes is much more frosty/silver than the Wink of Stella brushes. So it's the perfect excuse to have both sets :)

You've Got This detail - photo by Deborah Frings - Deborah's Gems

I'm sending this card to my son Ben - he had a rough time at the end of last year, which is why I went to visit him. He's moved house and it's tough to get going again, particularly as it's been so grey and dull. I know that he loves getting cards from us, so this one is on its way today.

Do visit The Male Room to see more inspirational projects for the men in our lives. That's all for now - but I'm feeling much more awake today so you never know, I might be back later!!

signature
Related Posts Plugin for WordPress, Blogger...