Showing posts with label LF - Celebration Scripty Sentiments. Show all posts

Monday, 18 March 2024

Easter Bunnies

... Morning!! Here's another of the Easter cards that I made this weekend. This is a fun, cute card with lots of Easter bunnies and Easter eggs:


Stamps: Waltzingmouse Stamps - Spring Baskets, Vintage Postcards; Lawn Fawn - Easter Before 'n' Afters, Magic Spring Messages, Happy Happy Happy, Celebration Scripty Sentiments; WF - Postage Collage
Inks: Gina K - Dusty Pink; Versafine Clair - Nocturne
Dies: Waffle Flower - A6 Postage Collage
Accessories: White & Kraft Card; WF - A6 Blocks Stencil; Copic Markers

I'm submitting this card to Sunday Stamps Challenge - SSC#331where they have some lovely spring colours to play with - perfect for an Easter card.


This card is a US A6 card measuring 4½" x 6¼" and using the WF A6 die, I can make a postage stamp style using their die. I'm very keen on the postage collage dies and have them in A2, A6, A7, and mini-slimline - so much fun!! Anyway, I die cut the A6 white panel and used the matching A6 blocks stencil and lightly brushed on pink ink to define the 'stamps'. I used a mix of stamps to add images and a greeting, I coloured the images with Copic markers and once all the little 'stamps' were created, I added postage elements. I layered the finished panel on kraft card and added the whole lot to the front of a side-opening A6 white note card.
 

For the inside, I cut a mat layer of kraft card. On the white panel, I stamped a greeting mixing stamps from two sets, added another cute bunny, coloured with Copic markers and added to the card.


This card was going to be for our daughter, Kat and her partner, Kobie. However, I've been asked for separate cards!! Not that it will be a hardship as making cards is jus so much fun. That's all for now - I'm off to make some more cards and listen to my new Audible book. See you soon.

signature photo Signature.png

Saturday, 16 March 2024

Easter Postage Style

.... Good evening!! It's been rather dull here today, so I've spent the day in my craft room. I've made a couple of cards - one I can share now, and one you'll see soon. I need several Easter cards for my family and this is the first:


Stamps: Lawn Fawn - Celebration Scripty Sayings, Celebration Scripty Sentiments, Happy Happy Happy; Waltzingmouse Stamps - Vintage Postcards; Waffle Flower - Postage Collage
Inks: Gina K - Wild Dandelion, Powder Blue, Blue Denim, Light Orchid, Medium Orchid, Dark Orchid, Light Lilac, Medium Lilac, Dark Lilac; Memento - Summer Sky; Versafine Clair - Nocturne
Dies: Waffle Flower - Postage Collage Die A2 
Accessories: White & Black Card; Gina K Stencil - Christmas Flowers; Copic Markers

I'm submitting this card to AAA Colourful - AAAC#02 where the colour board is just gorgeous - shades of pinks, blues and purples - love them!!


I'm working through the postage collage die cuts on my desk. For this one, I masked the edges of the die and between each 'stamp'. The flower stencil has four layers which are very easy to line up. I inked each flower a different colour, added the leaves and the dots. I removed the masking strips and used a mix of stamps sets to add the extra details in black ink. I layered the finished panel onto a black mat layer and then added the whole piece to the front of an A2 white note card.


For the inside of the card, I cut a mat layer of black card. On the white panel I stamped an Easter greeting made up from two stamps sets. I finished the panel by lightly stencilling another flower to the bottom corner.


It's been a fun day. Not only have I made some cards, I've completed a couple of pages in my art journals, and I've been listening to Audible. I'm listening to Misery by Stephen King - really enjoying this book - reminds me that I should rewatch the movie!! That's all for now. See you soon.

signature photo Signature.png

Wednesday, 13 April 2022

SHC - Happy Easter

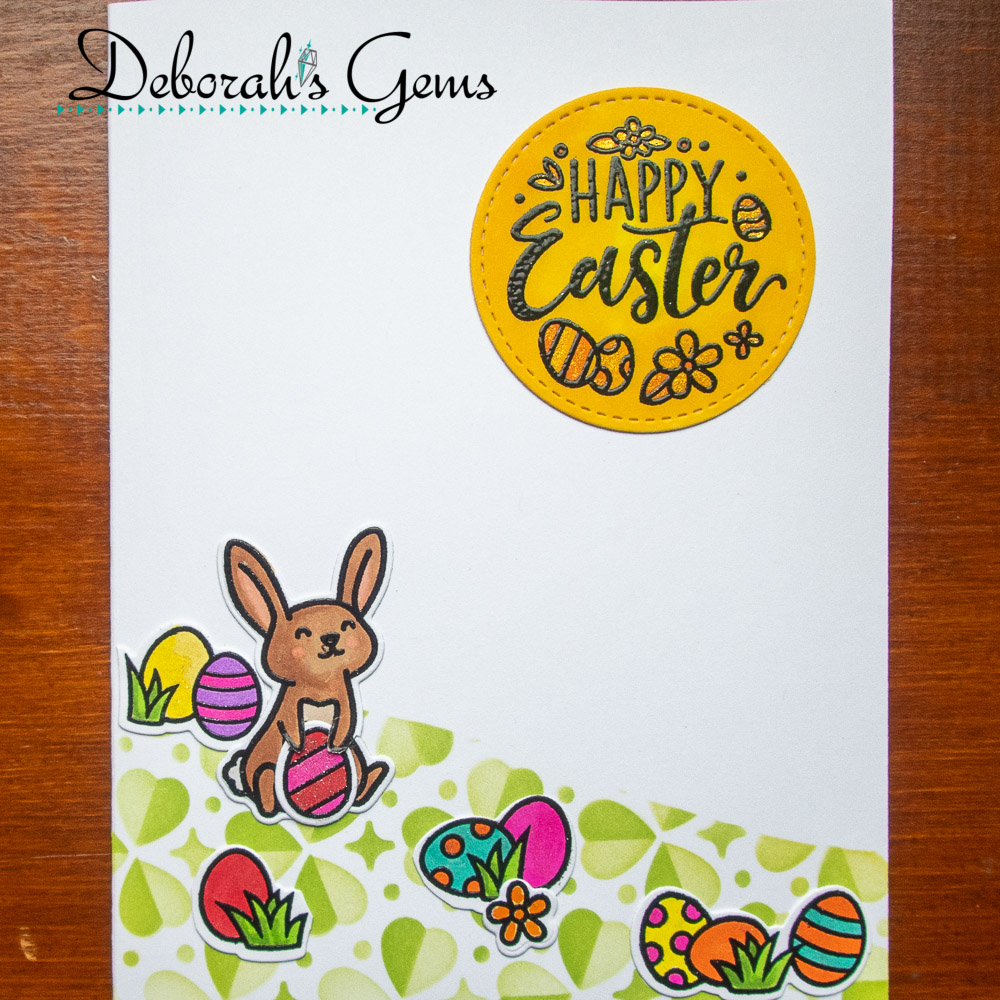
... Morning. I'm here with my Seven Hills Craft blog post. Today I've a simple Easter card to share with you:


Stamps: Lawn Fawn - Better Days, Simply Celebrate Spring, Magic Spring Messages, Scripty Autumn Sentiments, Celebration Scripty Sentiments
Inks: Gina K - Key Lime, Soft Stone; Versafine - Onyx Black; Versafine Clair - Nocturne
Dies: Lawn Fawn - Better Days, Simply Celebrate Spring, Magic Spring Messages
Accessories: White Card; SU DP - Daffodil Delight; Lawn Fawn - Clover Background Stencils, Hillside Stencils; Copic Markers; Clear Embossing Powder; Nuvo - Clear & Midas Aqua Shimmer Brushes

I'm submitting this card to Cupcake Inspirations Challenge - CIC#541 where they want to see bunnies, and to Addicted to CAS - ATCAS#217 where they want animals.


I had fun with this card. I started by creating the clover background hillside. I first masked off the top of the card with a hillside mask and then placed the clover stencils over the top. I used one shade of green ink, applied lightly for the first stencil and with a heavier hand for the second stencil. Next, I used my MISTI to stamp the bunny, some easter eggs, flowers and the greeting (sun) on white card. I removed the images and coloured them with Copic markers. I returned them to the MISTI and restamped with Versafine Onyx Black ink and heat embossed with clear powder. I used the matching dies to cut out the images. The bunny image has a heat on the belly, so I simply used a scalpel to cut under the arms and slipped in an easter egg. The easter eggs cut in a strip, so I cut them down to small groups and adhered them onto the card. To make the 'sun' I coloured the card yellow, and then stamped on top. I finished the front with the addition of some clear and gold tinted shimmer. Inside the card, I cut a mat layer of bright yellow design paper. On the white panel I created the greeting using words from two different sets and added some of the left-over die cuts.


That's all from me for today. See you again soon.

signature photo Signature.png

Wednesday, 27 October 2021

SHC - Halloween Stars ....

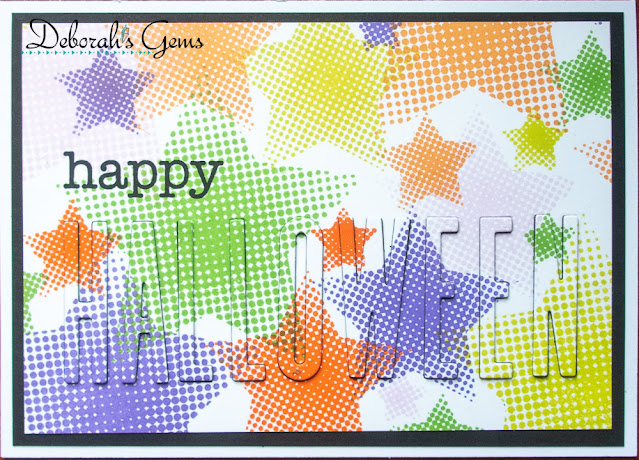
.... Morning! It's the last week of October, and the last day of the month is my very favourite holiday of the year - Halloween. My card for this week's Seven Hills Craft blog post is a non-traditional Halloween card. My mojo has gone AWOL and I've been browsing the 'net' for ideas. My card has been inspired by one designed by Therese Calvird - I changed the layout from portrait to landscape, change the theme, the colours and my card is layered. Here's the card:


Stamps: Altenew - Halftone Stars; Lawn Fawn - Celebration Scripty Sentiments, Scripty Autumn Sentiments, Happy Add On: Family
Inks: Gina K - Sweet Mango, Tangerine Tango, Key Lime, Lucky Clover, Lovely Lavender, Wild Lilac; Versafine Clair - Nocturne
Dies: C&9 - All the Letters
Accessories: White & Black Card

I'm submitting this card to Inkspirational - INK#250 where they want to see cards for Boys or Men.


I stamped my own background using the halftone stars in Halloween colours of orange, green and purple. I stamped a piece of card bigger than I needed and once I'd selected the area I wanted, but the panel to size. I used dies to cut out the word 'Halloween', along with three more sets in black card. I layered black letters together and finished with the patterned letter on top. I stamped the word 'happy' in bold black ink above the die cut word, and adhered the panel to a black mat layer. I added the whole piece to the front of an A6 (US size - 6¼" x 4½"). I used the inlaid die technique to inlay the letters.


Inside the card, I cut a black mat layer and on the white panel I stamped three stars to match the front of the card. I created the sentiment by using stamps from three Lawn Fawn sentiment sets - I like mixing things up!!


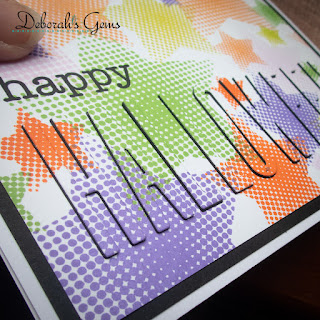
I took a close-up photo of the inlaid letter dies - you can clearly see the depth given with the black layers.

This card is for our son - he like Halloween too, but he's not into cute at all. So I was very happy to come up with a non-traditional Halloween card for him. That's it from me today. Thanks for stopping by. See you again soon.

signature photo Signature.png

Wednesday, 10 March 2021

SHC - Painted Roses ....

.... Morning! I'm here with my regular weekly post for Seven Hills Crafts. I've been watching Jennifer McGuire's video on her Gel Lift Technique. It was fab and I immediately had a go. My first attempt wasn't great. In fact I completely forgot to blend one of the ink layers all the way down the gel and ended up with a line across the images. I've put the photos at the end of this post. My first card was made using the waste card from cleaning off the brayer.


Stamps: Concord & 9th - Painted Rose; Lawn Fawn - Celebration Scripty Sayings; Hero Arts - Mod Pattern Background
Inks: Gina K - Lemon Drop, Wild Dandelion, Powder Blue, Blue Raspberry; Memento - Summer Skies, Danube Blue; Versafine - Onyx Black
Accessories: White Card; Clear Embossing Powder; Nuvo - Clear Aqua Shimmer Brush

I'm submitting this card to Color Hues - CH#13 where the colours are Yellow and Blue.


I stamped the large rose onto the yellow card, embossed it with clear powder and fussy cut it out. I did the same for the leaves. Next, I took a US A6 card and masked off the edges with ½" tape and stamped the background in soft blue ink. I removed the tape and adhered the complete rose. I finished the front by adding a scripty sentiment in dark blue and lots of shimmer to the rose with a clear aqua shimmer brush. On the inside, I cut a piece of white card slightly smaller than the base. I stamped the rose in pale yellow in the centre and finished by adding a sentiment in blue. I edged the panel with a blue marker and glued it in the card.


I was having such fun with this stamp set that I decide to decorate the envelope too.


This card is for my mother-in-law, and I'm perfectly safe sharing it here, as she doesn't do the Internet!!

My next card uses the soft negative image that I messed up, but I think I saved it okay.


Stamps: Concord & 9th - Painted Rose, Beautiful Words;  Hero Arts - Mod Pattern Background
Inks: Gina K - Lemon Drop, Wild Dandelion, Powder Blue, Jelly Bean Green
Dies: MFT - Zig-Zag Stitched Ovals Stax #5 
Accessories: White Card; Clear Embossing Powder; Nuvo - Clear Aqua Shimmer Brush; Gel Press

I'm submitting this card to the new Fusion challenge - FUSION#0521 - I've used the sketched and mostly the greens.


I used an fancy-edged oval die to cut out the rose. I positioned the just above the line the made in the image - it worked. I stamped a pale yellow background over the A2 card and added the oval towards the top of the card. I had a strip of the green card left and used that for the sentiment. I stamped the words in green ink and finished the sentiment inside the card. I stamped a pale yellow rose inside too.


Before I go, here are the two pages that I did first trying out Jennifer's technique. I would have been thrilled with them - but that line! So pleased that I was able to save the soft image. Still thinking about what I can do with the bold positive image.


That's it from me today - see you again soon.

signature photo Signature.png

Wednesday, 3 March 2021

SHC - Easter Bunnies ....

.... Morning! We've had a super weekend here in Northop Hall - it was sunny with bright blue skies, and warm over the weekend. A bit cooler since then. Mum has been in the garden putting in plants and I've been playing in my craft room - we've both been in our happy place!! Anyway, I'm here with my regular weekly post for Seven Hills Crafts. I've been trying to push myself out of my comfort zone and this first card is way out there:


Stamps: Lawn Fawn - Easter Before 'n' Afters, Celebration Scripty Sentiments, Blue Skies
Inks: Gina K - Key Lime, Jelly Bean Green, Grass Green; Distress - Tumbled Glass, Broken China; Versafine - Onyx Black; Kaleidacolor - Spectrum
Dies: Lawn Fawn - Easter Before 'n' Afters; Concord & 9th - Confetti Card Dies
Accessories: White Card; Copic Markers; Lawn Fawn Stencil - Grassy Hillsides; Clear Embossing Powder; Nuvo - Clear Aquashimmer Brush

I'm submitting this card to Never-Before-Used-Schtuff - NBUS#24 - all new to me!!


I started with a top folding A2 white card and created the background using the grassy hillside stencils. I used several shades of green for the grass and two shades of blue for the sky. I then stamped various images on white card, coloured them with Copics, restamped with Versafine black ink and heat embossed with clear powder. I stamped the greeting in on of the large white clouds. I used matching dies to cut out the bunnies, basket and eggs, I fussy cut the clouds. Next, I adhered two of the clouds to the right hand side of the card and used the large scalloped edged rectangle die from Confetti cards to cut out my card. I then adhered the elements to the front of the card. I used dimensional pads for the Easter basket and the red egg. On the inside, I cut a piece of white card and stamped a greeting and added a few more of the Easter elements.


My next card is more my usual style - tending towards clean and simple:


Stamps: Lawn Fawn - Easter Before 'n' Afters, Celebration Scripty Sentiments, Simply Celebrate Spring
Inks: Gina K - Soft Stone; Versafine - Onyx Black
Dies: Lawn Fawn - Simply Celebrate Spring
Accessories: White Card; Copic Markers; Clear Embossing Powder; Nuvo - Clear Aquashimmer Brush

I'm submitting this card to Fusion - FUSION#0421 where I've taken the rainbow dress as my inspiration.


I stamped the row of eggs on white card, coloured them with Copic markers, restamped with black Versafine, heat embossed with clear powder and cut them out with the matching die. I worked out where I wanted the coloured eggs to be on the card and then stamped lots of eggs in soft grey ink all over the front. I used dimensional pads to add the coloured eggs. I added lots of sparkle to the eggs with a clear aquashimmer brush. I finished the front by adding a bold scripty Easter greeting. On the inside I've kept things really simple with no message, but I did add a cute bunny.


I had a few bunnies left over from my first card, so I made a final Easter card - this one is very clean and simple:


Stamps: Lawn Fawn - Easter Before 'n' Afters, Celebration Scripty Sentiments, Simply Celebrate
Inks: Gina K - Sweet Mango; Versafine - Onyx Black; Versmark
Dies: Lawn Fawn - Easter Before 'n' Afters
Accessories: White Card; Copic Markers; Clear and White Embossing Powder; Gina K Card - Sweet Mango; Nuvo - Clear Aquashimmer Brush

I cut a strip of black card an inch wide and stamped the scripty Easter greeting in Versamark and heat embossed it with white powder. I layered this piece on peach card and adhered the panel to the front of a top folding A2 card. I finished the front with the cute bunny holding the peach Easter egg - I've added sparkle, but you can't see it in the photo above. On the inside, I cut a mat layer of peach card and on the white card I stamped a greeting and added the Easter basket.


I had lots of fun making the first card - it is very much out of my comfort zone, but I did a few like that this weekend. I might not do it again for a while. That's all from me for today. See you soon.

signature photo Signature.png

Wednesday, 3 June 2020

SHC - Happy Father's Day ...

.. Hello! I hope everyone is well and safe. I'm here today with my post for Seven Hills Craft blog - I've made a fun Father's Day card:


Stamps: Lawn Fawn - Simply Celebrate, Science of Love, Celebration Scripty Sentiments
Inks: Gina K - Jet Black Amalgam, Tranquil Teal, Ocean Mist, Christmas Pine, Lucky Clover; Versamark; Versafine - Onyx Black
Dies: Law Fawn - Simply Celebrate
Accessories: Cream Card; Gina K Card - Tranquil Teal; Clear Embossing Powder; Copic Markers

I'm submitting this card to Cardz 4 Guyz - C4G#246 who, as luck would have it, have Father's Day as their theme!!


At Kat's request I made this card for her to give to her dad on Father's Day. In case you've forgotten, that's on Sunday 21 June. Simply Celebrate is one of my favourite Lawn Fawn stamps sets as it's just so versatile. I think the balloons and stars are simple, fun image and can be customised so many different ways. I stamped the images 4 times, coloured with Copic markers, restamped and heat embossed with clear powder. I used the matching dies to cut out the images. I used my MISTI to position the greeting and stamped it in Versafine black ink and embossed it. For a change I used cream cardstock - I like the soft, warm look with all these shades of green and teal. I layered the cream panel on teal card, added them to the front of the card base and used dimensional pads to attach the balloons and stars. On the inside, I cut a teal mat layer and on the cream panel I created a sentiment.


I found the words in another Lawn Fawn stamp set and used them along with some cute little hearts. Kat is very pleased with this card and it's now sitting on my desk ready to give to Jonathan on 21 June.

That's all for now. Take care - see you soon.

signature photo Signature.png
Related Posts Plugin for WordPress, Blogger...