Showing posts with label C&9 - Tiny Tagalong. Show all posts

Wednesday, 8 September 2021

SHC - Gone But Not Forgotton ...

.... Morning! I'm here with my weekly Seven Hills Craft blog post. I suggest you grab a coffee (or tea) as this is a long post. In my stash I have stamps from several companies that have sadly closed their doors. However, this week, I'm using some of these stamps as Tara still has some stock of Lil' Inkers and Neat & Tangled on the website - all at bargain prices. Grab them while you can!! One of my favourite Lil' Inker stamp sets is Darling Diamonds - it's small, but so useful. I've made a few cards, and I'll start with a reasonably clean and simple birthday card:


Stamps: Lil' Inker - Darling Diamonds; Concord & 9th - Tiny Tagalongs; Altenew - Just a Number
Inks: Gina K - Soft Stone, Powder Blue, Blue Denim
Accessories: White Card; Copic Marker

I'm submitting this card to Addicted to Stamps and More - ATSM#413 where the theme is Birthdays. I'm too late to submit this to Color Throwdown - CTD#658, but I got the inspiration for the colours from their challenge.


I did all the stamping on this card freehand. However, in order to try to keep reasonably straight lines, I did pencil in a straight line before I stamped the complete line of diamonds. Once stamped, and allowed to dry, I erased the pencil line and winged it as I stamped the rest of the pattern. I finished the front with a simple birthday greeting in blue ink. I cut a piece of white card slightly smaller than the A2 (US size) note card, onto which I stamped a fun greeting and added a few more diamonds.


I used bright yellow and orange inks on my next card:


Stamps: Lil' Inker - Darling Diamonds; Altenew - Hello Hydrangea
Inks: Gina K - Peach Bellini, Sweet Mango, Tangerine Twist, Wild Dandelion, Sweet Corn, Tomato Soup; Versamark
Dies: Lil' Inker - Wonky Squares
Accessories: White Card; SU Card - Tangelo Twist

I'm submitting this card to the Color Hues Challenge - CH#25 - love the colours they've picked.


I randomly stamped the sweet diamond images on the front of an A2 note card. I made the sentiment the focal point of the card. I used the Lil' Inker Wonky Square dies to cut an orange mat layer and a white layer. I used Versamark to stamp more diamonds on the orange layer for a tone-on-tone look. I stamped 'hello' in bright yellow on the white panel. I love the way these dies echo the shape of the darling diamond stamps!! Inside the card, I cut a mat layer of orange card. On the white panel I added a message at the bottom of the card, along with some more diamonds. There's lots of space for my own message.


I got a bit carried away with this set of stamps. It is so easy to build background patterns - and all done freehand too. I'll start with my rainbow card:


Stamps: Lil' Inker - Darling Diamonds, Happy Shiny Sentiments; Altenew - Hello Hydrangea
Inks: Gina K - Bubblegum Pink, Lipstick, Sweet Mango, Wild Dandelion, Lucky Clover, Blue Raspberry, Wild Lilac; Versamark; Versafine Clair - Nocturne
Dies: Gina K - Master Layout 1
Accessories: White Card; GK Card - Black Onyx; White Embossing Powder

I'm submitting this card to Love to Craft Challenge Blog - LTCCB#62 - where it's Anything Goes.


I cut a piece of white card to 4¼" x 5½" and used my t-ruler to draw a light pencil line at ¾". I then stamped the first line of solid diamonds in red ink. Once dry, I erased the pencil line and stamped the rest of the card freehand hand. It's reasonably straight, going slightly wonky towards the bottom of the panel. I used dies to cut a mat layer of black card and the stamped panel. I stamped a fun sentiment on black card with Versamark ink and heat embossed with white powder - it's not perfect, but it'll do!! I trimmed the panel to size and adhered it to the front of the card. I finished the front by adding a sentiment above the panel. Inside the card, I have a mat layer of black card. I kept the white panel very simple, with a sentiment at the bottom and a tiny diamond stamp. Lots of space for my message.


I was having fun making background patterns, so I did a couple more - here's the first:


Stamps: Lil' Inker - Darling Diamonds; Altenew - Halftone Stars
Inks: Gina K - Red Hot, Blue Raspberry, Wild Dandelion; Versafine Clair - Nocturne
Dies: Lil' Inker - Wonky Squares
Accessories: White Card; GK Card - Black Onyx

I used the colours from last week's CAS Colours & Sketches - CASC&S#435 - I'm too late to submit, but then I didn't use the sketch, just the colours!


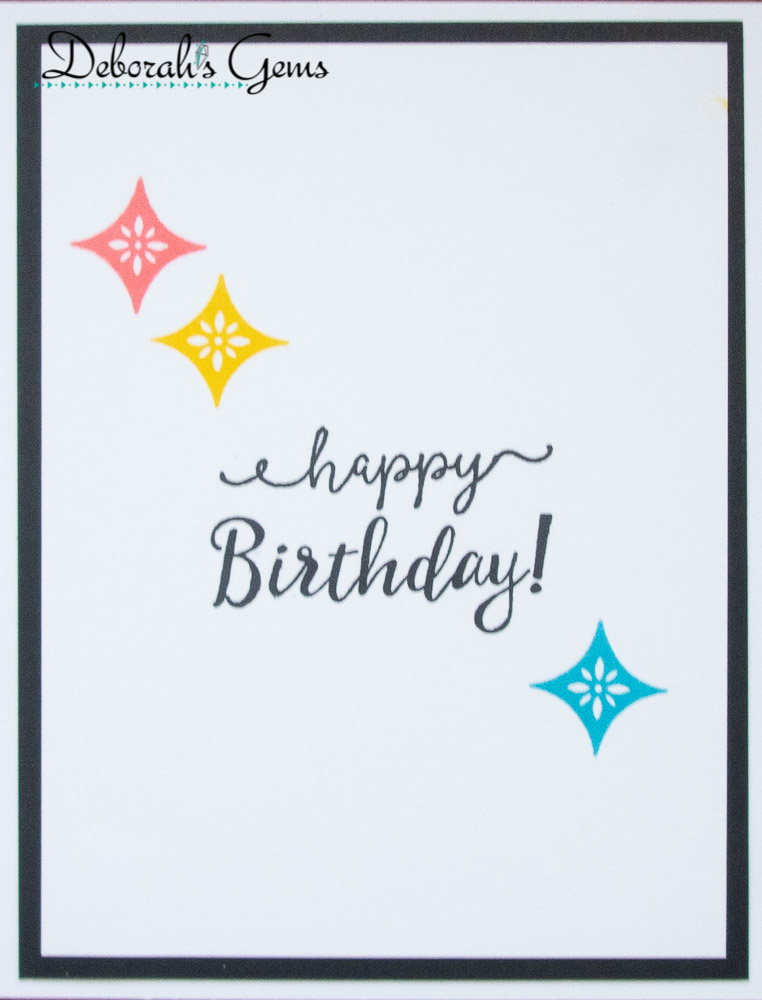
For this pattern, I drew pencil lines to mark the centre vertically and horizontally. I started stamping in the middle of the card and built the pattern from there. I cut a mat of black card and trimmed the stamped panel to fit on top and adhered it to the note card. I stamped the sentiment on white card, used a wonky square die to cut it out and made the black mat by drawing around the die on some black card and cutting it out. Inside, there's a black mat layer and on the white panel I stamped a birthday greeting and added some bright diamond images.

My last background pattern has a slightly more masculine feel to it:


Stamps: Lil' Inker - Darling Diamonds, Shiny Happy Sentiments; Altenew - Hello Hydrangea
Inks: Gina K - Blue Denim, Tranquil Teal, Faded Brick, Soft Stone; Versamark; Memento - Tuxedo Black
Dies: Gina K - Master Layout 1
Accessories: White Card; GK Card - Black Onyx; White Embossing Powder; Copic Markers

I started stamping the pattern in the centre of the white panel as before, but this time I stamped the ''petal' impressions different colours either side of the black dot, and I only filled in the centre of every other row. This gives a very different pattern. I used dies to trim a black mat and the white panel and adhered them to the notecard. I stamped a sentiment on black card with Versmark ink and heat embossed with white powder and adhered it across the front of the card. Inside, I cut a mat layer of black card and on the white panel stamped greeting in the corner which I coloured with Copic markers.


The inspiration for this next card came from the sentiment:


Stamps: Lil' Inker - Shiny Happy Sentiments; Altenew - Halftone Stars
Inks: Gina K - Key Lime, Jelly Bean Green, Fresh Asparagus, Ocean Mist, Turquoise Sea, Blue Lagoon; Versafine Clair - Nocturne
Accessories: White Card; Copic Markers

I'm submitting this card to Never-Before-Used-Schtuff - NBUS#30. I've had the Halftone Stars for a while, but this is the first time I've used them!!


This is a larger card at 6¼" x 4½". I stamped the sentiment in black ink towards the top of the card and then filled in the front with stars of all different sizes - both solid and halftone. I used greens and teals as they are my husband's favourite colours. I cut a piece of white card slightly smaller than the note card and stamped another of the sentiments from Shiny Happy Sentiments. I think this is just perfect for my hubby! I used a Copic marker to edge the panel and adhered it inside the card.


You'll be pleased to know, that we have come to my last card today - it's a Christmas card:


Stamps: Neat & Tangled - Winter Trees
Inks: Memento - Tuxedo Black; Gina K - Stormy Sky, Lemon Drop, Wild Dandelion; Versafine - Onyx Black
Dies: Lil' Inker - Wonky Squares
Accessories: White Card; Copic Markers; Clear Embossing Powder

I'm submitting this card to Merry Little Christmas Challenge Blog - MLCCB#38 where it's always Anything Christmas Goes.


Using my MISTI, I stamped the Christmas trees on white card, removed the panel and coloured with Copic markers. I returned the image to the MISTI, restamped with Versafine ink and heat embossed with clear powder. I used a wonky square die to cut out the image and then added lots of little stars to the sky. I stamped the trees again directly on the front of a square notecard and adhered the stamped image on top. I finished the front by adding a Christmas greeting. Inside I cut a panel of white card slightly smaller than the notecard, stamped a greeting, some more trees and a few more stars.


Well, that was a long post - thanks so much for sticking with me to the end. I'm very sad that both Lil' Inker and Neat & Tangled have shut up shop, but I'm so pleased I have some of their stamps and have been able to show them off here. Don't forget to visit Seven Hills Craft website to see what they - it's all at a great price. See you soon!!

signature photo Signature.png

Wednesday, 1 September 2021

SHC - A Wreath for All Seasons ....

... Pinch, punch, the first of the month!! Can you believe it's already September, no, me neither! However, it does mean that it's time for my weekly Seven Hills Craft Blog post. I have four cards to share with you today. I've focused on the Harvest Wreath stamp set from Concord & 9th's new release. I'll start with a birthday card:


Stamps: Concord & 9th - Harvest Wreath Turnabout, Tiny Tagalongs; MFT - Itty Bitty Birthday
Inks: Gina K - Honey Mustard, Blue Denim, Grass Green, Cherry Red
Dies: C&9 - Harvest Wreath
Accessories: White Card; SU Card - Cherry Cobbler; Copic Marker

I'm submitting this card to The Paper Players - PP#556 where they have a tic-tac-toe grid - I've picked the central horizontal line - birthday, die-cut, masculine.


I made the note card from dark red card. I used my MISTI to stamp the fuller wreath in blue, mustard, red and green inks - I used darker inks for a more seasonal look. I cut the panel slightly smaller than the note card, edged it with a blue marker and adhered it to the card. I used one of the co-ordinating dies to cut a stitched edge square in red card and stamped leaves in Versamark ink for a tone-on-tone look. I adhered the square to make a diamond shape. I finished the front by adding a simple birthday greeting in blue ink and cut out with a stitch edged die. Inside, I stamped one of the greeting from Harvest Wreath and added a tiny sentiment from Itty Bitty Birthday to complete the message. I also stamped some more of the leaves from the wreath image. This card is on it's way to my uncle - it's his birthday this weekend.


While I had this wreath image in the MISTI, I stamped another wreath in brighter colours:


Stamps: Concord & 9th - Harvest Wreath Turnabout, Tiny Tagalongs
Inks: Gina K - Wild Dandelion, Turquoise Sea, Blue Denim, Soft Stone; Versamark
Dies: C&9 - Harvest Wreath
Accessories: White Card; SU Card - Smoky Slate, Night of Navy; Nuvo - Clear Aqua Shimmer Brush; Glossy Accents

I'm submitting this card to Just Us Girls - JUGS#599 where it's a photo week. I've taken the colours from the inspiration photo.


I made the note card from soft grey card. I stamped the wreath leaves in Versamark ink around the edge of the grey note card for a tone-on-tone background pattern. I used blue, yellow, turquoise and grey ink to create this wreath. I added a simple sentiment in blue ink at the bottom of the panel.  I adhered the panel directly to the card base. I finished the front by adding a tiny heart which I die cut from navy card stock. I covered it with sparkle and added glossy accents. Love the way the heart looks! On the white panel inside the card, I simply stamped more of the leaves in yellow ink. I might add a greeting later, or leave it blank for my own message.


I changed the wreath image to the thinner wreath and made a Christmas card:


Stamps: Concord & 9th - Harvest Wreath Turnabout, All the Merrys, Holly Berry Turnabout
Inks: Gina K - Red Hot, Lucky Clover, Christmas Pine; Versamark
Dies: C&9 - Everyday Circles
Accessories: White Card; SU Card - Poppy Parade; Lawn Fawn - Gold Embossing Powder

I'm submitting this to The Holly & Ivy Christmas Challenge - H&ICC#100 where it's Anything Christmas Goes.


I used traditional Christmas colours for this card and the last impression was stamped with Versamark ink, I added gold embossing powder and heat set it. I didn't have gold card to match the gold embossing, so I made my own. I cut a piece of white card, rubbed Versamark ink around the edges and poured on gold embossing powder and heat set. I repeated this process three times to give a nice gold edge. I layered the stamped panel on the embossed piece and added both to the front of a 5¼" square note card. I used a stitch edge die to cut a circle panel, stamped a Christmas greeting, added some green leaves and then edged the circle with Versamark and used gold embossing powder to create a gold rim. I used dimensional pads to add the greeting to the front of the card. Inside, I cut a mat layer of red card. On the white panel I created the greeting from the words in the Holly Berry turnabout stamp set.


For my final card I changed up the colours and created a Halloween card:


Stamps: Concord & 9th - Harvest Wreath Turnabout, Tiny Tagalong; Stamping Bella - Oddball Sparkle Fairy
Inks: Gina K - Key Lime, Tangerine Twist, Wild Lilac, Black Onyx; Versamark
Accessories: White Card; SU Card - Tangelo Twist; Copic Markers; Nuvo - Clear Aqua Shimmer Brush; Clear Embossing Powder

I'm submitting this card to Time Out Challenge - TOC#195 where they want us to use a Coloured Card Base. I could have used any of the cards, but I like this orange one!!


I used traditional Halloween colours for the wreath. I stamped the sparkle fairy on white card, removed her from the MISTI, coloured her with Copic markers, restamped with Versafine black ink and heat embossed with clear powder. I then carefully fussy cut her out. I used a black marker to go over the white card edges. I added the Halloween sparkle in the centre of the wreath, stamped a simple greeting and adhered the fairy to the wreath. I added sparkle to the fairy's wings and the tiny skulls. On the white panel inside the card, I simply stamped the greeting and added more of the little skulls.


That's it. I could have made lots more cards with these wreath images - I have ideas for a wedding and sympathy cards, but I'll do those later. Thanks for staying to the end of the post. See you soon.

signature photo Signature.png

Wednesday, 25 August 2021

SHC - Sweater Weather!! ....

... Morning! I don't know what it's like around your area, but here in North Wales, it's been dull, grey, damp and feeling rather autumnal! So, for this week's Seven Hills Craft blog post, I've made a few, well several, autumn themed cards. Here's the first:


Stamps: Concord & 9th - Sweater Weather Turnabout, Give Thanks, Lace Leaf, Just Wanted to Say
Inks: Memento - Tuxedo Black; Gina K - Stormy Sky
Dies: Gina K - Master Layout 1
Accessories: White Card; Gina K Card - Black Onyx; Copic Markers

I'm submitting this card to Darnell's Never-Before-Used-Schtuff - NBUS#29 challenge. While I've had these stamps for quite a while, it's the first time the Lace Leaf and Sweater Weather stamps have been used.


I used my MISTI to stamp all the sweater weather panels. And, it's so easy to make multiple panels when you have the stamp set up in the MISTI.

For this card, I stamped all four turns with Copic friendly black ink. I used the stamping guide on the back of the pack to help me colour the images with Copic markers - I think I mostly did it!! I used a die to cut the coloured panel and layered it onto a black mat. I adhered this panel flat to my A2 (US size) notecard. I found this sentiment in another older stamp set and it's perfect for the theme. I stamped it on a white strip, cut that to size and adhered it to the front of the card. Inside, I cut a mat layer of black card. On the white panel I used grey ink to stamp the word 'hi' and to add a narrow sentiment strip with all the wonderful autumn things. I finished the panel by adding the watercolour wash image in a third-generation stamp.


My next card is more clean and simple in style:


Stamps: Concord & 9th - Sweater Weather Turnabout, Cozy Up; Altenew - School Days
Inks: Gina K - Red Hot, Wild Dandelion, Turquoise Sea; Versafine Clair - Nocturne; Versamark
Dies: Gina K - Master Layout 2
Accessories: White Card; Gina K Card - Black Onyx; Gold Embossing Powder

I used the colours from last week's CAS Colours & Sketches challenge - CASC&S#433 - such bold, bright colours.


I used a stitch edged die to cut out a small section of the stamped panel and layered that onto a black mat. I adhered this to the top left-hand corner of the card. Now, these cards have come about because summer seems to have vanished around here. Looking through my stash I found this fabulous sentiment in an old Altenew set called School Days and it's perfect. Inside the card, I cut a mat layer of black card. On the white panel, I kept things very simple with a fun knitted sock which I coloured to match the inks on the front of the card and used another of the sentiments from School Days.


Next is an autumn themed birthday card:


Stamps: Concord & 9th - Sweater Weather Turnabout, Tiny Tagalongs
Inks: Gina K - Sandy Beach, Kraft, Warm Cocoa, Dark Chocolate
Dies: Concord & 9th - Sweater Weather
Accessories: White Card; SU Card - Crumb Cake, Early Espresso; Gold Glitter

I'm submitting this card to The Male Room - TMR#153 where the challenge is celebrating its 8th birthday.


I used kraft cardstock to make the note card and stamped the Sweater Weather turnabout in four shades of brown directly on the card front. I used the co-ordinating dies to create the greeting panel. I used the rectangle die to cut a kraft label onto which I applied double sided adhesive. I used dark brown card to cut the 'autumn wishes' words and adhered that to the kraft panel. I then poured gold glitter onto the panel and burnished the glitter in place. I used dimensional tape to adhere the finished panel. Inside the card, I cut a mat layer of dark brown card. On the white card, I stamped a birthday greeting and added some autumn foliage. This card is for my uncle - his birthday is next month.


Next is a fun, colourful autumn card:


Stamps: Concord & 9th - Sweater Weather Turnabout, Cozy Up
Inks: Gina K - Blue Raspberry, Tangerine Twist, Plum Punch, Lucky Clover, Warm Glow; Versafine Clair - Nocturne
Dies: Concord & 9th - Sweater Weather
Accessories: White Card; Gina K Card - Plum Punch, Blue Raspberry, Tangerine Twist, Lucky Clover; Cuttlebug EF - Swiss Dots

I am submitted this card to Love to Craft Challenge Blog - LTCCB#61 where it's Anything Goes.


I made the notecard from plum cardstock. I used darker, more autumnal colours for this card panel. Stupidly, I dropped the panel on the floor and rolled my chair over the card. This resulted in some deep creases. So to rescue the card, I used one of my embossing folders - first time for ages!! I adhered the panel directly to the front of the card. I created the greeting panel by using the Sweater Weather dies and four different coloured card. I used the in-lay die technique to add the letters. I used dimensional tape to add the finished panel. Inside the card, I cut a piece of white card slightly smaller than the notecard. I create a bold, colourful sentiment using stamps from another old set - Cozy Up!


My final card is very clean and simple:


Stamps: Concord & 9th - Sweater Weather Turnabout, Lace Leaf, Give Thanks
Inks: Gina K - Red Hot, Wild Dandelion, Turquoise Sea, Dark Chocolate; Versamark
Accessories: White Card; SU Card - Crumb Cake; Gold Embossing Powder

I'm submitting this card to AAA Cards - AAA#197 where they want us to use a one inch strip and that's it!


I used kraft cardstock to make the note card. I stamped a narrow sentiment strip on the card in dark brown ink - it lists all the wonderful things we like in autumn. I had some of the bright sweater weather panel left over, so I cut a strip one inch wide and used dimensional tape to adhere it above the stamped sentiment. On the white panel inside, I stamped a fun greeting in bright colours.


Well, that turned into a very long post. I really enjoy working with Concord & 9th's turnabout stamps - you can make so many different styles of card. I've made lots of autumn themed cards as it's Kat's favourite season. And, now that she's back in Nottingham sharing a flat with her friend Rachel, I'll be sending lots of cards her way. So it seemed a good idea to have some in my stash.

That's it for now and who knows, we might even have summer weather when this post goes live. See you next week.

signature photo Signature.png
Related Posts Plugin for WordPress, Blogger...