Showing posts with label VI - Ahead of our Time. Show all posts

Thursday, 6 May 2021

Happy Birthday ....

..... Morning! Surprise, another post from me this week. I've got a birthday card to share. I made this for my brother-in-law:


Stamps: Visible Image - Ahead of our Time, Happy Birthday
Inks: Versafine - Onyx Black; Gina K - Sea Glass, Ocean Mist, Turquoise Sea; Versafine Clair - Nocturne
Accessories: White Card; Visible Image Stencil - Ripples; Clear Embossing Powder

I'm submitting this card to Never-Before-Used-Schtuff - NBUS#26 - the stencil and birthday stamps are new, and the Ahead of our Time image is old and not used before!! I'm also submitting to Seize the Birthday - STB#213, I'm skipping the Toppings option and just making a birthday card. I'm also playing along with The Paper Players - PP#539 where they want Cards for Boys.


My BIL likes the artist RenĂ© Magritte. Many of Magritte's paintings feature a man wearing a bowler hat, and this image from Ahead of our Time is just perfect for Tim's card. I used my MISTI to stamp the image in black Versafine ink and heat embossed it with clear powder. I repeated this twice to make the image as black as possible and to get as much shine as possible. Once cooled, I placed the stencil over the image and inked the design with three shades of teal ink. I finished the front by stamping a simple birthday greeting. On the inside, I cut a piece of white slightly smaller than the note card which is 6¼" x 4½". I stamped the spiral clock face in the centre of the panel using teal inks. I then added the verse from the Happy Birthday stamp set. I like this verse and can see it being used often! I edged the panel with a marker pen and adhered it to the card.


It's okay to share the card today as it was Tim's birthday yesterday!

That's all from me today. See you soon.

signature photo Signature.png

Wednesday, 25 April 2018

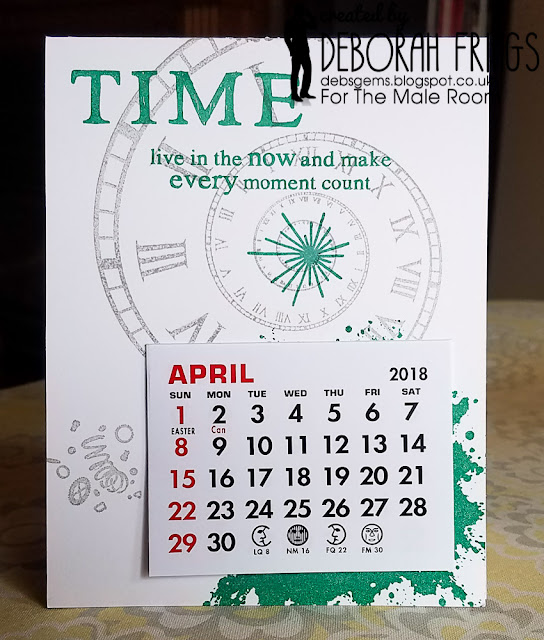
TMR - Anything but a card ....

...... Hi! I've done it again, it's been ages since I posted here. But I've a good excuse - I've been away at a crafting retreat (more of that in the new week or so), and since being back I've been busy with the school's drama production. I'm here today with my project for our new challenge at The Male Room - TMR#84 - Anything apart from a Card. I do have to own up to the fact that this is an old project that I made towards the end of 2017, but I just haven't had time to make anything new. However, it is in use every day:


Stamps: Visible Image - Somewhere in Time, Ahead of our Time, Rays of Light
Inks: Stampin' Up! - Smoky Slate, Emerald Envy
Accessories: White Lustre Card; Vippies Designs - Large Self Adhesive Calendar Pad

You can find full details of how I made the calendar here. This one is in our dining room. I also have a calendar in my craft room and on my office desk.

That's all from me for today as I'm still trying to get back to my normal routine. For more inspirational projects - none of them a card - check out The Male Room blog to see what the rest of the team have created. You have until midnight (BST) on Tuesday 8th May to play along - that's 7.00pm EDT in the States. Have fun!!

signature

Sunday, 26 November 2017

New Calendars .....

..... Hi! Good morning. We've really been enjoying our holiday weekend - all very relaxed. I had a fun time in my craft room yesterday afternoon - I made some calendars for next year. They are really easy to make. I did ten in all:

Calendars - photo by Deborah Frings - Deborah's Gems

Stamps: Visible Image - Somewhere in Time, Ahead of our Time, Rays of Light
Inks: Stampin' Up! - Smoky Slate, Lemon Lime Twist, Berry Burst, Emerald Envy; Gina K - Passionate Pink, Cherry Red, Sweet Mango, Jelly Bean Green, Blue Lagoon, Blue Raspberry, Wild Lilac
Accessories: White Lustre Card; Vippies Designs - Large Self Adhesive Calendar Pads


To make the calendar you cut a panel of white card 11½" x 4¼" - basically cut a sheet of letter size paper in half vertically. Score across the centre at 5½" and fold. Next cut a panel of card 5" x 4¼", this should be scored at 1", 2½", and 4". Fold at the centre and crease into place, and crease the other two folds in the opposite direction - you should end up with a piece of card in the shape of a W.

On the large folded card stamp your design. I decided to use these wonderful time-related images - so appropriate for a calendar. I used my MISTI to stamp the images - it was so quick and I was able to restamp any images that needed extra pressure! Once I'd finished all the stamping, I added tape to the outside flaps of the "W" card and adhered them to the inside of each printed card. I finished each calendar by adding the calendar pad. Here's a close up of two of the calendars:


I have kept two of the calendars - one for my craft room and one for my office desk. The rest are going to be sent to family and friends. I'm entering these calendars into the November challenge at Love to Craft Challenge Blog - LTCCB#16, where anything goes.

I've got a really fun day planned for the last day of our holiday. This afternoon I'm off to my local craft shop - Scrappy Chic - for some art journaling fun, and then in the evening Jonathan and I are off to Royal Oak to see Squeeze! So excited. That's all for now. See you soon.

signature
Related Posts Plugin for WordPress, Blogger...