Showing posts with label LF - Milo's ABCs. Show all posts

Thursday, 28 July 2022

Cat Card

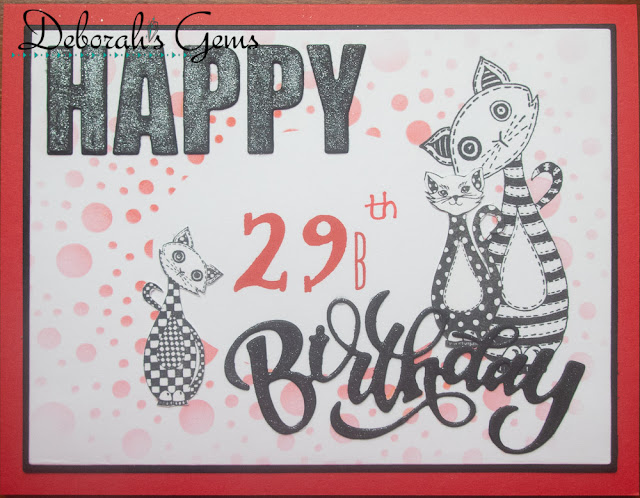
.... Morning! Last month my son asked me to make a birthday card for a friend of his. She likes red, cats and would be celebrating her 31st birthday - but I had to put 29Bth - an in joke between them. So, this is the card I made and Ben was delighted with it:


Stamps: Dylusions - Cat Among the Pigeons, Numberology; Lawn Fawn - Milo's ABSc
Inks: Stamping Up! - Poppy Parade
Dies: Gina K - Happy Birthday Trio, Master Layouts 1
Accessories: White & Black Card; SU Card - Poppy Parade; Gina K Stencil - Fizzy; Nuvo - Clear Aqua Shimmer Brush; Gina K - Masking Magic

I'm submitting this card to a few challenges:

I started by cutting an oval mask from Masking Magic and placed that in the centre of a piece of white card that I cut out with the smaller of the two rectangles in ML1. I placed the stencil over the top and used a bright red ink going lightly at the edges and corners and getting darker around the masked oval. I stamped the large cat before removing the oval mask. I matted the inked panel on black card and then stamped the required number and added two more smaller cats. I stamped them on scrap white card and fussy cut them out. I adhered the panel to the front of a red card and finished the front by adding a die cut birthday greeting in black card. I also added some sparkle to the words with a clear aqua shimmer brush. Inside the card, I cut a mat layer of black card. On the white panel I simply added a light stencil of fizzy dots and another cute cat, and left a large blank space for Ben's message.


That's all from me today. Hope everyone is keeping well. I'd also like to thank everyone for your comments - they are all much appreciated.

signature photo Signature.png

Sunday, 16 May 2021

Happy Anniversary ....

... Morning! I'm here with a quick post today to share an anniversary card that my mum asked me to make for her. Friends of hers will be celebrating their Ruby Wedding anniversary soon, so I had fun making the card for mum. 


Stamps: Concord & 9th - Heart Turnabout; MFT - Birthday Sentiments, Essential Sentiments, Journal It - Pocket Calculator; Lawn Fawn - Milo's ABCs; Visible Image - Follow Your Heart
Inks: Gina K - Lipstick, Soft Stone; Versafine Clair - Nocturne; Hero Arts - Unicorn
Dies: Concord & 9th - Heartstrings
Accessories: White & Black Card; Red Satin Mirri Card; Holographic Heart Card; White Embossing Powder

I'm submitting this card to Happy Little Stampers Anything Goes with Dies - HLSAGD#05 and to Never-Before-Used-Schtuff - NBUS#26 - I've had the Heatstrings die for ages, but this is the first time it's been out to play!!


As it's a Ruby anniversary I had to use red, and I combined the red with grey and black (sadly I missed the deadline for Paper Players - PP#540). I started by cutting a piece of white card 5½" square. I used my MISTI to stamp the Heart turnabout stamp. I stamped the first and third impression with bright red ink and the second and fourth in soft grey which gives a complete background. I edged the panel with a black marker and adhered it to the front of a 5¾" white square card. The heartstring die set consists of three parts - a tiny heart, a solid heart and the heartstrings die which cuts out the string sections. I used the solid heart and heartstrings die to cut out the red satin mirri layer. I used the solid heart to cut out a silver heart holographic layer as well as two white hearts. I adhered the two white hearts together, adhered the silver heart layer on top of them and finished by adding the red heartstring layer on top. Next, I die cut a small black heart onto which I stamped the number 40 in white ink and heat embossed with white powder. I adhered the black number heart on top of the heart panel and glued this to the card. I finished the front by stamping a simple 'happy anniversary' message in black.

Inside the card, I cut a piece of red mirri card for the mat layer. On the white panel, I stamped a beautiful graffiti style heart in soft grey ink. I stamped a scripty 'happy' in black in and a clean, crisp 'anniversary' in red ink.


I'm very pleased how this turned out. And I'm so pleased how the heartstring die looks, I can see it working for a shaker card!! I took a close-up photo of the holographic heart card - it's so pretty in real-life as the shimmer moves:


Jonathan and I travelled down to the University of Nottingham to see Kat yesterday. It was a wet and dull day, but it was great to see Kat. It's the first time that I've been down to see her room since she started last September. She made the place beautiful and so homely. Kat's course has almost finished and she'll be coming back home in three weeks'. The year has flown by. I asked Kat if she'd had a good year despite all the difficulties with Covid and the various restrictions. She said yes, and she's loves her course and she's made some very good friends.

Well, that's all from me for today. See you soon.

signature photo Signature.png

Monday, 29 December 2014

Christening card ...

... Here's another of my scheduled posts.  Today's card was made for a friend who attended a Christening earlier this month.  She wanted a simple card for a boy with his name and date of Christening, this is what I made:

Christening card - photo by Deborah Frings - Deborah's Gems

Stamps: WMS - Celtic Heritage; Serendipity - Quilted Heart Set; Lawn Fawn - Milo's ABCs
Inks: Versafine - Onyx Black; Memento - London Fog
Dies: Lil Inkers - Stitched Rectangles #5
Accessories: White Lustre Card; Papermania - Inspirations Cool Tones; Sakura Stardust Clear Pen

I actually based this card on one that I made last year.  I changed things up a bit though.  Instead of a one layer card, I made this one two layers and edged the die cut layer with a blue marker for definition.  I stamped the heart onto the panel and then again several times on patterned paper and then had fun piecing it all together.  I added a couple of blue buttons to the heart.  The front was finished with a simple sentiment at the top and the name and date at the bottom.  I wrote over the words with a Sakura Stardust pen for some sparkle.  On the inside of the card I cut a piece of design paper as a mat and stamped the heart again in pale grey.

Christening Card inside - photo by Deborah Frings - Deborah's Gems

The photo below is the card that I made last year - I can actually see it working on all pink and even yellow or green for a general baby card!

Bundle of Love - photo by Deborah Frings - Deborah's Gems

I hope that you're all enjoying the holiday period.  We are having a very busy visit in the UK - it's so nice to catch up with family and friends.  That's all for now - see you soon.

signature
Related Posts Plugin for WordPress, Blogger...