Showing posts with label HA - Color Layering Holly. Show all posts

Friday, 10 December 2021

The Christmas Tree ....

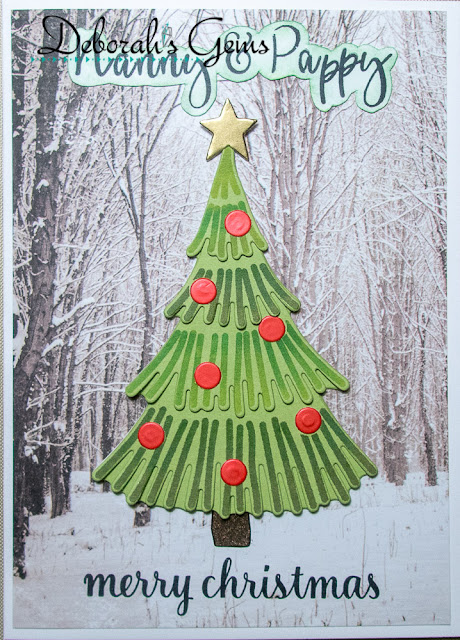
... Morning!! Yes, it's me with another post - that's three in a week. Wow. Today I'm sharing a card that I made for Rachel - my daughter's flat mate. Rach asked me to make a personalised Christmas card for her grandparents - it was my absolute pleasure. Here's the card:


Stamps: C&9 - Fa La La Fringe Tree, Perfectly Penned, Yuletide Ornament, Tiny Trees Turnabout; Hero Arts - Color Layering Holly Leaf
Inks: Gina K - Jelly Bean Green, Fresh Asparagus, Christmas Pine, Lipstick, Warm Cocoa; Versafine Claire - Nocturne; Delicata - Golden Glitz
Dies: C&9 - Fa La La Fringe Tree
Accessories: White Card; SU Card - Pear Pizzazz; Kaisercraft DP - Christmas Edition; Red Satin Mirri Card; Gold Satin Mirri Card

I'm submitting this card to Happy Little Stampers Anything Goes with Dies - HLSAGD#12 and to Merry Little Christmas Challenge Blog - MLCCB#41 where it is always Anything Christmas Goes.


Rach asked me to make a more traditional Christmas card for her grandparents. So this card is mostly more traditional - I've used red and green and featured Christmas trees, but I think the backing paper gives a slightly more contemporary twist. I trimmed the design paper to fit a 6¼" x 4½" card. I stamped the personalised names with an older C&9 set - Perfectly Penned - it's super and the first time that I've actually used it!! I stamped the fringe tree on green card using several shades of green ink. I used the matching die to cut it out the stamped layers along with the green base tree. I adhered the layers and added pretty red satin baubles to the tree. I adhered the tree to the notecard, added a gold star and finished with a simple greeting. Inside the card, I cut a mat layer of green card. On the white panel I stamped a Christmas greeting. I stamped the matching mini fringe tree towards the bottom of the panel.


I sent the card to Rachel earlier this week and she was delighted with it - just hope her Nanny and Pappy like it too. That's all from me today. See you again soon.

signature photo Signature.png

Wednesday, 24 November 2021

SHC - More Christmas Cards ....

.... Morning! I'm here with my Seven Hills Craft blog post. The recent cold weather has put me in a wintery mood and I decided to make a few more Christmas cards for my stash. After all, it's useful to have a few spares. Here's my first card:


Stamps: Concord & 9th - Big On Christmas; Hero Arts - Color Layering Holly
Inks: Gina K - Key Lime, Grass Green, Christmas Pine, Lipstick, Red Hot, Cherry Red; Versafine Clair - Nocturne
Dies: C&9 - Quilted Front Cover Plate; Hero Arts - Color Layering Holly
Accessories: White Card; SU Card - Cherry Cobbler; Nuvo - Clear Aqua Shimmer Brush

I'm submitting this card to Uniko Studio Challenge - USC#68 where the theme is celebrate with the option of using red and green, done. I'm also playing along with Global Design Project - GDP#319 where the theme is Christmas, and Never-Before-Used-Schtuff - NBUS#32 - it's the first time I've used the Hero Arts layering holly stamps and dies!!


I used an American A6 card (6¼" x 4½"). I cut a piece of white card 5½" x 3¾" and stamped a bold sentiment in deep red ink in the centre of the panel. I used a stitched card front die to add detail to the panel and layered it on to a piece of deep red card. I adhered the whole piece to the front of the notecard. I've had the Hero Arts Color Layering Holly stamp set and dies for quite a while, and this is the first time I've used them. The holly leaves and berries are triple-step stamps and then cut out with the co-ordinating dies. I die cut extra holly leaves and berries in deep red card and layered the stamped pieces onto them. I adhered them to the front of the card and added sparkle to the berries with a clear aqua shimmer brush. Inside the card, I cut a mat layer of deep red card and on the white panel added a greeting and holly for decoration.


Next, I have a couple of mini slimline cards - they work perfectly with the stamp sets I've used.


Stamps: Concord & 9th - Big On Christmas, Tiny Trees Turnabout
Inks: Gina K - Red Velvet, Tangerine Twist, Wild Dandelion, Lucky Clover, Blue Lagoon; Versafine Clair - Nocturne; Delicata - Silvery Shimmer
Dies: Gina K - Master Layout 7
Accessories: White & Black Card

I'm submitting this card to Addicted to CAS - ATCAS#211 where the theme is colourful, and to Happy Little Stampers Christmas - HLSXMAS#11 where it's anything goes with the option of creating a scene (which I skipped).


I cut a piece of white card measuring 6½" x 6¼", scored on the long edge at 3¼" to make a mini slimline card. I used a stitched edge die to cut a piece of white card. I put the panel in the MISTI, positioned the large sentiment and used brushes to add ink to the stamp. I stamped each colour in turn, repeating a few times to blend the colours. I added some silver stars for a bit of sparkle. I layered the panel on black card and adhered the lot to the front of the notecard. Inside, I cut a mat layer of black card. On the white panel I stamped a Christmas greeting and added a few more stars.


Finally, another mini slimline card - very clean and simple.


Stamps: Concord & 9th - Big On Christmas; MFT - Party Lights; Hero Arts - Color Layering Holly
Inks: Gina K - Red Velvet, Tangerine Twist, Wild Dandelion, Lucky Clover, Blue Lagoon; Versafine Clair - Nocturne
Dies: Gina K - Master Layout 7
Accessories: White & Black Card; Glossy Accents; Nuvo - Clear Aqua Shimmer Brush; White Gel Pen

I'm submitting this card to 52 Christmas Card Throwdown - 52CCT43-21 - where they want to see fairy lights, and to The Holly & Ivy Christmas Challenge - H&ICC#106 where it's anything Christmas goes.


I used the same method as outlined above to make this card. On the stitched edge die cut panel I stamped the fairy lights - the wire in black ink and rainbow colours for the lights. I added a simple Christmas greeting, layered the panel on black card and added to the front of the notecard. I added sparkle to the lights with a clear aqua shimmer brush, I used a white gel pen to add a highlight and covered the lights with glossy accents for shine. Inside the card, I cut a mat layer of black card and on the white panel stamped a greeting a more lights.


I think that probably is all the Christmas cards that I'll be making this year - but who knows!! Thanks for staying with me. See you again next week. Take care.

signature photo Signature.png
Related Posts Plugin for WordPress, Blogger...